> ## Documentation Index
> Fetch the complete documentation index at: https://docs.xano.com/llms.txt
> Use this file to discover all available pages before exploring further.
# Knowledge
> Knowledge helps AI Agents understand your Xano workspace
Everything in Knowledge influences how AI agents build in this workspace, including the in-product Xano Agent and external AI coding agents like Claude, Codex, and others.
Agents read `AGENTS.md` on every run and reference docs and skills whenever a task calls for them. By curating Knowledge, you control what the agent understands, how it approaches work, and which rules it follows. Use the preview to see exactly how this context will appear to an agent.
Knowledge is valuable for solo builders and essential for teams. It helps ensure your backend is built and managed the way you expect when AI builders are involved, from high-level implementation strategy down to the detailed rules that define how specific logic should behave.
You can read a workspace's Knowledge from the command line with `xano knowledge list` and `xano knowledge get`. See [Knowledge commands in the CLI reference](/xano-cli/command-reference#xano-knowledge).
## AGENTS.md
If you're starting fresh with Knowledge, you should create your `AGENTS.md` first.
In the left-hand navigation, click Knowledge.
On the next screen, click Set up AGENTS.md.
Fill in the instructions for your build agents.
Knowledge only impacts all agents building *in* Xano, not agents you've built *using* Xano.
Specificity is fine, but you can (and should) also create separate docs and skills for specific object creation. Your agent will receive `AGENTS.md` with each prompt, and everything utilizes tokens, so efficiency is key to using Knowledge successfully.
* Good for AGENTS.md -- `Make sure all input names use camelCase.`
**Why?** Inputs are used across multiple different workflow types.
* Bad for AGENTS.md -- `For APIs, ensure that all input names are lowercase only. Also, for tasks, make sure that each scheduled run includes an audit at the beginning and at the end.`
**Why?** Specific instructions that only apply to single workflow types would be better suited for more specific skills that are only read when working on those workflows.
### What is this backend for?
A quick name for the backend. If you're not sure, just use the workspace name. Your agent will use this as context for the choices it makes.
### Any naming or data conventions?
These are rules related to how things like tables and APIs are named, or how your database columns are formatted. Here are some examples:
```bash theme={null}
Use snake_case for database table and field names.
Use camelCase for API response keys.
Status fields should use lowercase enum values, e.g. draft, published, archived, rejected.
```
### How does auth & security work?
This section dictates authentication and security practices for your backend. Here are some examples:
```bash theme={null}
All write actions require an authenticated user.
Public users may browse published posts only.
Only the owner user can edit their own posts.
Only admins can delete posts.
Use role-based checks for admin-only endpoints.
Never trust client-provided user_id; use the authenticated user's id.
```
### What should the agent never be doing?
Here, you can place anything else that you need the agent to follow, no matter what you're building. Examples are below.
```bash theme={null}
Never delete tables, fields, or existing production data without asking.
Never make draft posts publicly visible without asking.
Never modify payment, payout, or purchase logic without asking.
Never remove rate limits or abuse-prevention checks without asking.
Never create admin-only endpoints without access control.
```
Once you've saved your changes, you'll be taken to a split-screen view where you can continue to edit your `AGENTS.md` file, and also see an easy-to-read rendered version.
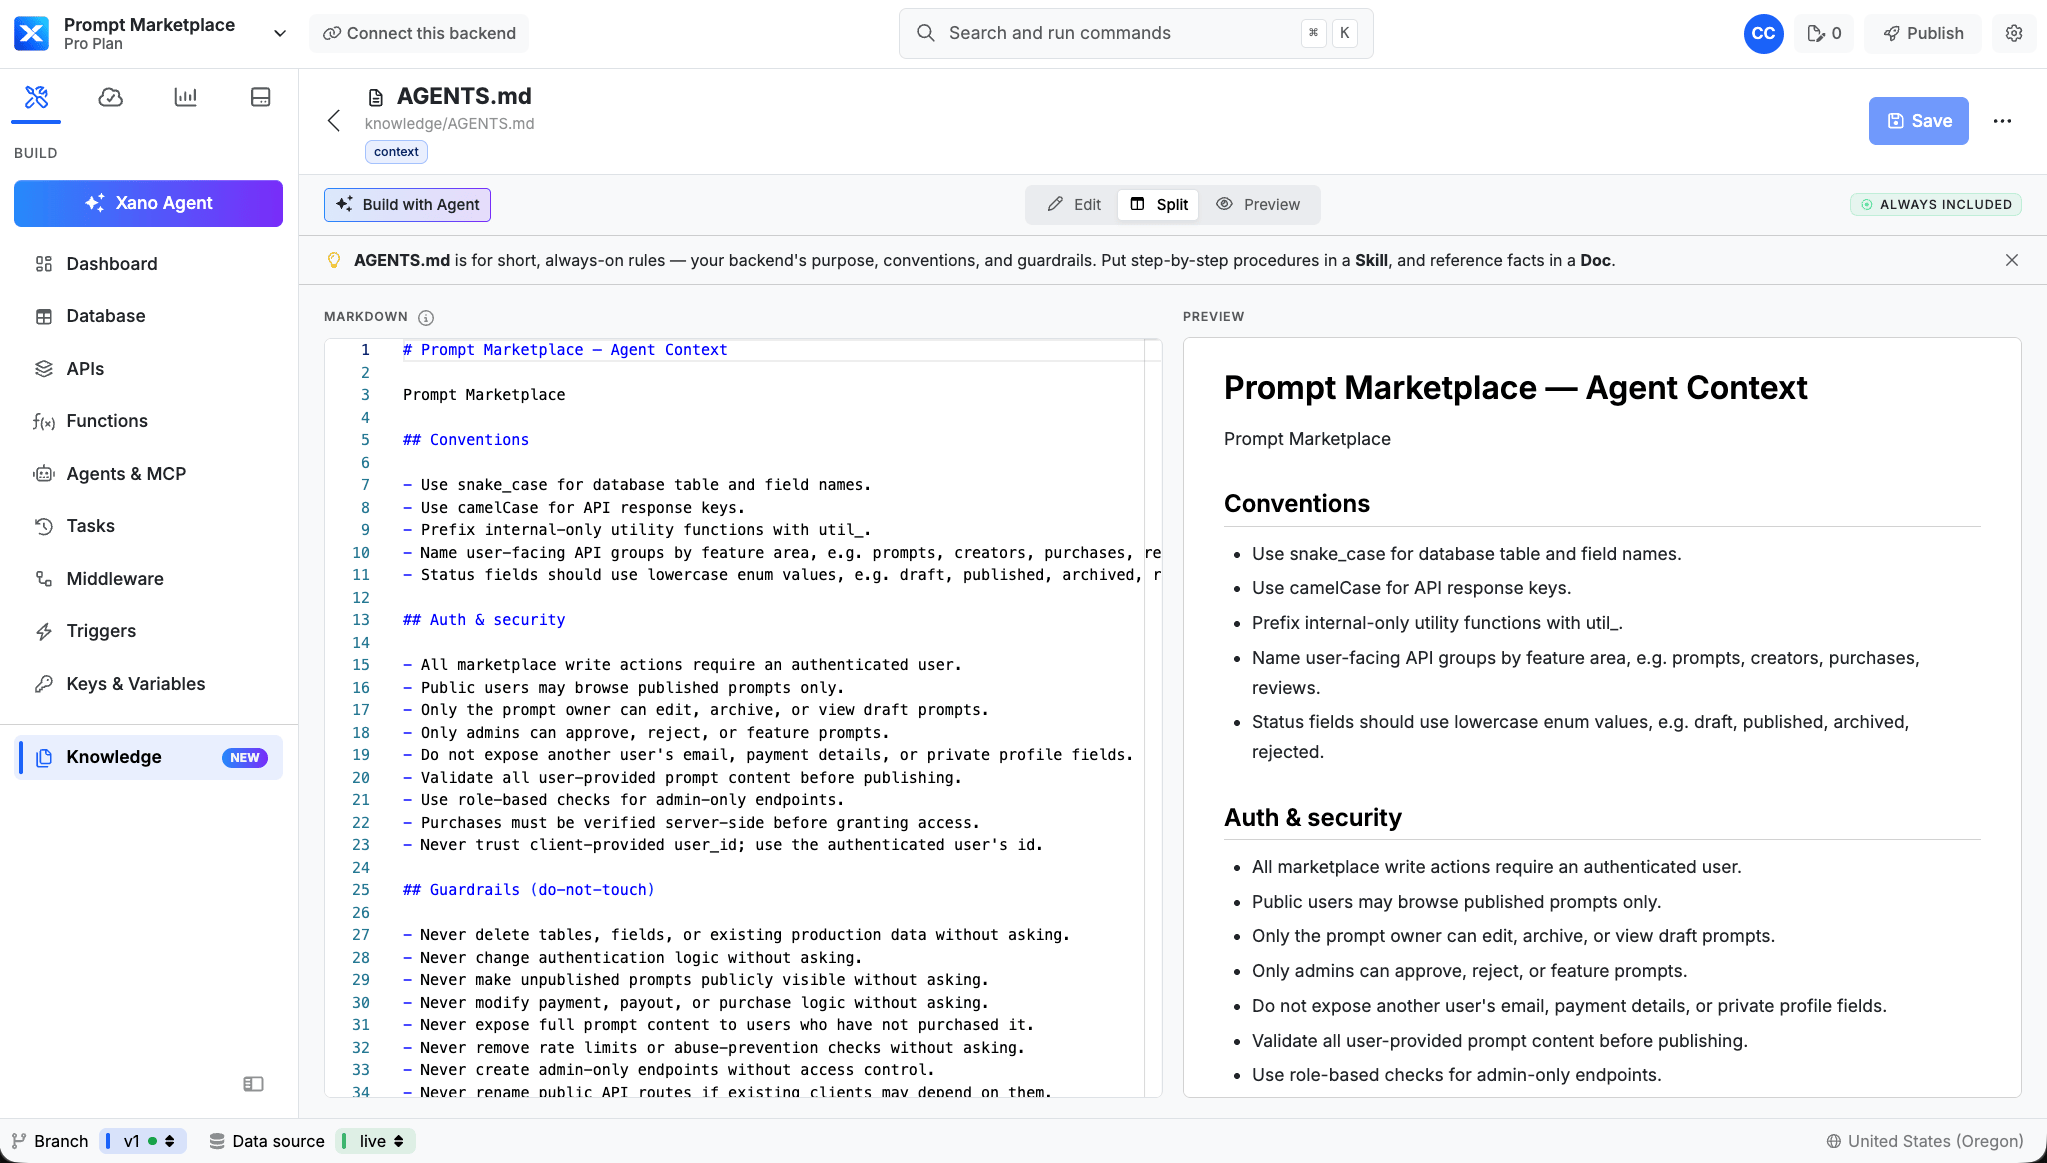 # Prompt Marketplace — Agent Context
AI Prompt Marketplace
## Conventions
* Use snake\_case for database table and field names.
* Use camelCase for API response keys.
* Prefix internal-only utility functions with util\_.
* Name user-facing API groups by feature area, e.g. prompts, creators, purchases, reviews.
* Use id for primary keys and {resource}\_id for foreign keys.
* Use created\_at and updated\_at timestamps on all persisted records.
* Status fields should use lowercase enum values, e.g. draft, published, archived, rejected.
* Money amounts are stored in cents as integers, e.g. price\_cents.
* Do not store derived totals unless they are needed for performance.
## Auth & security
* All marketplace write actions require an authenticated user.
* Public users may browse published prompts only.
* Only the prompt owner can edit, archive, or view draft prompts.
* Only admins can approve, reject, or feature prompts.
* Do not expose another user's email, payment details, or private profile fields.
* Validate all user-provided prompt content before publishing.
* Use role-based checks for admin-only endpoints.
* Purchases must be verified server-side before granting access.
* Never trust client-provided user\_id; use the authenticated user's id.
## Guardrails (do-not-touch)
* Never delete tables, fields, or existing production data without asking.
* Never change authentication logic without asking.
* Never make unpublished prompts publicly visible without asking.
* Never modify payment, payout, or purchase logic without asking.
* Never expose full prompt content to users who have not purchased it.
* Never remove rate limits or abuse-prevention checks without asking.
* Never create admin-only endpoints without access control.
* Never rename public API routes if existing clients may depend on them.
* Never store secrets, API keys, or credentials in database records.
* Never change pricing or revenue-share logic without confirmation.
### AGENTS.md settings
Once you've created `AGENTS.md` and returned to the Knowledge section, you can click on the on your `AGENTS.md` to change settings.
**Tags** are used to search across your workspace; so apply any tags you'd normally be searching for where you'd want `AGENTS.md` to be surfaced.
Not sure how to search? Press Cmd/Ctrl + K.
**Enforcement** is used to lock your AGENTS.md file, so it can not be modified or have its settings changed by anyone other than [workspace administrators](team-collaboration/role-based-access-control-rbac).
## Docs
Docs are used as reference materials; things like a brief on what your application does or information about your company.
An example of an appropriate doc could be a pricing plan reference, text from a company sales deck, or even notes on your target user base.
# ChatForge Pricing Plan Reference
This doc defines the available subscription plans, feature limits, and upgrade rules for ChatForge, a fictional AI chat product used for demo purposes.
Use this as reference material when building billing, permissions, onboarding, upgrade prompts, usage limits, or account settings features.
## Plans
### Starter
The Starter plan is for individuals trying ChatForge.
Limits:
* 1 workspace
* 50 AI conversations per month
* 5 saved prompts
* 1 connected knowledge source
* Community support only
* No team members
* No custom model settings
### Plus
The Plus plan is for individual power users.
Limits:
* 3 workspaces
* 1,000 AI conversations per month
* 100 saved prompts
* 10 connected knowledge sources
* Email support
* Custom model settings
* No team members
### Team
The Team plan is for small teams collaborating with AI.
Limits:
* 10 workspaces
* 10,000 AI conversations per month
* Unlimited saved prompts
* 100 connected knowledge sources
* Priority support
* Custom model settings
* Up to 25 team members
* Shared team prompt library
* Basic audit history
### Enterprise
The Enterprise plan is for organizations with advanced security and scale requirements.
Limits:
* Unlimited workspaces
* Custom conversation limits
* Unlimited saved prompts
* Unlimited connected knowledge sources
* Dedicated support
* Unlimited team members
* Shared team prompt library
* Advanced audit history
* SSO
* Custom data retention
* Custom contract terms
## Upgrade rules
Users should be prompted to upgrade when they attempt to exceed a plan limit.
Users should not lose access to existing conversations, prompts, or knowledge sources when they downgrade, but they may be prevented from creating new ones until usage is below the new plan limit.
Enterprise plan limits may be customized per customer.
## Feature access
Custom model settings are available on Plus, Team, and Enterprise.
Team members are available on Team and Enterprise.
Shared team prompt libraries are available on Team and Enterprise.
Basic audit history is available on Team.
Advanced audit history is available on Enterprise.
SSO is available on Enterprise only.
Custom data retention is available on Enterprise only.
Dedicated support is available on Enterprise only.
Click New doc or skill in the top-right corner.
Choose **Doc** from the dropdown. Give it a name, and set its inclusion mode.
# Prompt Marketplace — Agent Context
AI Prompt Marketplace
## Conventions
* Use snake\_case for database table and field names.
* Use camelCase for API response keys.
* Prefix internal-only utility functions with util\_.
* Name user-facing API groups by feature area, e.g. prompts, creators, purchases, reviews.
* Use id for primary keys and {resource}\_id for foreign keys.
* Use created\_at and updated\_at timestamps on all persisted records.
* Status fields should use lowercase enum values, e.g. draft, published, archived, rejected.
* Money amounts are stored in cents as integers, e.g. price\_cents.
* Do not store derived totals unless they are needed for performance.
## Auth & security
* All marketplace write actions require an authenticated user.
* Public users may browse published prompts only.
* Only the prompt owner can edit, archive, or view draft prompts.
* Only admins can approve, reject, or feature prompts.
* Do not expose another user's email, payment details, or private profile fields.
* Validate all user-provided prompt content before publishing.
* Use role-based checks for admin-only endpoints.
* Purchases must be verified server-side before granting access.
* Never trust client-provided user\_id; use the authenticated user's id.
## Guardrails (do-not-touch)
* Never delete tables, fields, or existing production data without asking.
* Never change authentication logic without asking.
* Never make unpublished prompts publicly visible without asking.
* Never modify payment, payout, or purchase logic without asking.
* Never expose full prompt content to users who have not purchased it.
* Never remove rate limits or abuse-prevention checks without asking.
* Never create admin-only endpoints without access control.
* Never rename public API routes if existing clients may depend on them.
* Never store secrets, API keys, or credentials in database records.
* Never change pricing or revenue-share logic without confirmation.
### AGENTS.md settings
Once you've created `AGENTS.md` and returned to the Knowledge section, you can click on the on your `AGENTS.md` to change settings.
**Tags** are used to search across your workspace; so apply any tags you'd normally be searching for where you'd want `AGENTS.md` to be surfaced.
Not sure how to search? Press Cmd/Ctrl + K.
**Enforcement** is used to lock your AGENTS.md file, so it can not be modified or have its settings changed by anyone other than [workspace administrators](team-collaboration/role-based-access-control-rbac).
## Docs
Docs are used as reference materials; things like a brief on what your application does or information about your company.
An example of an appropriate doc could be a pricing plan reference, text from a company sales deck, or even notes on your target user base.
# ChatForge Pricing Plan Reference
This doc defines the available subscription plans, feature limits, and upgrade rules for ChatForge, a fictional AI chat product used for demo purposes.
Use this as reference material when building billing, permissions, onboarding, upgrade prompts, usage limits, or account settings features.
## Plans
### Starter
The Starter plan is for individuals trying ChatForge.
Limits:
* 1 workspace
* 50 AI conversations per month
* 5 saved prompts
* 1 connected knowledge source
* Community support only
* No team members
* No custom model settings
### Plus
The Plus plan is for individual power users.
Limits:
* 3 workspaces
* 1,000 AI conversations per month
* 100 saved prompts
* 10 connected knowledge sources
* Email support
* Custom model settings
* No team members
### Team
The Team plan is for small teams collaborating with AI.
Limits:
* 10 workspaces
* 10,000 AI conversations per month
* Unlimited saved prompts
* 100 connected knowledge sources
* Priority support
* Custom model settings
* Up to 25 team members
* Shared team prompt library
* Basic audit history
### Enterprise
The Enterprise plan is for organizations with advanced security and scale requirements.
Limits:
* Unlimited workspaces
* Custom conversation limits
* Unlimited saved prompts
* Unlimited connected knowledge sources
* Dedicated support
* Unlimited team members
* Shared team prompt library
* Advanced audit history
* SSO
* Custom data retention
* Custom contract terms
## Upgrade rules
Users should be prompted to upgrade when they attempt to exceed a plan limit.
Users should not lose access to existing conversations, prompts, or knowledge sources when they downgrade, but they may be prevented from creating new ones until usage is below the new plan limit.
Enterprise plan limits may be customized per customer.
## Feature access
Custom model settings are available on Plus, Team, and Enterprise.
Team members are available on Team and Enterprise.
Shared team prompt libraries are available on Team and Enterprise.
Basic audit history is available on Team.
Advanced audit history is available on Enterprise.
SSO is available on Enterprise only.
Custom data retention is available on Enterprise only.
Dedicated support is available on Enterprise only.
Click New doc or skill in the top-right corner.
Choose **Doc** from the dropdown. Give it a name, and set its inclusion mode.
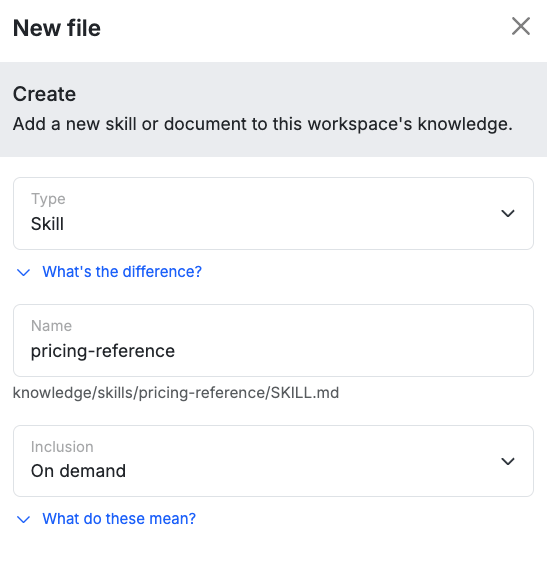 **Inclusion Modes**
* **Always Included** -- Includes the whole doc in every agent request. Use this sparingly.
* **On Demand** -- The agent only gets the title and description up front, so it knows it exists and can intelligently utilize it.
* **Manual** -- The agent has no idea this exists unless you refer to it explicitly.
Once you've written your doc, click Save.
## Skills
Skills are used to give your agent more specific instructions during the build process, but don't necessarily need to be surfaced to the agent every time. An example of this would be `Make sure background tasks run no more than once per day, at 3:00am`.
Click New doc or skill in the top-right corner.
Choose **Skill**, fill in the name and apply some tags.
On the next screen, you'll get to define the skill itself.
### What does this skill do?
This will be provided to your agent with each request along with the skill title (if you choose on-demand inclusion). Keep it short and effective to inform the agent what this skill does.
Example: `Provides all required building conventions for background tasks`
### When should the agent use it?
This is provided when the agent actually invokes the skill; used to determine any conventions that should be followed to complete the requested task.
Example: `This should be used any time a user wants to create or edit a background task`
### First Steps
You can start writing your skill here, or just click Create Skill and navigate to the full editing experience.
### References
References are supporting files that the agent can load on demand as part of a skill. Using references is important to ensure that the main SKILL.md file doesn't become bloated and the agent can selectively retrieve only what it needs.
The line `If a background task calls for specific run logging, reference @run-logging.md for more details.` in the example skill below shows how you'd refer to a reference when creating your skills.
# Background Task Conventions
Use this skill when creating, editing, reviewing, or debugging background tasks, scheduled jobs, cron jobs, recurring workflows, queues, batch processing, or automated maintenance routines.
## Core rules
Background tasks should be conservative by default.
Do not create a high-frequency task unless the user explicitly asks for it.
Most recurring background tasks should run no more than once per day.
If a task processes user data, sends notifications, charges money, syncs external systems, deletes records, or changes account state, ask before making it recurring.
If a background task calls for specific run logging, reference @run-logging for more details.
## Default schedule conventions
Use these defaults unless the user specifies otherwise:
* Maintenance jobs: once per day
* Cleanup jobs: once per day
* Digest generation: once per day
* Analytics rollups: once per day
* Billing reconciliation: once per day
* External syncs: once per day
* Notification retries: use a capped retry strategy, not an unlimited schedule
Avoid running background tasks every minute or every few minutes unless the product requirement clearly depends on near-real-time behavior.
## Safety requirements
Every recurring task should have:
* A clear purpose
* A predictable schedule
* A maximum amount of work per run
* A way to avoid duplicate processing
* Error handling
* Logging
* A safe retry strategy
* A guard against running on records that are already complete
## Idempotency
Design background tasks so running the same task twice does not create duplicate records, duplicate emails, duplicate charges, duplicate notifications, or duplicate external API calls.
Use status fields, timestamps, job run records, or unique keys when needed.
## Batching
For tasks that may process many records, use batching.
Prefer small batches over processing an entire table at once.
Track progress when a job may need multiple runs to complete.
## External services
When calling external APIs from a background task:
* Respect provider rate limits
* Store the last successful sync time when useful
* Retry temporary failures
* Do not retry permanent failures forever
* Log enough detail to troubleshoot failures without storing secrets
## Notifications
Background tasks that send emails, push notifications, SMS messages, or webhooks must avoid duplicate sends.
Before sending, check whether the message has already been sent for the relevant user, record, and event.
## Deletion and cleanup
Prefer soft deletion, archiving, or marking records inactive over permanent deletion.
Ask before creating a task that permanently deletes user data.
Cleanup tasks should include a clear retention rule, such as “delete temporary files older than 30 days.”
## Ask before doing these
Ask before:
* Scheduling a task more than once per day
* Creating a task that sends messages to users
* Creating a task that charges money
* Creating a task that permanently deletes data
* Creating a task that syncs large amounts of external data
* Creating a task that changes user permissions or account state
* Creating a task with no clear stop condition or processing limit
# Background Task Run Logging Reference
Use this reference when building or editing a background task that needs to record its execution history.
The workspace already includes a `background_task_run` table. Use it to track when a task starts, whether it finishes successfully, how much work it performed, and any high-level errors that occurred.
## Existing table
Use the existing `background_task_run` table.
Expected fields:
```bash theme={null}
id
task_name
status
started_at
completed_at
records_checked
records_processed
records_failed
error_message
metadata
created_at
updated_at
```
Expected `status` values:
```bash theme={null}
running
completed
completed_with_errors
failed
skipped
```
Do not create a new run logging table unless the user explicitly asks for one.
## When to create a run record
Create a `background_task_run` record at the beginning of each scheduled task run.
Set:
```bash theme={null}
task_name = the stable name of the task
status = running
started_at = now
records_checked = 0
records_processed = 0
records_failed = 0
```
Use a stable `task_name` value that will not change if the task title is edited later.
## When to update the run record
Update the same `background_task_run` record when the task finishes.
For a successful run, set:
```bash theme={null}
status = completed
completed_at = now
records_checked = total records reviewed
records_processed = total records successfully processed
records_failed = 0
```
If the task finishes but some records fail, set:
```bash theme={null}
status = completed_with_errors
completed_at = now
records_checked = total records reviewed
records_processed = total records successfully processed
records_failed = total records that failed
error_message = short summary of the failure
```
If the task cannot complete, set:
```bash theme={null}
status = failed
completed_at = now
error_message = short summary of the failure
```
If the task has no eligible work to perform, set:
```bash theme={null}
status = skipped
completed_at = now
records_checked = 0
records_processed = 0
records_failed = 0
```
## Metadata
Use `metadata` only for task-specific operational details that help with debugging or safe continuation.
Appropriate metadata examples:
```bash theme={null}
last_processed_id
batch_size
sync_cursor
provider_name
dry_run
```
Do not store secrets, access tokens, API keys, passwords, payment details, or large raw API responses in `metadata`.
## Counting rules
Use these counting conventions consistently:
```bash theme={null}
records_checked = records the task evaluated
records_processed = records the task successfully changed or acted on
records_failed = records the task attempted but could not complete
```
Do not count skipped records as processed.
## Error messages
Keep `error_message` short and safe.
Good examples:
```bash theme={null}
3 records failed validation.
External provider returned a temporary error.
Task stopped because the configured batch size was reached.
```
Bad examples:
```bash theme={null}
Full API response body with sensitive data
Access token or authorization header
Full user record payload
Raw payment details
```
## Required task shape
When adding run logging to a background task, use this structure:
```bash theme={null}
1. Create a background_task_run record with status = running.
2. Store the run record id for later updates.
3. Process the task's eligible records.
4. Track checked, processed, and failed counts.
5. Update the same background_task_run record before the task ends.
```
Every background task that uses this reference should finish with exactly one final status:
```bash theme={null}
completed
completed_with_errors
failed
skipped
```
## Preview
Once you've populated your AGENTS.md and some docs / skills, you can preview what it all will look like to an agent by clicking Preview agent context in the top-right.
This is the context the agent receives at the start of every turn. Your AGENTS.md is shown in full; always-on skills are shown by their summary; on-demand items are listed by name so the agent can pull them in when relevant; and manual items load only when you name them in a prompt.
At the bottom of the modal, you can also see an estimate of potential token usage.
**Inclusion Modes**
* **Always Included** -- Includes the whole doc in every agent request. Use this sparingly.
* **On Demand** -- The agent only gets the title and description up front, so it knows it exists and can intelligently utilize it.
* **Manual** -- The agent has no idea this exists unless you refer to it explicitly.
Once you've written your doc, click Save.
## Skills
Skills are used to give your agent more specific instructions during the build process, but don't necessarily need to be surfaced to the agent every time. An example of this would be `Make sure background tasks run no more than once per day, at 3:00am`.
Click New doc or skill in the top-right corner.
Choose **Skill**, fill in the name and apply some tags.
On the next screen, you'll get to define the skill itself.
### What does this skill do?
This will be provided to your agent with each request along with the skill title (if you choose on-demand inclusion). Keep it short and effective to inform the agent what this skill does.
Example: `Provides all required building conventions for background tasks`
### When should the agent use it?
This is provided when the agent actually invokes the skill; used to determine any conventions that should be followed to complete the requested task.
Example: `This should be used any time a user wants to create or edit a background task`
### First Steps
You can start writing your skill here, or just click Create Skill and navigate to the full editing experience.
### References
References are supporting files that the agent can load on demand as part of a skill. Using references is important to ensure that the main SKILL.md file doesn't become bloated and the agent can selectively retrieve only what it needs.
The line `If a background task calls for specific run logging, reference @run-logging.md for more details.` in the example skill below shows how you'd refer to a reference when creating your skills.
# Background Task Conventions
Use this skill when creating, editing, reviewing, or debugging background tasks, scheduled jobs, cron jobs, recurring workflows, queues, batch processing, or automated maintenance routines.
## Core rules
Background tasks should be conservative by default.
Do not create a high-frequency task unless the user explicitly asks for it.
Most recurring background tasks should run no more than once per day.
If a task processes user data, sends notifications, charges money, syncs external systems, deletes records, or changes account state, ask before making it recurring.
If a background task calls for specific run logging, reference @run-logging for more details.
## Default schedule conventions
Use these defaults unless the user specifies otherwise:
* Maintenance jobs: once per day
* Cleanup jobs: once per day
* Digest generation: once per day
* Analytics rollups: once per day
* Billing reconciliation: once per day
* External syncs: once per day
* Notification retries: use a capped retry strategy, not an unlimited schedule
Avoid running background tasks every minute or every few minutes unless the product requirement clearly depends on near-real-time behavior.
## Safety requirements
Every recurring task should have:
* A clear purpose
* A predictable schedule
* A maximum amount of work per run
* A way to avoid duplicate processing
* Error handling
* Logging
* A safe retry strategy
* A guard against running on records that are already complete
## Idempotency
Design background tasks so running the same task twice does not create duplicate records, duplicate emails, duplicate charges, duplicate notifications, or duplicate external API calls.
Use status fields, timestamps, job run records, or unique keys when needed.
## Batching
For tasks that may process many records, use batching.
Prefer small batches over processing an entire table at once.
Track progress when a job may need multiple runs to complete.
## External services
When calling external APIs from a background task:
* Respect provider rate limits
* Store the last successful sync time when useful
* Retry temporary failures
* Do not retry permanent failures forever
* Log enough detail to troubleshoot failures without storing secrets
## Notifications
Background tasks that send emails, push notifications, SMS messages, or webhooks must avoid duplicate sends.
Before sending, check whether the message has already been sent for the relevant user, record, and event.
## Deletion and cleanup
Prefer soft deletion, archiving, or marking records inactive over permanent deletion.
Ask before creating a task that permanently deletes user data.
Cleanup tasks should include a clear retention rule, such as “delete temporary files older than 30 days.”
## Ask before doing these
Ask before:
* Scheduling a task more than once per day
* Creating a task that sends messages to users
* Creating a task that charges money
* Creating a task that permanently deletes data
* Creating a task that syncs large amounts of external data
* Creating a task that changes user permissions or account state
* Creating a task with no clear stop condition or processing limit
# Background Task Run Logging Reference
Use this reference when building or editing a background task that needs to record its execution history.
The workspace already includes a `background_task_run` table. Use it to track when a task starts, whether it finishes successfully, how much work it performed, and any high-level errors that occurred.
## Existing table
Use the existing `background_task_run` table.
Expected fields:
```bash theme={null}
id
task_name
status
started_at
completed_at
records_checked
records_processed
records_failed
error_message
metadata
created_at
updated_at
```
Expected `status` values:
```bash theme={null}
running
completed
completed_with_errors
failed
skipped
```
Do not create a new run logging table unless the user explicitly asks for one.
## When to create a run record
Create a `background_task_run` record at the beginning of each scheduled task run.
Set:
```bash theme={null}
task_name = the stable name of the task
status = running
started_at = now
records_checked = 0
records_processed = 0
records_failed = 0
```
Use a stable `task_name` value that will not change if the task title is edited later.
## When to update the run record
Update the same `background_task_run` record when the task finishes.
For a successful run, set:
```bash theme={null}
status = completed
completed_at = now
records_checked = total records reviewed
records_processed = total records successfully processed
records_failed = 0
```
If the task finishes but some records fail, set:
```bash theme={null}
status = completed_with_errors
completed_at = now
records_checked = total records reviewed
records_processed = total records successfully processed
records_failed = total records that failed
error_message = short summary of the failure
```
If the task cannot complete, set:
```bash theme={null}
status = failed
completed_at = now
error_message = short summary of the failure
```
If the task has no eligible work to perform, set:
```bash theme={null}
status = skipped
completed_at = now
records_checked = 0
records_processed = 0
records_failed = 0
```
## Metadata
Use `metadata` only for task-specific operational details that help with debugging or safe continuation.
Appropriate metadata examples:
```bash theme={null}
last_processed_id
batch_size
sync_cursor
provider_name
dry_run
```
Do not store secrets, access tokens, API keys, passwords, payment details, or large raw API responses in `metadata`.
## Counting rules
Use these counting conventions consistently:
```bash theme={null}
records_checked = records the task evaluated
records_processed = records the task successfully changed or acted on
records_failed = records the task attempted but could not complete
```
Do not count skipped records as processed.
## Error messages
Keep `error_message` short and safe.
Good examples:
```bash theme={null}
3 records failed validation.
External provider returned a temporary error.
Task stopped because the configured batch size was reached.
```
Bad examples:
```bash theme={null}
Full API response body with sensitive data
Access token or authorization header
Full user record payload
Raw payment details
```
## Required task shape
When adding run logging to a background task, use this structure:
```bash theme={null}
1. Create a background_task_run record with status = running.
2. Store the run record id for later updates.
3. Process the task's eligible records.
4. Track checked, processed, and failed counts.
5. Update the same background_task_run record before the task ends.
```
Every background task that uses this reference should finish with exactly one final status:
```bash theme={null}
completed
completed_with_errors
failed
skipped
```
## Preview
Once you've populated your AGENTS.md and some docs / skills, you can preview what it all will look like to an agent by clicking Preview agent context in the top-right.
This is the context the agent receives at the start of every turn. Your AGENTS.md is shown in full; always-on skills are shown by their summary; on-demand items are listed by name so the agent can pull them in when relevant; and manual items load only when you name them in a prompt.
At the bottom of the modal, you can also see an estimate of potential token usage.
 ## Using Agent Knowledge
### In the Xano Agent
The Xano Agent is automatically presented with your knowledge in every session. You don't need to do anything; it already knows how to use it.
### In other AI coding agents
Knowledge is downloaded when running `xano workspace pull`, and your agent will likely pick up on this when working through your requests. However, to ensure consistency throughout each development session, you can instruct your agent to ensure that it refers to the knowledge present.
## What's next
See the in-product agent that reads your Knowledge on every build.
Connect external AI coding agents like Claude Code and Codex to your workspace.
Control who can edit or unlock enforced AGENTS.md files.
## Using Agent Knowledge
### In the Xano Agent
The Xano Agent is automatically presented with your knowledge in every session. You don't need to do anything; it already knows how to use it.
### In other AI coding agents
Knowledge is downloaded when running `xano workspace pull`, and your agent will likely pick up on this when working through your requests. However, to ensure consistency throughout each development session, you can instruct your agent to ensure that it refers to the knowledge present.
## What's next
See the in-product agent that reads your Knowledge on every build.
Connect external AI coding agents like Claude Code and Codex to your workspace.
Control who can edit or unlock enforced AGENTS.md files.