> ## Documentation Index
> Fetch the complete documentation index at: https://docs.xano.com/llms.txt
> Use this file to discover all available pages before exploring further.

# Xano MCP Server

> Learn how to use the Xano MCP Server with an MCP client to build your entire backend with AI

<Warning>
  The Metadata API and MCP Server are experimental and under active development. Using them with AI or automation tools may result in data loss, corruption, or deletion. Do not use in production without full safeguards and backups.
</Warning>

The Xano MCP Server is a collection of tools that you can connect to using your favorite MCP client of choice, to chat with your Xano backend. The MCP server has a great number of tools available to help you build and manage your workspace with AI. Here are just a few examples:

* Create database tables and update table schema
* Generate sample data
* Build APIs, custom functions, background tasks, AI agents, and any other type of logic or workflow
* Gather the OpenAPI spec for your workspace to assist with frontend development

<Card title="Xano MCP Tools" icon="server" href="/building/build-with-ai/xano-mcp-tools">
  A list of all the tools available in the Xano MCP Server
</Card>

### Using the Xano MCP Server

<Steps>
  <Step title="Generate an Access Token">
    Access Tokens are used for authentication when connecting to the Xano MCP server. Head to your [instance selection screen](https://app.xano.com/instance) and click the⚙️ icon next to your instance.

    Choose <span class="ui-bubble"><Icon icon="robot" /> Metadata API & MCP Server</span>, and click <span class="ui-bubble"><Icon icon="key" /> Manage Access Tokens</span>.

    Click <span class="ui-bubble"><Icon icon="plus" /> New Access Token</span>.

    Give your access token a name, and select the scopes you need. Click <span class="ui-bubble">Create</span> at the bottom of the panel. You can read more about the scopes in our [Token Scopes Reference](/xano-features/metadata-api/token-scopes-reference).

    You'll only be shown your token once, so make sure to copy it and store it in a safe place.
  </Step>

  <Step title="Connect with your client of choice">
    <Tip>
      Right now, we recommend using VS Code over other clients. We're working to improve the experience across the board, but in our testing, VS Code has performed the best while using the Xano MCP Server with the ChatGPT 4o model.
    </Tip>

    <Tabs>
      <Tab title="VS Code" icon="https://mintcdn.com/xano-997cb9ee/aZQYcxhIvSDTNEim/images/icons/vscode.svg?fit=max&auto=format&n=aZQYcxhIvSDTNEim&q=85&s=bb6c91058fcbe6ee28fcda04e03de2e6" width="100" height="100" data-path="images/icons/vscode.svg">
        You can add an MCP server to a specific project, or to your user configuration to make it available across all projects.

        MCP Servers in VS Code require access to Copilot.

        ### Specific Project Configuration (recommended)
        <Steps>
          <Step title="Create a .vscode/mcp.json file in your workspace" />

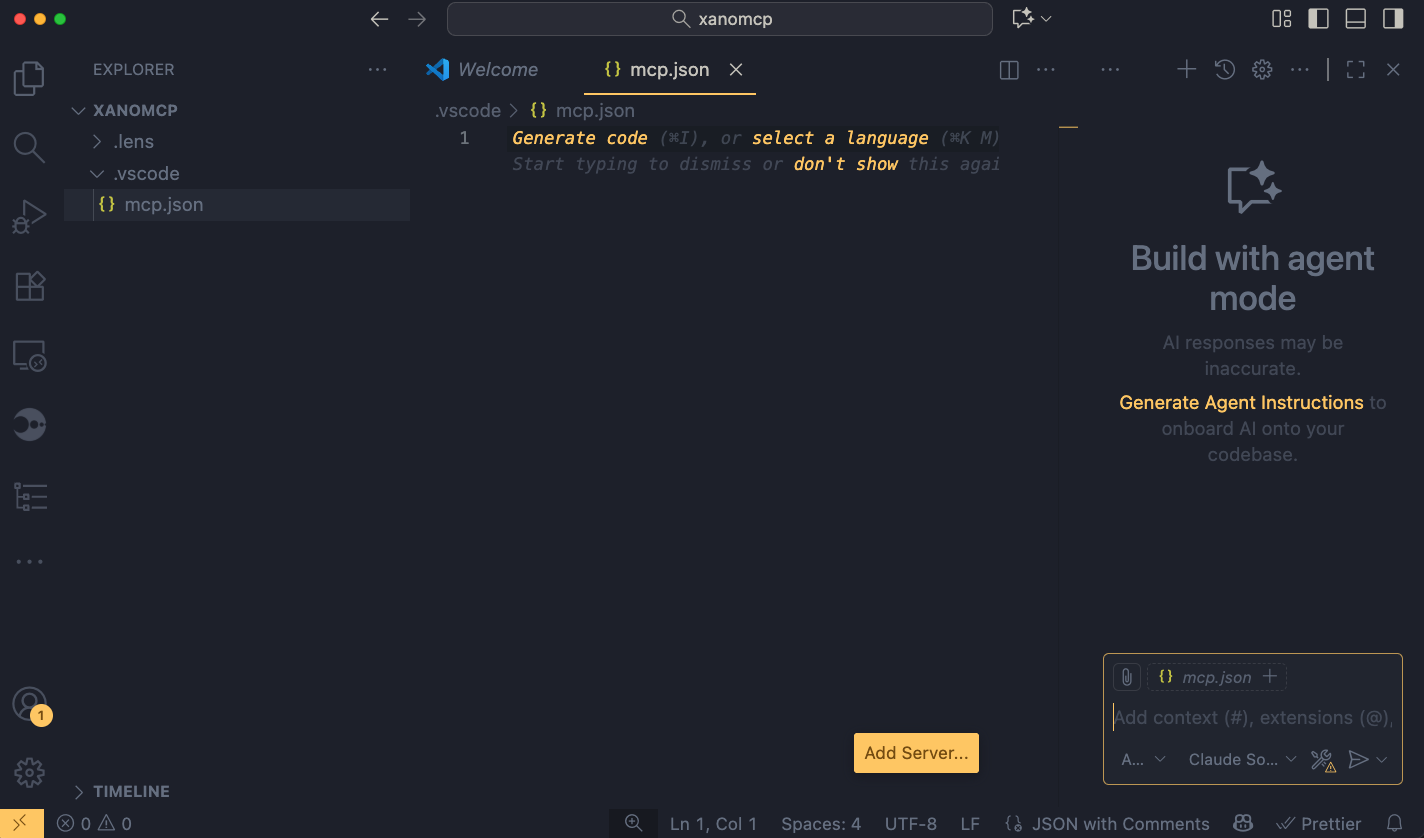
          <Step title="Select the Add Server button in the editor">
            <Frame caption="Add Server button">
              <img src="https://mintcdn.com/xano-997cb9ee/E3ZmWFmmOyx8Tmpx/images/xano-mcp-20251011-090416.png?fit=max&auto=format&n=E3ZmWFmmOyx8Tmpx&q=85&s=2dc5e1747dc924859c5bd1841d7c38b7" alt="xano-mcp-20251011-090416" width="1424" height="838" data-path="images/xano-mcp-20251011-090416.png" />
            </Frame>
          </Step>

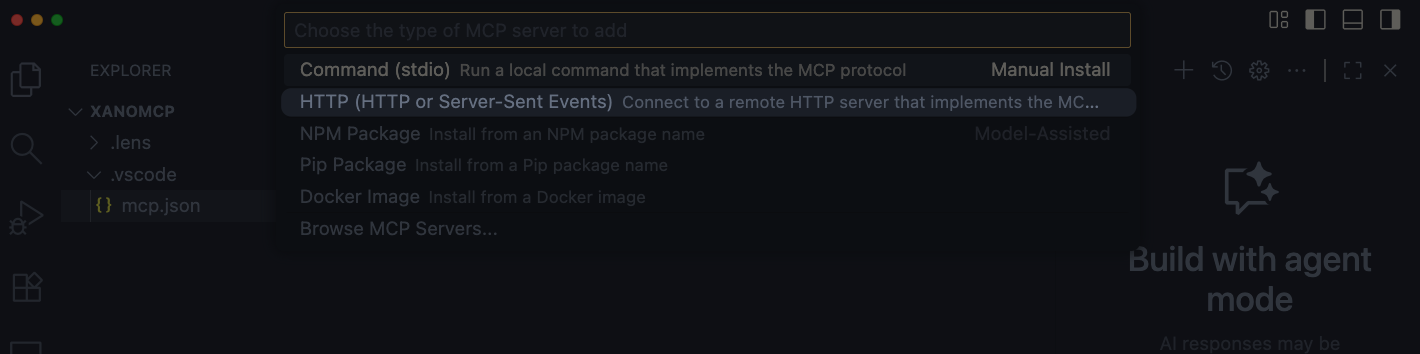
          <Step title="Choose 'HTTP' from the list">
            <Frame>
              <img src="https://mintcdn.com/xano-997cb9ee/E3ZmWFmmOyx8Tmpx/images/xano-mcp-20251011-090514.png?fit=max&auto=format&n=E3ZmWFmmOyx8Tmpx&q=85&s=7183a531e6f8848e08f45f7e19ad2393" alt="xano-mcp-20251011-090514" width="1420" height="354" data-path="images/xano-mcp-20251011-090514.png" />
            </Frame>
          </Step>

          <Step title="Provide the necessary details">
            You'll be asked for the URL to connect to your server, which you can find in the MCP Server panel in your instance settings. Use the `streaming` URL.
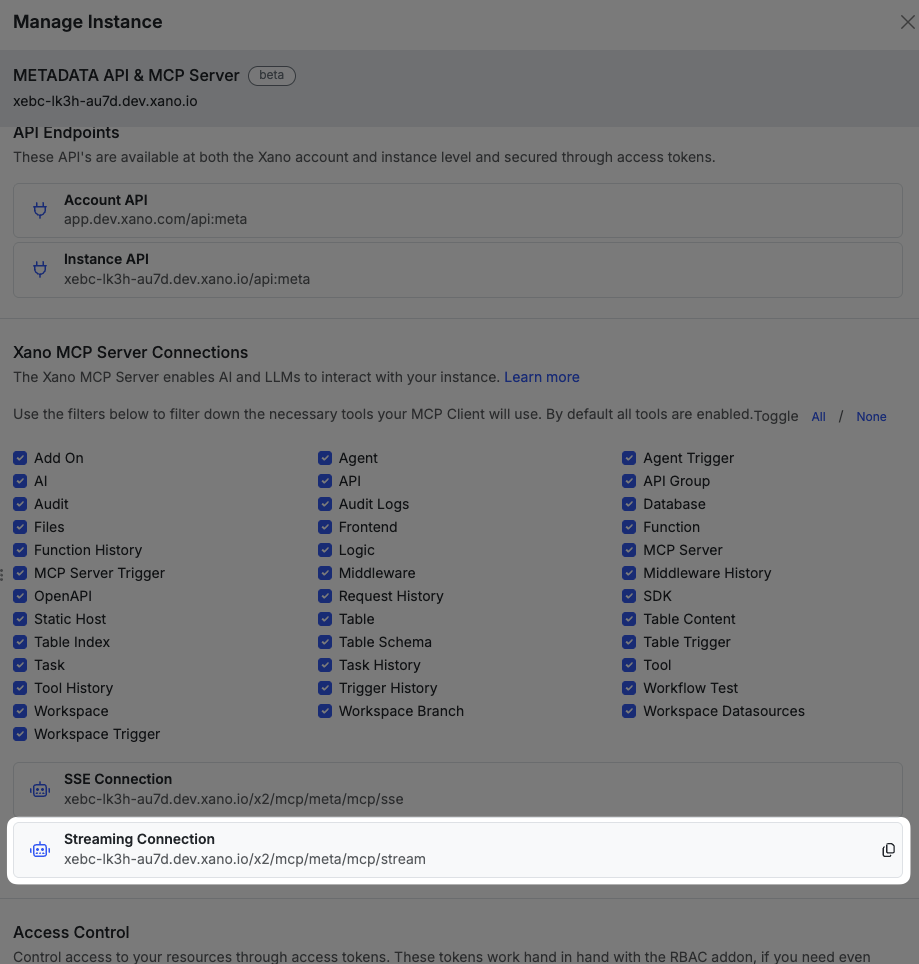
            <Frame caption="Getting the URL">
              <img src="https://mintcdn.com/xano-997cb9ee/E3ZmWFmmOyx8Tmpx/images/xano-mcp-20251011-090811.png?fit=max&auto=format&n=E3ZmWFmmOyx8Tmpx&q=85&s=85f44b832ca5fa8f69db6f8a71a21c18" alt="xano-mcp-20251011-090811" width="919" height="964" data-path="images/xano-mcp-20251011-090811.png" />
            </Frame>

            Then, give VS Code a name for your server.
          </Step>

          <Step title="Add authentication information">
            You'll need to manually add the authentication information for the MCP server. You'll need the access token you generated earlier.

            Add a comma after `type`, and then on a new line, add `"headers": {"Authorization": "Bearer token_here"}`.
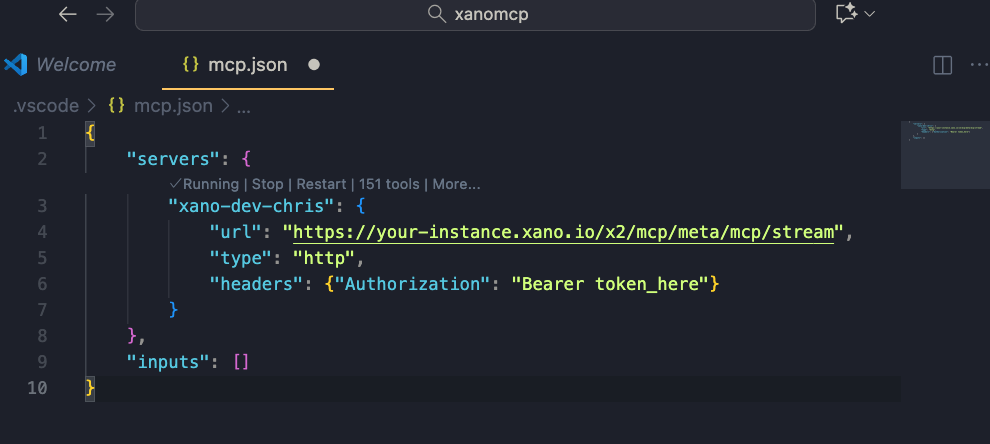
            <Frame caption="Adding authentication information">
              <img src="https://mintcdn.com/xano-997cb9ee/E3ZmWFmmOyx8Tmpx/images/xano-mcp-20251011-091135.png?fit=max&auto=format&n=E3ZmWFmmOyx8Tmpx&q=85&s=25aa556d9341361253130275ab7c2e42" alt="xano-mcp-20251011-091135" width="990" height="444" data-path="images/xano-mcp-20251011-091135.png" />
            </Frame>

            Save the file.
          </Step>

          <Step title="You're ready to use the Xano MCP Server in VS Code">
            You can now use the Xano MCP Server in VS Code.
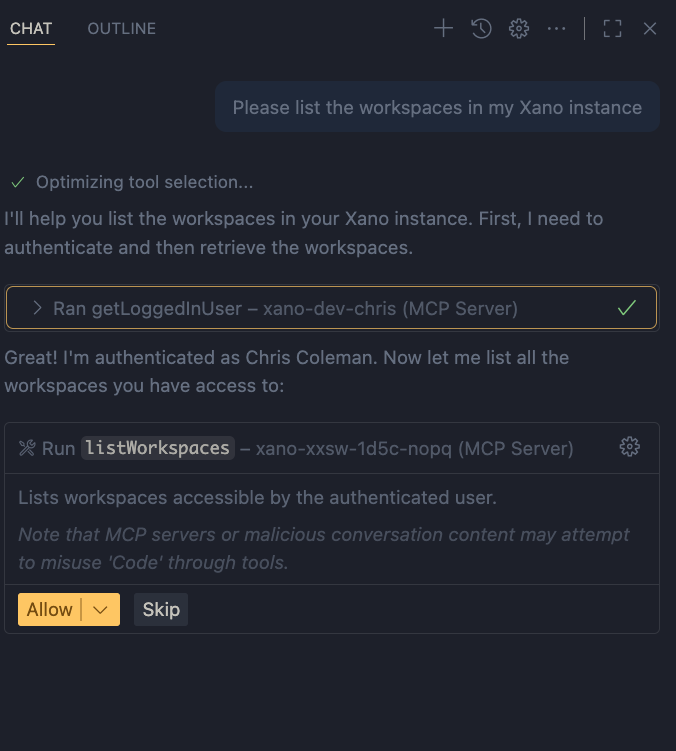
            <Frame caption="Using the Xano MCP Server in VS Code">
              <img src="https://mintcdn.com/xano-997cb9ee/E3ZmWFmmOyx8Tmpx/images/xano-mcp-20251011-091409.png?fit=max&auto=format&n=E3ZmWFmmOyx8Tmpx&q=85&s=68b438ce2d1ddc2d8dfc11cb68e5fa77" alt="xano-mcp-20251011-091409" width="676" height="751" data-path="images/xano-mcp-20251011-091409.png" />
            </Frame>
          </Step>
        </Steps>

        For more details on connecting to MCP servers in VS Code, see the [VS Code MCP Server documentation](https://code.visualstudio.com/docs/copilot/customization/mcp-servers).
      </Tab>

      <Tab title="Cursor" icon="https://mintcdn.com/xano-997cb9ee/aZQYcxhIvSDTNEim/images/icons/Cursor_light.svg?fit=max&auto=format&n=aZQYcxhIvSDTNEim&q=85&s=c42cd27f6fa1b802cadd5a3514d7ff46" width="467" height="532" data-path="images/icons/Cursor_light.svg">
        <Steps>
          <Step title="Open your Cursor settings by going to the menu > Settings > Cursor Settings" />

          <Step title="On the left-hand side, click Tools & Integrations" />

          <Step title="Click New MCP Server" />

          <Step title="Add an entry for the Xano MCP server">
            ```json theme={null}
            "<server name goes here, can be anything>": {
              "command": "npx",
              "args": [
                "mcp-remote",
                "https://your-instance-url.xano.io/x2/mcp/meta/mcp/sse",
                "--header",
                "Authorization:${AUTH_TOKEN}"
              ],
              "env": {
                "AUTH_TOKEN": "Bearer <your access token goes here>"
              }
            }
            ```
          </Step>

          <Step title="Use the Xano MCP Server in a chat">
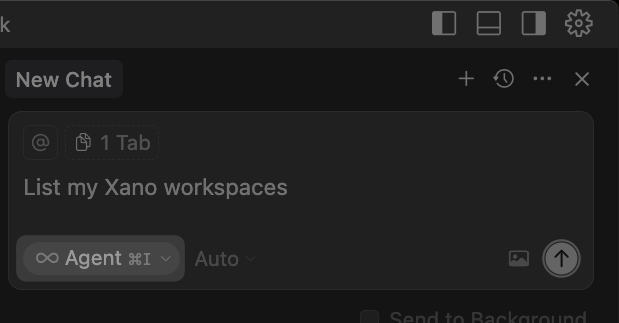
            Make sure Agent mode is selected.

            <Frame caption="Agent mode selector">
              <img src="https://mintcdn.com/xano-997cb9ee/E3ZmWFmmOyx8Tmpx/images/xano-mcp-20251014-100504.png?fit=max&auto=format&n=E3ZmWFmmOyx8Tmpx&q=85&s=463b3a31f5da77061572cd019ab7ea8f" alt="xano-mcp-20251014-100504" width="619" height="323" data-path="images/xano-mcp-20251014-100504.png" />
            </Frame>

            You'll now be able to use the Xano MCP server in Cursor.
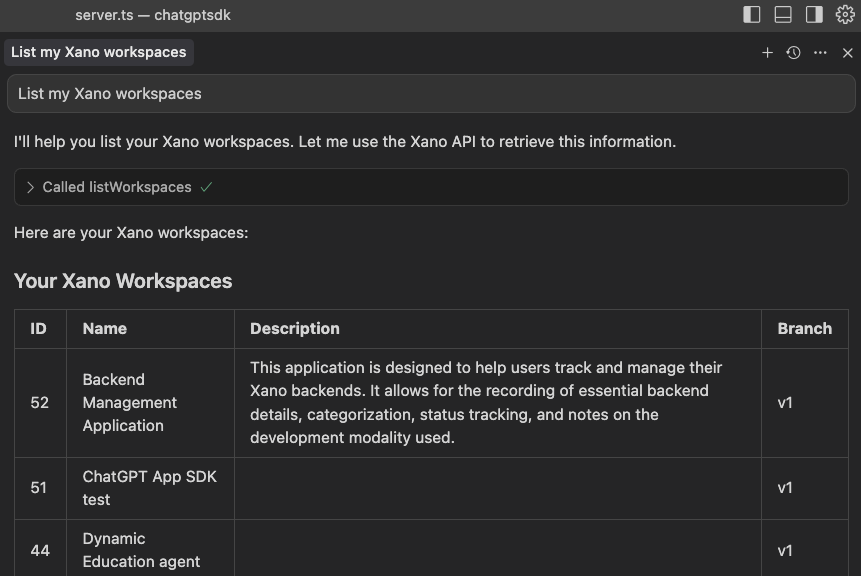
            <Frame caption="Using the Xano MCP Server in Cursor">
              <img src="https://mintcdn.com/xano-997cb9ee/E3ZmWFmmOyx8Tmpx/images/xano-mcp-20251014-100553.png?fit=max&auto=format&n=E3ZmWFmmOyx8Tmpx&q=85&s=fa014e2ed96071f60c40a5c70aa4ae35" alt="xano-mcp-20251014-100553" width="861" height="576" data-path="images/xano-mcp-20251014-100553.png" />
            </Frame>
          </Step>
        </Steps>
      </Tab>

      <Tab title="Windsurf" icon="https://mintcdn.com/xano-997cb9ee/aZQYcxhIvSDTNEim/images/icons/Windsurf_light.svg?fit=max&auto=format&n=aZQYcxhIvSDTNEim&q=85&s=ad7fc1569a810d534939040c60c6cc78" width="1024" height="1024" data-path="images/icons/Windsurf_light.svg">
        <Steps>
          <Step title="Open your Windsurf settings by going to the menu > Settings > Windsurf Settings" />

          <Step title="Scroll down to the Cascase settings, and click Manage plugins" />

          <Step title="Click View raw config" />

          <Step title="Add an entry for the Xano MCP server">
            ```json theme={null}
            "xano": {
              "command": "npx",
              "args": [
                "mcp-remote",
                "https://your-instance-url.xano.io/x2/mcp/meta/mcp/sse",
                "--header",
                "Authorization:${AUTH_TOKEN}"
              ],
              "env": {
                "AUTH_TOKEN": "Bearer <your access token goes here>"
              }
            }
            ```
          </Step>

          <Step title="You're ready to use the Xano MCP Server in Windsurf">
            You can now use the Xano MCP Server in Windsurf.

            <Frame caption="Using the Xano MCP Server in Windsurf">
              <img src="https://mintlify.s3.us-west-1.amazonaws.com/xano-997cb9ee/images/xano-mcp-20251014-100636.png" alt="xano-mcp-20251014-100636" />
            </Frame>
          </Step>
        </Steps>
      </Tab>
    </Tabs>
  </Step>
</Steps>