> ## Documentation Index
> Fetch the complete documentation index at: https://docs.xano.com/llms.txt
> Use this file to discover all available pages before exploring further.
# Building APIs in Xano
> Learn how to build APIs with no code, with code, or with AI, all in Xano
Before continuing, make sure you're familiar with:
* [Core Components](/building/logic/core-components)
* [Working with Data](/building/logic/working-with-data)
If you need a primer on what an API is, we've added a quick summary below. For more detailed information, check out [What is an API](/before-you-begin/key-concepts#-api) in the Before You Begin section.
## Building APIs in Xano
APIs are a core part of any backend. They allow you to connect your backend to other services and applications.
Each API is assigned a name, a verb, and a URL.
* The name is the unique identifier for the API. For example, `user_list`. We'll be referencing this sample API throughout the rest of this page.
* The verb is the HTTP verb that will be used to make the request. For example, `GET`.
* The URL is the endpoint that the API will be accessed at. For example, `https://myapi.com/user_list`.
APIs in Xano are built in three parts:
* Inputs
\-- Inputs are the data that the API will accept. For example, `name` and `email`.
* Logic
\-- The logic is the logic that will be executed when the API is called. For example, retrieving a record from your database or calculating a user's age.
* Response
\-- The response is the data that the API will return. For our `user_list` API, it might return a list of users, or a single user.
## API Groups
APIs live inside of API groups. Think of groups as folders that you can use to organize all of your different APIs. For example, you might have a group for your authentication APIs, a group for your user APIs, and a group for file storage APIs.
### Creating a new API Group
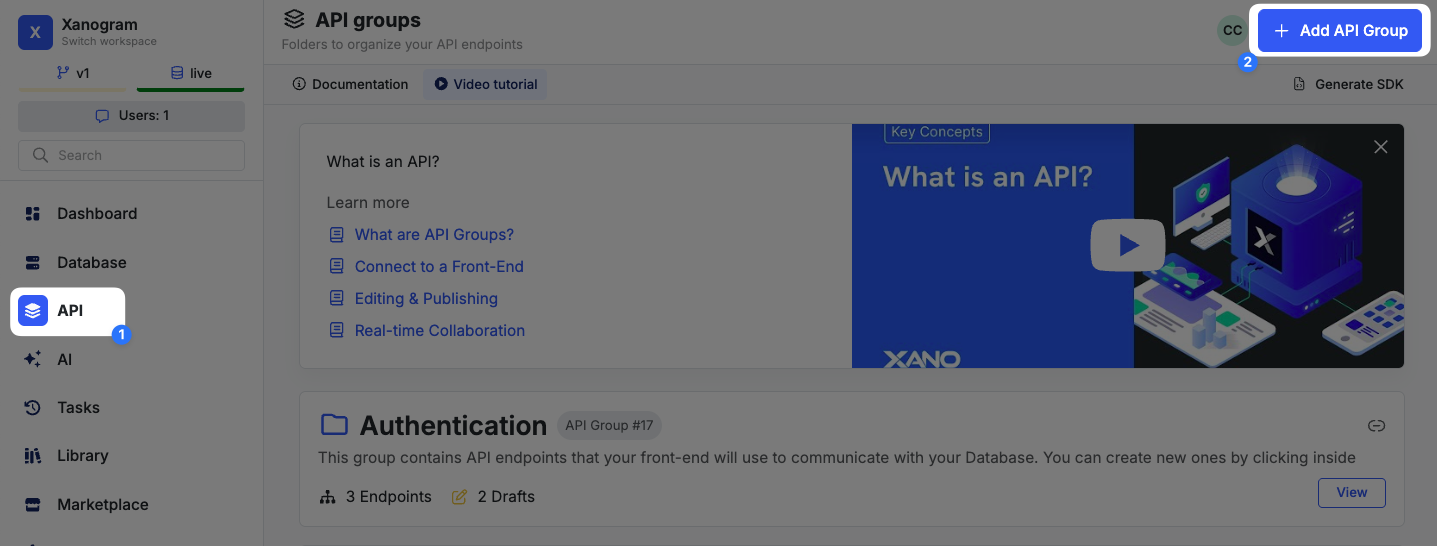
From the sidebar, click API, and then click **+ Add API Group**.
 In the panel that opens, give your API group a name. You can also provide a description, tags for organization, and choose whether or not to make auto-generated API documentation available for this group.
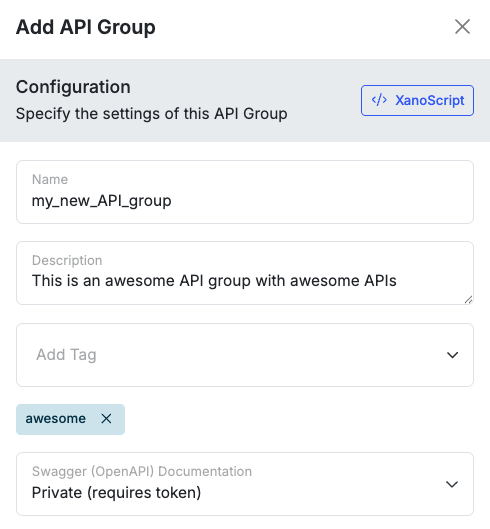 | Parameter | Description |
| ------------------------------- | ---------------------------------------------------------------------------------------------------------------------------------------------------------------------------------------------------------------------------------------------------------------------------------- |
| name | The name of the API group. This comes immediately after the `api_group` definition, and before the opening curly brace. |
| description | A description of the API group. |
| tags | Tags for organization. |
| Swagger (OpenAPI) Documentation | Options for auto-generated API documentation. By default, it will be public, non-tokenized documentation. You can switch to tokenized documentation by clicking the toggle and choosing "Private (requires token)", or disable it by clicking the toggle and selecting "Disabled". |
You can also create an API group using XanoScript.
```javascript theme={null}
api_group my_new_API_group {
description = "This is an awesome API group with awesome APIs"
tags = ["awesome"]
canonical = "awesome"
history = {inherit: true}
}
```
| Parameter | Description |
| ----------- | ------------------------------------------------------------------------------------------------------------------------------------------------------------------------------------------------------------------------------------------------------------------------------------------------------ |
| name | The name of the API group. This comes immediately after the `api_group` definition, and before the opening curly brace. |
| description | A description of the API group. |
| canonical | The canonical ID of the API group. |
| swagger | Options for auto-generated API documentation. If not provided, it will default to public, non-tokenized documentation.
| Parameter | Description |
| ------------------------------- | ---------------------------------------------------------------------------------------------------------------------------------------------------------------------------------------------------------------------------------------------------------------------------------- |
| name | The name of the API group. This comes immediately after the `api_group` definition, and before the opening curly brace. |
| description | A description of the API group. |
| tags | Tags for organization. |
| Swagger (OpenAPI) Documentation | Options for auto-generated API documentation. By default, it will be public, non-tokenized documentation. You can switch to tokenized documentation by clicking the toggle and choosing "Private (requires token)", or disable it by clicking the toggle and selecting "Disabled". |
You can also create an API group using XanoScript.
```javascript theme={null}
api_group my_new_API_group {
description = "This is an awesome API group with awesome APIs"
tags = ["awesome"]
canonical = "awesome"
history = {inherit: true}
}
```
| Parameter | Description |
| ----------- | ------------------------------------------------------------------------------------------------------------------------------------------------------------------------------------------------------------------------------------------------------------------------------------------------------ |
| name | The name of the API group. This comes immediately after the `api_group` definition, and before the opening curly brace. |
| description | A description of the API group. |
| canonical | The canonical ID of the API group. |
| swagger | Options for auto-generated API documentation. If not provided, it will default to public, non-tokenized documentation.
Use `swagger = {token: ""}` to create tokenized documentation.
Use ` swagger = {active: false}` to disable auto-generated API documentation. |
| tags | Tags for organization. |
| history | The request history settings for the API group. Defaults to `{inherit: true}`, which means it will inherit the request history settings from the workspace. |
The canonical ID is used to generate the endpoint URLs for the APIs in this group. If not provided, Xano will auto-generate one for you.
For example, if the canonical ID is set to `awesome`, the base URL for the APIs in this group will be `https://yourdomain.com/api:awesome/api_name`.
## Creating a new API
Clicking the **+ Add API Endpoint** button will open a panel that allows you to create a new API.
You can choose from one of the following options:
| Type | Description |
| --------------------------------------------------------------- | ---------------------------------------------------------------------------------------------------------- |
| **Custom Endpoint** | Creates a blank canvas for you to build your API from scratch. |
| **External API request** | Creates a pre-built API for making requests to external APIs. |
| **CRUD Database Operations** | Creates a pre-built API for performing CRUD operations (Create, Read, Update, Delete) on a database table. |
| **Webhook** | Creates a pre-built API for receiving webhooks from external services. |
| **Authentication** | Creates a pre-built API for authentication. |
| **Upload Content** | Creates a pre-built API for uploading files, such as images or attachments. |
| **HTML Page** | Creates a pre-built API for serving HTML pages. |
| **Use XanoScript** | Opens the XanoScript editor so you can build your API from scratch. |
You'll be asked to provide some basic information about your API before continuing.
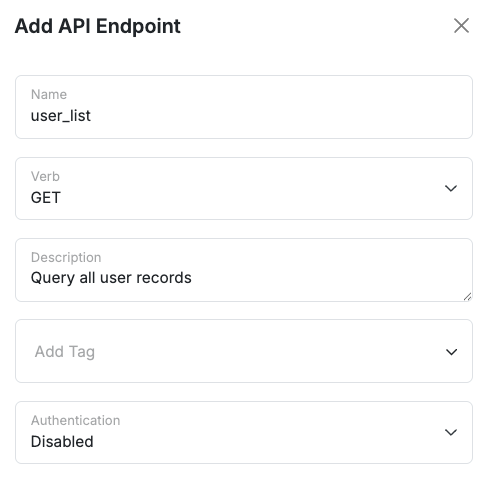 | Parameter | Description |
| -------------- | ----------------------------------------------------------------------------------------------------- |
| Name | The name of the API. |
| Verb | The HTTP verb that will be used to make the request. |
| Description | A description of the API. |
| Tags | Tags for organization. |
| Authentication | Choose whether this endpoint requires a valid authentication token present in the headers to execute. |
You can build APIs in Xano in three different ways. Choose the one that best fits your needs. You can switch between them at any time.
## The Canvas View
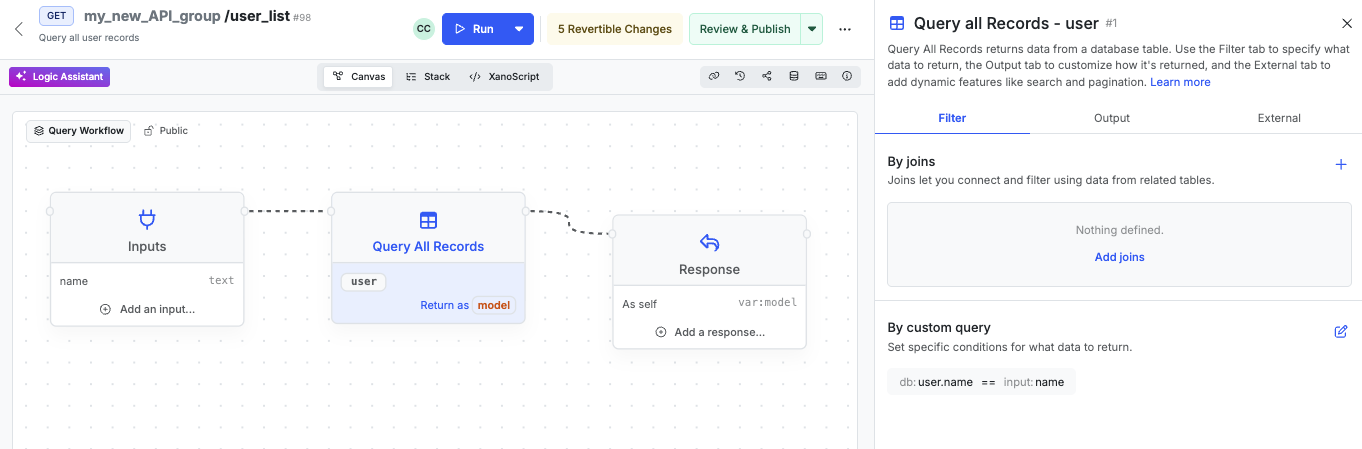
The canvas view is a visual representation of your API in a node-based format. If you're new to the canvas view, review the [Canvas View](/building/build-visually/canvas-view) basics first.
| Parameter | Description |
| -------------- | ----------------------------------------------------------------------------------------------------- |
| Name | The name of the API. |
| Verb | The HTTP verb that will be used to make the request. |
| Description | A description of the API. |
| Tags | Tags for organization. |
| Authentication | Choose whether this endpoint requires a valid authentication token present in the headers to execute. |
You can build APIs in Xano in three different ways. Choose the one that best fits your needs. You can switch between them at any time.
## The Canvas View
The canvas view is a visual representation of your API in a node-based format. If you're new to the canvas view, review the [Canvas View](/building/build-visually/canvas-view) basics first.
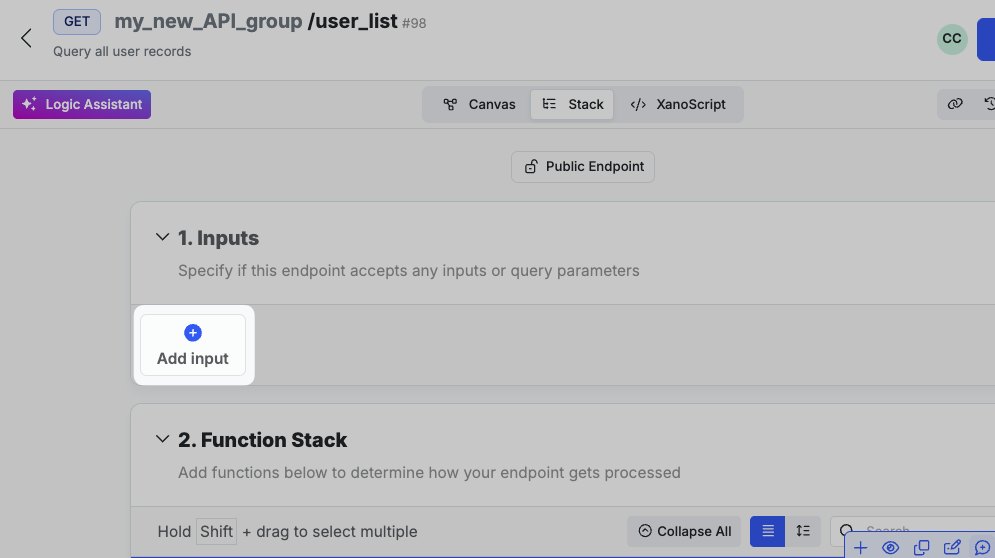
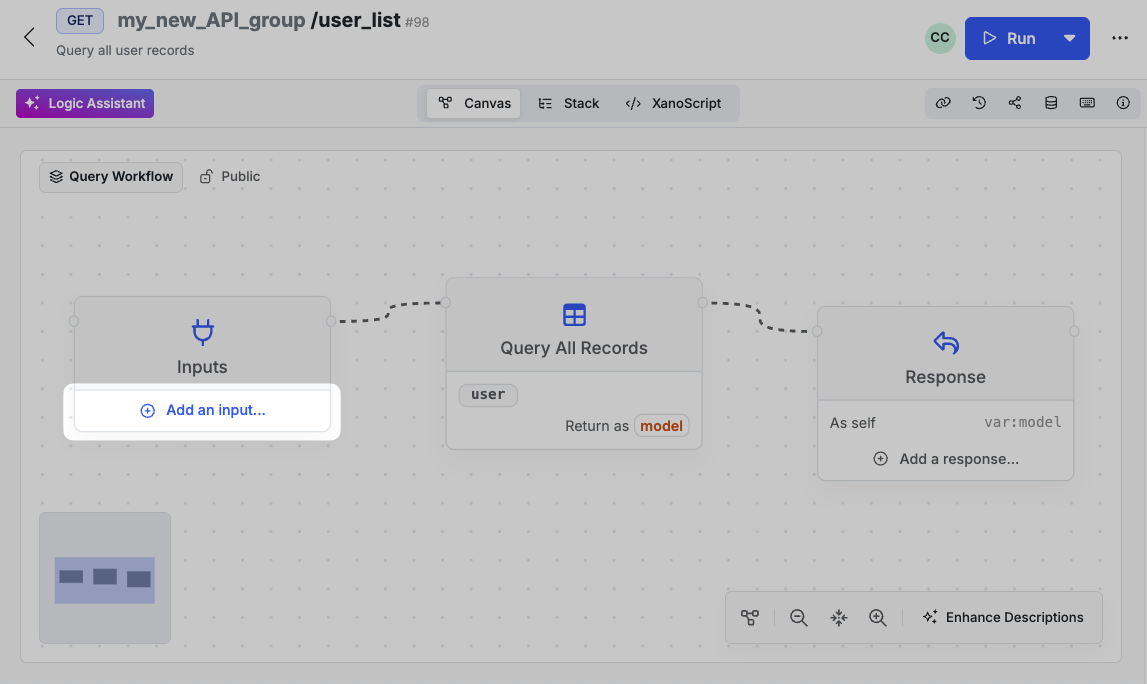 Inputs define the data your API expects. Learn how to add and configure them.
Functions define the behavior of your API. Add and arrange functions to process inputs and fetch data.
Control exactly what data your API sends back.
Inputs define the data your API expects. Learn how to add and configure them.
Functions define the behavior of your API. Add and arrange functions to process inputs and fetch data.
Control exactly what data your API sends back.
 Inputs define the data your API expects. Learn how to add and configure them.
Functions define the behavior of your API. Add and arrange functions to process inputs and fetch data.
Control exactly what data your API sends back.
Inputs define the data your API expects. Learn how to add and configure them.
Functions define the behavior of your API. Add and arrange functions to process inputs and fetch data.
Control exactly what data your API sends back.
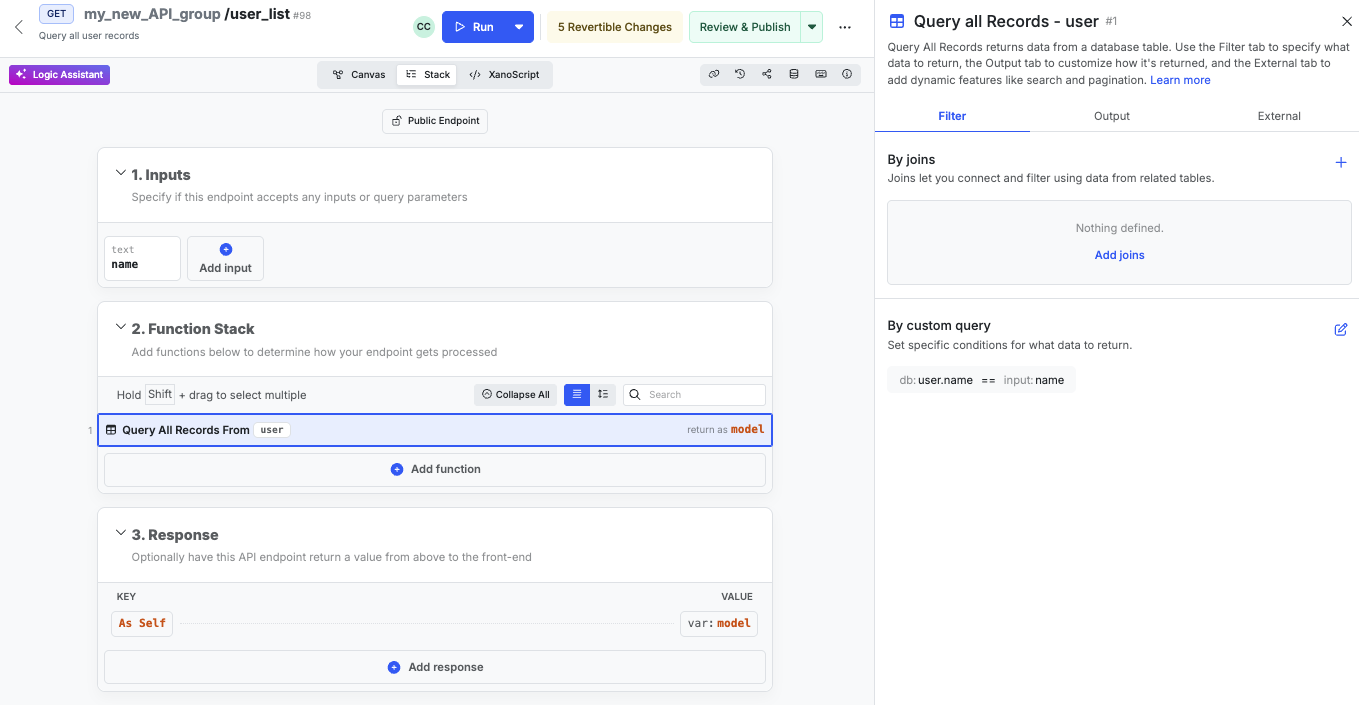 A basic API in XanoScript has three parts — **inputs**, **functions**, and **response** — just like in the visual builder:
```javascript lines icon="code" Example of a basic API in XanoScript theme={null}
query user_list verb=GET {
description = "Query all user records"
input {
text name? filters=trim
}
stack {
db.query user {
search = $db.user.name ==? $input.name
return = {type: "list"}
} as $model
}
response {
value = $model
}
history = {inherit: true}
}
```
For more information on how to build APIs in XanoScript, see the XanoScript API documentation.
A basic API in XanoScript has three parts — **inputs**, **functions**, and **response** — just like in the visual builder:
```javascript lines icon="code" Example of a basic API in XanoScript theme={null}
query user_list verb=GET {
description = "Query all user records"
input {
text name? filters=trim
}
stack {
db.query user {
search = $db.user.name ==? $input.name
return = {type: "list"}
} as $model
}
response {
value = $model
}
history = {inherit: true}
}
```
For more information on how to build APIs in XanoScript, see the XanoScript API documentation.