> ## Documentation Index
> Fetch the complete documentation index at: https://docs.xano.com/llms.txt
> Use this file to discover all available pages before exploring further.

# Tenant Center

<Info>
  ## **Quick Summary**

  The Tenant Center allows you to deploy your current workspace to multiple tenant environments. Tenants are best utilized for things like separate development, staging, and production environments, or isolating different customers or user groups into their own workspaces, like users in a specific region or your beta testers.

  Each tenant gets its own isolated database, and receives logic from releases you choose to deploy.
</Info>

<CardGroup cols={2}>
  <Card title="Why Tenant Center" icon="lightbulb" href="#why-tenant-center">
    What Tenant Center unlocks and when to reach for it
  </Card>

  <Card title="Using Tenant Center" icon="play" href="#using-tenant-center">
    The end-to-end flow: create a tenant, deploy a release, call its APIs
  </Card>

  <Card title="Managing Tenants" icon="sliders" href="#managing-tenants">
    Day-2 operations: edit, impersonate, env vars, backups, logs
  </Card>

  <Card title="Tenant Types" icon="layer-group" href="#tenant-types">
    Shared, Dedicated, and Remote namespaces, plus infrastructure sizing
  </Card>

  <Card title="Tenant Clusters" icon="server" href="#tenant-clusters">
    Register remote Kubernetes clusters for Regional Isolation tenants
  </Card>

  <Card title="RBAC: Tenant Center" icon="lock" href="#rbac-tenant-center">
    Permissions and common role recipes
  </Card>
</CardGroup>

## Why Tenant Center

The Tenant Center brings a traditional CI/CD workflow into Xano, and gives you a single place to run as many isolated copies of your backend as your business needs — each with its own database, its own URL, and its own lifecycle.

With Tenant Center, you can:

* **Run real dev / stage / production environments** for the same workspace, instead of editing live and hoping for the best
* **Isolate customers or user groups** into their own tenants — perfect for per-customer data isolation, beta cohorts, or rolling out new features to one group at a time
* **Deploy across regions** to reduce latency for users in another part of the world or to satisfy data-residency requirements
* **Stage Xano platform upgrades safely** by running a tenant on a newer (or older) platform release and validating against it before rolling that version out everywhere else

Higher tenant tiers extend this further: a Dedicated tenant gets its own CPU, memory, and storage so it's insulated from noisy neighbors and can be sized to its workload, and a Remote tenant runs on infrastructure in a specific region or cluster you control. See [Tenant Types](#tenant-types) for the full breakdown.

### Tenant vs. branch vs. workspace

| Use a...      | When you need...                                                                                   |
| ------------- | -------------------------------------------------------------------------------------------------- |
| **Branch**    | An isolated edit state inside the same workspace for a feature or experiment. No separate runtime. |
| **Tenant**    | An isolated runtime with its own database and URL, sharing logic released from a source workspace. |
| **Workspace** | A fully separate project with its own branches, releases, and tenants.                             |

## Using Tenant Center

This section walks the full Tenant Center flow in the order you'll actually use it: create a tenant, call its APIs, and deploy a release to it.

### Creating New Tenants

<Steps>
  <Step title="From your main (usually your production or primary development) workspace, head to the Tenant Center from the left-hand navigation menu.">
    You'll find it located under the Marketplace (if you have it enabled) or the Library.

    <Frame>
      <img src="https://mintcdn.com/xano-997cb9ee-docs-tenant-center/uyc3Z1s2XmmZ4ksr/images/594627c1-image.jpeg?fit=max&auto=format&n=uyc3Z1s2XmmZ4ksr&q=85&s=eda1599448cb8628244ad84b8ee4033d" width="376" height="222" data-path="images/594627c1-image.jpeg" />
    </Frame>
  </Step>

  <Step title="Click Add Tenant to create a new tenant.">
    Click <span class="ui-bubble"><Icon icon="plus" /> Add Tenant</span> to create a new tenant.

    Remember, tenants can be either your own stage and production environments, or actual separate user workspaces.

    When adding a new tenant, you'll need to provide some basic information.

    | Parameter                                      | Purpose                                                                                                                                                                                                                                              | Example                                                                  |
    | ---------------------------------------------- | ---------------------------------------------------------------------------------------------------------------------------------------------------------------------------------------------------------------------------------------------------- | ------------------------------------------------------------------------ |
    | Display Name                                   | The name of the tenant workspace                                                                                                                                                                                                                     | Stage, Beta, Customer ABC                                                |
    | Description                                    | A description of the tenant workspace                                                                                                                                                                                                                | "Staging changes for testing" "Workspace for customer ABC" "Beta access" |
    | Type                                           | See [Tenant Types](#tenant-types)                                                                                                                                                                                                                    |                                                                          |
    | <Icon icon="arrow-turn-down-right" /> Platform | Choose which Xano release you want your Tenant to deploy with.                                                                                                                                                                                       | The latest release is recommended.                                       |
    | <Icon icon="arrow-turn-down-right" /> Cluster  | See [Tenant Clusters](#tenant-clusters)                                                                                                                                                                                                              |                                                                          |
    | RBAC Override                                  | Enable this option to set specific user permissions for this tenant. See the [RBAC: Tenant Center](#rbac-tenant-center) section below for more information.                                                                                          |                                                                          |
    | Ingress Enabled                                | Enable or disable ingress (incoming traffic) for this tenant. Disabling ingress will prevent any API calls from reaching this tenant. Use this if traffic is routed through your own gateway/load balancer instead of Xano's default ingress.        |                                                                          |
    | Tags                                           | Apply tags to your tenants to easily filter them when searching and deploying new changes. Great for things like separating subscription tiers or tagging development-specific, internal tenants. <br />**This is optional, but highly recommended** | dev prod beta                                                            |
    | Custom Domain                                  | Custom domains require additional setup outside of Xano. Please reach out to support for more details.                                                                                                                                               |                                                                          |
  </Step>
</Steps>

<Info>
  ## **A note on new tenant creation**

  Creating a new tenant does not deploy a release to it by default.
</Info>

### Developing and Deploying Releases

Once you have one or more tenants, you push changes to them by cutting a **release** from your source workspace and deploying it. A release is a snapshot of **logic and schema only** — no data — taken from a source branch. Deploying a release to a tenant overwrites its function stacks, APIs, and table structure, but **preserves**:

* Tenant database records
* Environment variables
* Backups
* RBAC overrides
* Ingress and infrastructure settings

<Note>
  **Worth a quick read: "release" and "platform" are two different things in Xano.**

  A **release** (what this section is about) is a snapshot of *your* workspace logic and schema that you deploy to tenants. A tenant's **platform** is the version of Xano itself that tenant is running, chosen via the **Platform** setting when you create the tenant.

  The two are completely independent — updating a tenant's platform won't deploy your workspace changes, and deploying a release won't change the platform a tenant is running on.
</Note>

<Warning>
  **Take a backup before deploying.** There is no built-in release rollback — if a deploy introduces a regression, you recover by either restoring the tenant from a pre-deploy backup or redeploying a previous release. See [Backups](#backups) for the restore flow.
</Warning>

<Steps>
  <Step title="Make any changes you'd like to deploy in your development tenant. Push them to your stage tenant if you're using one.">
    Just make sure you're deploying from the tenant that contains your final, tested round of changes to push live to your tenants.
  </Step>

  <Step title="Use the tag selector to filter only the tenants you want to deploy to.">
    Select the appropriate tags and click **Apply**. Remember, you can also deploy to a single tenant by clicking the <img src="https://mintcdn.com/xano-997cb9ee-docs-tenant-center/nLFElrTvB_3W2RS1/images/f85fc869-image.jpeg?fit=max&auto=format&n=nLFElrTvB_3W2RS1&q=85&s=07de9269f83be01ae89ac9f7bd276f2f" className="inline m-0" width="10" height="19" data-path="images/f85fc869-image.jpeg" /> icon on that specific tenant.

    <Frame>
      <img src="https://mintcdn.com/xano-997cb9ee-docs-tenant-center/cadqcCiW0Bk9umYC/images/c44457db-image.jpeg?fit=max&auto=format&n=cadqcCiW0Bk9umYC&q=85&s=6684894ac91e314eb151e0ee6c8f88f3" width="407" height="299" data-path="images/c44457db-image.jpeg" />
    </Frame>
  </Step>

  <Step title="Set up a new release.">
    Click <span class="ui-bubble">Releases</span> at the top of the page to open the Releases panel.

    In the Releases panel, click <span class="ui-bubble"><Icon icon="plus" /> Add New Release</span>

    Give your new release a name, a description, and choose the source branch you'll be deploying changes from.

    <Frame>
      <img src="https://mintcdn.com/xano-997cb9ee-docs-tenant-center/kCxi4At8aiWv9vf6/images/05628d02-image.jpeg?fit=max&auto=format&n=kCxi4At8aiWv9vf6&q=85&s=2270e15543a34ca65c7cc4508a65bee8" width="406" height="219" data-path="images/05628d02-image.jpeg" />
    </Frame>

    When you're ready, click <span class="ui-bubble">Create</span> at the bottom of the panel.
  </Step>

  <Step title="Select the tenants you'd like to deploy to.">
    You can click the checkbox at the top to select all currently shown tenants, or select individual tenants yourself.

    When deploying to multiple tenants, deployment runs sequentially. If a tenant fails (for example, an invalid database reference), the deploy stops on that tenant and remaining tenants are skipped — resolve the failure and re-run the deploy against the remaining tenants.

    <Frame>
      <img src="https://mintcdn.com/xano-997cb9ee-docs-tenant-center/Hln3opCLxPVIX6Cf/images/c43c6f90-image.jpeg?fit=max&auto=format&n=Hln3opCLxPVIX6Cf&q=85&s=3f01081b924de7719e1f281f6880559e" width="366" height="275" data-path="images/c43c6f90-image.jpeg" />
    </Frame>
  </Step>

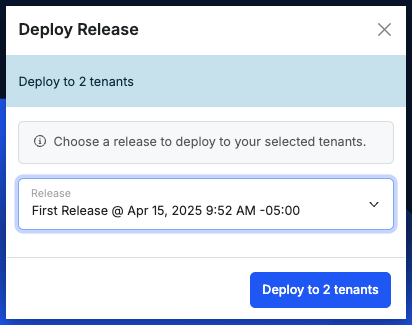
  <Step title="Deploy Release">
    Click <img src="https://mintcdn.com/xano-997cb9ee-docs-tenant-center/cadqcCiW0Bk9umYC/images/d67529d9-image.jpeg?fit=max&auto=format&n=cadqcCiW0Bk9umYC&q=85&s=4b60e10adae444ec054fc49610fb7e30" className="inline m-0" width="112" height="26" data-path="images/d67529d9-image.jpeg" /> at the top of the page to deploy a release to your selected tenants.

    Select the release to deploy and click the Deploy button at the bottom of the panel.

    <Frame>
      <img src="https://mintcdn.com/xano-997cb9ee-docs-tenant-center/cadqcCiW0Bk9umYC/images/d450e2be-image.jpeg?fit=max&auto=format&n=cadqcCiW0Bk9umYC&q=85&s=7efca33090eb027a73f6a1ae877cf646" width="412" height="325" data-path="images/d450e2be-image.jpeg" />
    </Frame>

    After deployment, the **Release Stats** table at the top will give you quick visibility into your deployment metrics.

    <Frame>
      <img src="https://mintcdn.com/xano-997cb9ee-docs-tenant-center/HJhBiFpN3qlcIO_6/images/e2614260-image.jpeg?fit=max&auto=format&n=HJhBiFpN3qlcIO_6&q=85&s=e1ae31f152d915864ce28ee00112305b" width="378" height="100" data-path="images/e2614260-image.jpeg" />
    </Frame>
  </Step>
</Steps>

### Calling Tenant APIs

Each tenant will have their own base URL, which can be used to call a tenant's APIs directly. You can find this URL and more by clicking <span class="ui-bubble"><Icon icon="ellipsis-vertical" /></span> and choosing <span class="ui-bubble">Details</span>.

You can also utilize the `X-Tenant` header to route a request to a specific tenant instead of using that tenant's base URL. Set the header as `X-Tenant: <tenant name>` against your source workspace's base URL and the request will be routed to that tenant. This is useful when a single frontend needs to target multiple tenants without swapping base URLs.

## Managing Tenants

Once you've created a tenant, you can click the <span class="ui-bubble">⋮</span> icon to access tenant settings.

### Edit Tenant

Change the settings applied when creating the tenant, such as the display name or description.

| Option                                                                       | Description                                                       |
| ---------------------------------------------------------------------------- | ----------------------------------------------------------------- |
| <Icon icon="arrow-turn-down-right" /> Display Name                           | Change the human readable name of the tenant                      |
| <Icon icon="arrow-turn-down-right" /> Description                            | Edit the tenant description                                       |
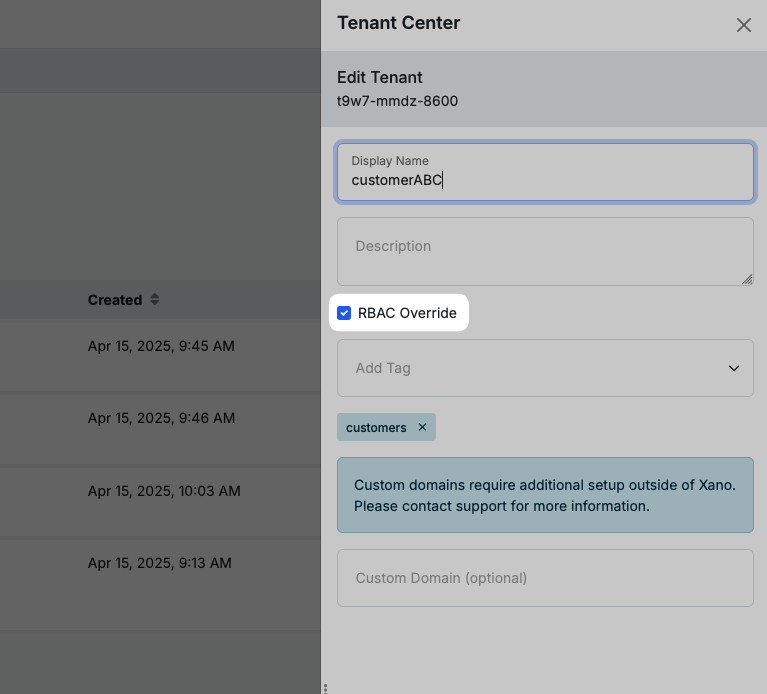
| <Icon icon="arrow-turn-down-right" /> Enable [RBAC Override](#rbac-override) | Allows for tenant-specific RBAC configuration                     |
| <Icon icon="arrow-turn-down-right" /> Add or Edit Tags                       | Use tags for easily searching for related items in your workspace |
| <Icon icon="arrow-turn-down-right" /> Custom Domain                          | Add a custom domain (contact support for setup information)       |
| <Icon icon="arrow-turn-down-right" /> Proxy URL                              | Forward all requests to a different URL                           |

### Deploy Release

Push a release (a snapshot of your workspace logic and schema) to this specific tenant. This is the same flow described in [Developing and Deploying Releases](#developing-and-deploying-releases), scoped to a single tenant.

When you open the panel you'll see:

* **Release selector** — choose any release from the source workspace. Each entry shows the release name, hotfix label (if any), and the timestamp it was created.
* **View Changes** — opens a diff of the current tenant content versus the selected release so you can review exactly what will change before deploying. If the tenant is already on the selected release, this option is disabled.
* **Deploy** — runs the deployment. The panel reports per-tenant progress and elapsed time.

A few behaviors worth knowing:

* If a release references a database object (table, field, etc.) that doesn't exist on the target tenant, the deploy fails with a database reference error and the tenant is left on its previous release. Resolve the missing reference and re-run the deploy.
* You can deploy to multiple tenants in one operation from the main Tenant Center view; deployment runs sequentially and stops on the first failure.
* Deploy Release does **not** change the tenant's platform version — for that, use Deploy Platform below.

### Deploy Platform

Update the **Xano platform version** this tenant runs on. This is independent of Deploy Release: a release ships *your* workspace logic, while Deploy Platform updates the underlying Xano runtime the tenant executes against.

The panel shows:

* **Platform selector** — choose any available Xano platform version. Each entry shows the platform ID, name, and the date it was published. The selector defaults to the tenant's current platform.
* **Deploy** — applies the selected platform to the tenant.

While the platform deploy is running you'll see *"Your tenant is being updated. This may take a few minutes."* — the tenant's pods are recreated against the new platform image, so expect a brief restart of the affected services.

Use Deploy Platform to:

* Stage a tenant on a newer platform version to validate your workspace against it before rolling that version out to production tenants
* Pin a tenant to a specific platform version for stability
* Catch a tenant up to the platform other tenants are already running

<Note>
  Deploy Platform is available on Resource Isolation (Dedicated) and Regional Isolation (Remote) tenants. Shared Namespace tenants run on the same platform as the source instance and don't expose this option.
</Note>

### Manage Resources

Edit the CPU, memory, storage, autoscaling, affinity, and toleration settings for this tenant's deployments. Available on Resource Isolation and Regional Isolation tenants.

This panel is covered in detail in [Configuring Resources for Tenants](#configuring-resources-for-tenants), including the Small / Medium / Large templates, the Custom editor, per-deployment configuration for the database and Redis instances, the Horizontal Pod Autoscaler fields, and how affinity and toleration rules interact.

Two save options are available at the bottom of the panel:

* **Save** — persists your resource changes without redeploying the tenant's platform.
* **Save & Deploy** — persists the changes and immediately redeploys the platform so the new resource allocation takes effect. If the tenant has no platform assigned yet, only Save is available.

### Infrastructure

A read-only observability view into the live Kubernetes resources backing this tenant. Use it to check pod health, verify a deployment rolled out correctly, look up the tenant's external IP, or confirm storage is provisioned.

The panel is organized into six tabs, each backed by live data from the cluster. A **Refresh** button at the top reloads the current tab.

| Tab             | What it shows                                                                                                                                                                                         |
| --------------- | ----------------------------------------------------------------------------------------------------------------------------------------------------------------------------------------------------- |
| **Pods**        | Every running pod with current CPU usage, RAM usage, age, restart count, lifecycle phase, and ready status. Click a row to see container images, ports, resource requests/limits, and status history. |
| **Deployments** | Each deployment with ready vs. desired replica counts and the container image being used. Click through for full container specs.                                                                     |
| **Services**    | Service discovery details: service type (ClusterIP, LoadBalancer, etc.), cluster IPs, external IP, and exposed ports. Useful for tracing how traffic reaches the tenant.                              |
| **PVCs**        | Persistent Volume Claims: name, status, capacity, access modes, storage class, and age. This is where you confirm the database's persistent storage is healthy.                                       |
| **Ingress**     | Ingress configuration: ingress class, hostnames, and the load balancer address or IP that external traffic enters through.                                                                            |
| **Jobs**        | Kubernetes Jobs associated with the tenant: name, start time, age, completion count, and success count.                                                                                               |

CPU is reported in cores or millicores (e.g. `1.2 cores` or `850m`) and memory in Gi or Mi depending on magnitude.

The Infrastructure panel is read-only — to change any of these values, use [Manage Resources](#manage-resources) or [Deploy Platform](#deploy-platform).

### Impersonate

Access the tenant in its current state. Great for troubleshooting tenant-specific issues and manual verification of pushed changes

### Environment Variables

You can access and manage this tenant's environment variables from here. Use these to store things like API keys and other sensitive information to be used in that tenant's function stacks.

For example, if you are pushing a feature that calls OpenAI, and each tenant has their own OpenAI API key, you'd put that here and just make sure the variable name matches what your function stacks reference.

### Backups

Create or restore a backup of a tenant

### Logs

Review logs directly associated with that tenant, such as release deployments, backups, and impersonations.

<Frame>
  <img src="https://mintcdn.com/xano-997cb9ee-docs-tenant-center/Ziuz6VvpYItirmv5/images/3dae731a-image.jpeg?fit=max&auto=format&n=Ziuz6VvpYItirmv5&q=85&s=721a9a9af15228a44d81667d6036e55b" width="409" height="245" data-path="images/3dae731a-image.jpeg" />
</Frame>

***

## Tenant Types

Some workspaces may have access to different tenant types, which unlock significant operational flexibility beyond the default Shared Namespace. Upgrading to a Dedicated or Remote tenant lets you:

* **Choose dedicated CPU, memory, and storage** so a tenant is insulated from noisy neighbors and can be sized to its actual workload
* **Pin a tenant to a specific region** for data residency compliance or to reduce latency for users in that region
* **Run a tenant on a specific Xano platform release**, which is invaluable for safe development — you can stage a tenant on a newer or older platform version and validate your workspace against it before rolling that platform version out to production tenants

When creating a new tenant, you may see a **Type** dropdown. This allows you to select which tenant type to assign to the new tenant.

### What's available at each tier

| Capability                                                  | Data Isolation (Shared) | Resource Isolation (Dedicated) | Regional Isolation (Remote) |
| ----------------------------------------------------------- | ----------------------- | ------------------------------ | --------------------------- |
| Isolated database and base URL                              | ✓                       | ✓                              | ✓                           |
| Deploy releases from a source workspace                     | ✓                       | ✓                              | ✓                           |
| Per-tenant environment variables, backups, and impersonate  | ✓                       | ✓                              | ✓                           |
| Dedicated CPU, RAM, and storage (no noisy-neighbor effects) | —                       | ✓                              | ✓                           |
| Configurable Horizontal Pod Autoscaler                      | —                       | ✓                              | ✓                           |
| Pin to a specific Xano platform version (Deploy Platform)   | —                       | ✓                              | ✓                           |
| Live infrastructure observability (pods, PVCs, ingress…)    | —                       | ✓                              | ✓                           |
| Run in a specific region or your own Kubernetes cluster     | —                       | —                              | ✓                           |
| Data residency for compliance use cases                     | —                       | —                              | ✓                           |

Shared tenants are the right starting point when isolation between customers is the only goal and your workloads can safely share resources. Dedicated tenants add control over the infrastructure each tenant runs on — sizing, autoscaling, platform version, and live observability — which is what you need once a tenant has SLAs, predictable load requirements, or has to be staged on a specific Xano version. Regional tenants extend that further by running on infrastructure in a region or cluster you control, which is the only option that satisfies data-residency requirements or in-region latency targets.

| Type                                     | Description                                                     | Pick this when                                                                                           |
| ---------------------------------------- | --------------------------------------------------------------- | -------------------------------------------------------------------------------------------------------- |
| Data Isolation (Shared Namespace)        | Shares resources with the source instance. No extra settings.   | You need data isolation between customers but the workloads can safely share resources. Lowest overhead. |
| Resource Isolation (Dedicated Namespace) | Gets dedicated resources; you choose allocation after creation. | A tenant has predictable load requirements, SLAs, or noisy-neighbor concerns.                            |
| Regional Isolation (Remote Namespace)    | Runs on dedicated resources in a different cluster/region.      | You have data residency requirements or need to reduce latency for users in another region.              |

<Warning>
  Tenant type is set at creation and cannot be changed afterward. To move a tenant to a different type, create a new tenant at the desired type and migrate data via backup/restore.
</Warning>

### Tenant Infrastructure

When deploying a *Resource Isolation (Dedicated Namespace)* or *Regional Isolation (Remote Namespace)* tenant, after creating the tenant you'll be prompted to select the specific infrastructure allocation for that tenant. We offer three pre-defined infrastructure packages, plus a Custom option:

* Small = “Get me live fast.”
  Best for MVPs, prototypes, internal tools, early-stage production, or moderate traffic.

* Medium = “We’re in production and growing.”
  For apps with steady real users, more endpoints, more background jobs, and higher concurrency.

* Large = “We need serious headroom.”
  Built for high traffic, enterprise workloads, heavy automation, larger datasets, and lots of simultaneous users.

* Custom = manually define all aspects of a tenant's available resources for more advanced configurations.

<Frame caption="Building a Custom Configuration">
  <img src="https://mintcdn.com/xano-997cb9ee/-MN8ESCfR4YZwvOf/images/tenant-center-20260407-173252.png?fit=max&auto=format&n=-MN8ESCfR4YZwvOf&q=85&s=32d8f5dd47ead9ff68c8b7cf40df732b" alt="tenant-center-20260407-173252" width="1170" height="1854" data-path="images/tenant-center-20260407-173252.png" />
</Frame>

### Configuring Resources for Tenants

**Resource Isolation** and **Regional Isolation** tenants both run on dedicated infrastructure, which means you control exactly how much CPU, memory, storage, and scaling capacity is allocated to each deployment. After a qualified tenant is created, open its **⋮** menu and choose **Manage Resources** to open the resource configuration panel.

#### Templates vs Custom

At the top of the panel you'll see four options: **Small**, **Medium**, **Large**, and **Custom**.

* Clicking **Small / Medium / Large** applies one of the predefined infrastructure packages described above — a quick starting point for most tenants.
* Any time you change an individual value, the selection automatically switches to **Custom**, indicating that you've diverged from a template. You can return to a template at any point by re-selecting it (this will overwrite your custom values).
* Toggling **Verbose** at the top reveals additional detail in the summary view, including affinity and toleration rules.

#### Deployments

A tenant with configurable resources is made up of two independently configurable deployments:

* **Database** — the tenant's Postgres instance, including persistent storage
* **Redis** — the tenant's Redis instance, used for caching and realtime features

Each deployment can be toggled **ON** or **OFF** using the colored buttons near the top of the panel. Disabling a deployment frees its resources but will disable any tenant functionality that depends on it, so only turn these off if you're sure your tenant doesn't need them.

Click the edit (pencil) icon on a deployment to configure its resources.

#### CPU and RAM

For each deployment you can configure four values:

| Field         | Purpose                                                |
| ------------- | ------------------------------------------------------ |
| Requested CPU | The minimum CPU Kubernetes guarantees to the container |
| Limit CPU     | The maximum CPU the container is allowed to consume    |
| Requested RAM | The minimum memory guaranteed to the container         |
| Limit RAM     | The maximum memory the container is allowed to consume |

Requested values reserve capacity on the node; limits cap burst usage. As a rule of thumb, set requests to what the workload normally needs and limits to a safe ceiling above that. Setting requests equal to limits gives you the most predictable performance.

#### Autoscaler (Horizontal Pod Autoscaler)

Deployments that support autoscaling expose an **Autoscaler** section with three fields:

| Field         | Purpose                                                  |
| ------------- | -------------------------------------------------------- |
| Min replicas  | Minimum number of pods to keep running at all times      |
| Max replicas  | Maximum number of pods the autoscaler can scale up to    |
| CPU threshold | Target CPU utilization percentage that triggers scale-up |

When average CPU across running pods exceeds the threshold, Kubernetes adds replicas (up to **Max**). When utilization drops, it scales back down (no lower than **Min**). Increase **Min replicas** for workloads that need hot capacity on standby; increase **Max replicas** to give the tenant more headroom for traffic spikes.

#### Storage

For deployments with persistent storage (the database), set the **Storage** value to the size of the persistent volume. Storage can typically be increased later but not decreased, so start conservatively and grow as needed.

#### Affinity

**Affinity** rules control which nodes in the cluster your tenant's pods are allowed to run on. This is especially useful on Regional Isolation clusters where you've tagged nodes by zone, hardware class, or customer. Each expression consists of:

* **Key** — the node label to match (e.g. `topology.kubernetes.io/zone`)
* **Operator** — `In`, `NotIn`, `Exists`, `DoesNotExist`, `Gt`, `Lt`
* **Value** — the value (or values) to match against
* **Type** — `Required` (hard constraint; pods won't schedule without a match) or `Preferred` (soft constraint; scheduler tries but will fall back)

Click **Add Affinity...** to add additional expressions. All expressions are combined to select eligible nodes.

#### Toleration

**Tolerations** let tenant pods run on nodes that have been tainted — for example, nodes reserved for a specific customer or workload class. Each toleration consists of:

* **Key** — the taint key on the node
* **Value** — the taint value (when applicable)
* **Operator** — `Equal` or `Exists`
* **Effect** — `NoSchedule`, `PreferNoSchedule`, or `NoExecute`

Tolerations don't *require* the pod to run on tainted nodes — they just allow it to. Combine tolerations with affinity rules when you need to both allow and require placement on specific nodes.

#### Saving changes

When you're finished, click **Ok** to close the edit view for a deployment, then **Save & Deploy** (or **Deploy** if you arrived from another flow) at the bottom of the panel. Resource changes are rolled out immediately, which may cause a brief restart of the affected deployment.

## Tenant Clusters

A **Tenant Cluster** is a remote Kubernetes cluster registered with your instance and used to host **Regional Isolation** tenants (the *Remote Namespace* type). Tenant Clusters are what make it possible for a tenant created in the Tenant Center to run in a different region, a dedicated production environment, or any other Kubernetes footprint you control.

Typical use cases:

* Hosting tenants in a specific geographic region for latency or data-residency requirements
* Running isolated production environments separate from your main instance
* Dedicating infrastructure to a particular customer or customer segment

Tenant Clusters are managed from the Tenant Clusters panel (available on plans that include Regional Isolation). Once a cluster is registered, it becomes a selectable target when you create a Regional Isolation tenant in the Tenant Center.

### Creating a Tenant Cluster

From the Tenant Clusters panel, click **Add new cluster** and provide:

| Field                    | Purpose                                                                                                                                                                                                  |
| ------------------------ | -------------------------------------------------------------------------------------------------------------------------------------------------------------------------------------------------------- |
| Cluster Name             | Display name used when selecting the cluster during tenant creation                                                                                                                                      |
| Description              | Optional notes about the cluster's purpose                                                                                                                                                               |
| Type                     | **Standard** for on-demand tenants, or **Run** to keep a pool of pre-provisioned ("warm") tenants ready for fast assignment                                                                              |
| Warm Tenants by Template | *(Run type only)* Number of warm tenants to keep on deck for each template size: Small, Medium, Large, and Custom                                                                                        |
| Domain                   | Base domain for the cluster. Each tenant deployed to this cluster will be a subdomain of this domain by default (per-tenant custom domains are still supported)                                          |
| Ingress Settings         | *(Optional)* Xano Secret, Xano TLS Host, Custom Secret, Custom TLS Host, and YAML Annotations for the ingress controller. Tenant variables such as `{{tenant.name}}.domain.com` can be used in any field |
| Credentials (KubeConfig) | The KubeConfig YAML used to authenticate against the target cluster *(see below)*                                                                                                                        |

### KubeConfig

The **Credentials** field accepts a standard Kubernetes `kubeconfig` YAML document — the same file format produced by `kubectl config view --raw` or by your cloud provider's CLI (e.g. `aws eks update-kubeconfig`, `gcloud container clusters get-credentials`, `az aks get-credentials`).

Xano uses this KubeConfig to connect to your cluster and provision, update, and remove tenant workloads. A few things to keep in mind:

* **Required permissions** — the credentials must have sufficient RBAC permissions in the target cluster to create and manage namespaces, deployments, services, ingresses, and secrets.
* **Network reachability** — the cluster's API server must be reachable from Xano. If your control plane is behind an IP allow-list, make sure Xano's outbound IPs are whitelisted before saving the KubeConfig.
* **Long-lived credentials** — prefer service-account tokens or other long-lived credentials over short-lived user tokens, since Xano needs ongoing access to manage tenants over the cluster's lifetime.
* **Updating credentials** — you can rotate the KubeConfig at any time by opening the cluster, clicking **Credentials**, and pasting the new YAML. This requires the `TenantClusterSecrets: Update` permission.

<Warning>
  The KubeConfig grants Xano administrative access to the target cluster. Store and rotate it with the same care you'd apply to any other cluster admin credential.
</Warning>

### Editing and Deleting Clusters

Opening a cluster from the list shows its general settings and ingress configuration. From here you can:

* **Edit** general settings — name, description, type, warm pool sizes, and domain
* **Edit Ingress** — update ingress secrets, TLS hosts, and annotations independently of the general settings
* **Credentials** — view or replace the cluster's KubeConfig
* **Delete** — remove the cluster registration. Deletion requires typing a confirmation phrase and cannot be undone

### How Tenant Clusters relate to the Tenant Center

Tenant Clusters are the infrastructure layer; the Tenant Center is where you create and operate the tenants that run on them. The flow is:

1. **Register a cluster** in Tenant Clusters by supplying its KubeConfig, domain, and ingress settings.
2. **Create a tenant** in the Tenant Center and choose **Regional Isolation** (*Remote Namespace*) as the type.
3. **Select the cluster** you registered as the target for that tenant.
4. **Deploy releases** to the tenant from the Tenant Center exactly as you would for any other tenant — the release is deployed into the remote cluster transparently.

If you're using a **Run**-type cluster with warm tenants configured, new tenant creation pulls from the warm pool for near-instant provisioning; Xano then replenishes the pool in the background.

### Permissions

Tenant Cluster management is gated by dedicated RBAC permissions:

* **TenantCluster** — Create, Read, Update, Delete cluster registrations
* **TenantClusterSecrets** — Read and Update the KubeConfig credentials stored on a cluster

## RBAC: Tenant Center

The Tenant Center addon includes additional [Role-based Access Control (RBAC)](/team-collaboration/role-based-access-control-rbac) settings you can use to manage tenant-related permissions.

These permissions include:

* **Tenant Center** - Enables access to the Tenant Center

* **Tenant Center RBAC** - Enables access to Tenant Center RBAC Override settings *Note: This does not disable the ability to disable/enable Tenant Center RBAC Overrides, but does disable access to editing the specific override settings.*

* **Tenant Center Logs** - Enables access to the logs inside of the Tenant Center

* **Tenant Center Backup** - Determines if a user can modify backup settings or perform backup/restore operations for tenants

* **Tenant Center Deploy** - Determines if a user can deploy releases to tenants

* **Tenant Center Impersonate** - Determines if a user can impersonate (access directly) a tenant

* **Tenant Center Secrets** - Enables access to secrets for a tenant, such as [Environment Variables](/the-function-stack/environment-variables)

### RBAC Override

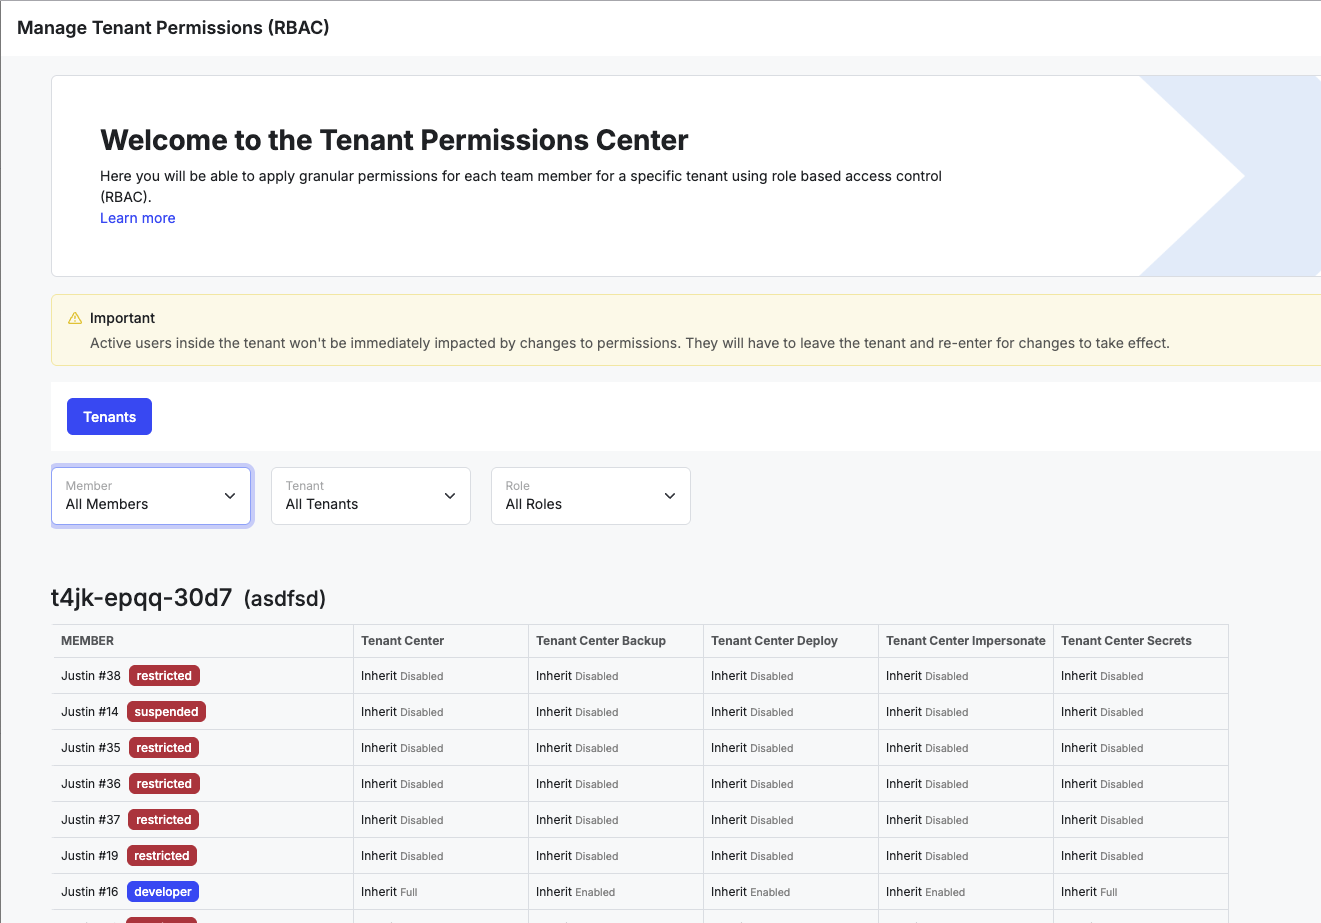
From the **Edit Tenant** panel, you can enable **RBAC Override**. This option allows you to specify individual user permissions for each tenant by clicking **RBAC** at the top of the Tenant Center.

<Frame caption="Enabling the RBAC Override option">
  <img src="https://mintcdn.com/xano-997cb9ee-docs-tenant-center/m01Lj7YE2_vScNay/images/2b2fb573-image.jpeg?fit=max&auto=format&n=m01Lj7YE2_vScNay&q=85&s=bcaaff85f8ff2f42f9754942cde945e9" width="767" height="694" data-path="images/2b2fb573-image.jpeg" />
</Frame>

<Frame caption="An example of available permissions with RBAC Override enabled">
  <img src="https://mintcdn.com/xano-997cb9ee-docs-tenant-center/kCxi4At8aiWv9vf6/images/064a8081-image.jpeg?fit=max&auto=format&n=kCxi4At8aiWv9vf6&q=85&s=a99f596a1fe60f2d98ba2f80648ac283" width="1321" height="923" data-path="images/064a8081-image.jpeg" />
</Frame>

### Common role recipes

| Role                                                                                       | Permissions to grant                                                                                                            |
| ------------------------------------------------------------------------------------------ | ------------------------------------------------------------------------------------------------------------------------------- |
| **Deploy operator** — can ship releases but not change tenant config or read secrets       | Tenant Center, Tenant Center Deploy, Tenant Center Logs                                                                         |
| **Read-only auditor** — can review tenant state and deploy history without making changes  | Tenant Center, Tenant Center Logs                                                                                               |
| **Tenant admin** — full lifecycle ownership of a tenant including secrets and backups      | Tenant Center, Tenant Center Deploy, Tenant Center Backup, Tenant Center Secrets, Tenant Center Impersonate, Tenant Center Logs |
| **Support engineer** — can impersonate to troubleshoot but cannot deploy or change secrets | Tenant Center, Tenant Center Impersonate, Tenant Center Logs                                                                    |

## Best Practices

<Steps>
  <Step title="Tag your tenants">
    Using tags is crucial to quick and consistent work inside of the Tenant Center, especially as the number of tenants you have grows.
  </Step>

  <Step title="Follow a traditional deployment framework">
    This would include developing on a **development** tenant, pushing final changes to a **stage** tenant where all of your [QA and testing](/testing-debugging/test-suites) happens, and then deploying releases from **stage**.

    Read more about the entire Development Lifecycle [here](/before-you-begin/the-development-life-cycle).
  </Step>

  <Step title="Inform your users of upcoming deployments">
    In most cases, it's good practice to make sure your users are aware of upcoming changes.
  </Step>
</Steps>