> ## Documentation Index
> Fetch the complete documentation index at: https://docs.xano.com/llms.txt
> Use this file to discover all available pages before exploring further.
# AI-Assisted Development
> Use Claude Code with the Xano Developer MCP and the Xano CLI to build your backend with AI.
export const BrowserFrame = props => {
const {url = "xano.run", maxWidth = 820, className = "", lightSrc, darkSrc, alt = "", children} = props || ({});
const style = typeof maxWidth === "number" ? {
maxWidth: `${maxWidth}px`,
margin: "16px 0"
} : {
maxWidth,
margin: "16px 0"
};
const hasSwapImages = Boolean(lightSrc && darkSrc);
return
{hasSwapImages ? <>


: children}
;
};
The following guide walks you through setting up an AI-powered [XanoScript](xanoscript/introduction) development workflow in **VS Code** using **Claude Code**, the **Xano Developer MCP**, and the **Xano CLI**.
**Prerequisites:** [Node.js](https://nodejs.org/) 18+, [VS Code](https://code.visualstudio.com/), and [Git](https://git-scm.com/downloads) installed.
This guide uses Claude Code, but the Developer MCP works with Cursor, Codex, Windsurf, VS Code Copilot, and other MCP-compatible AI tools. See the [Developer MCP guide](/developer-mcp/get-started) for platform-specific setup.
Install [Claude Code](https://docs.anthropic.com/en/docs/claude-code/overview) — the AI assistant you'll use to write and modify XanoScript locally.
```bash theme={null}
npm install -g @anthropic-ai/claude-code
```
Open your terminal and install the [Xano CLI](/xano-cli/get-started) globally using npm:
```bash theme={null}
npm install -g @xano/cli
```
Then authenticate and pull your workspace:
```bash theme={null}
xano auth
xano workspace pull -d ./my-workspace
```
This creates a `my-workspace` folder in your current directory and downloads your workspace into it. You can also pull into the current folder with `xano workspace pull .`
Next, we recommend initializing a Git repository in your workspace folder so you can track and review the details of what changed before each push.
See the [CLI Get Started](/xano-cli/get-started) guide for full details.
Open the pulled workspace folder in VS Code, then install the [XanoScript Language Server](https://marketplace.visualstudio.com/items?itemName=xano.xanoscript-language-server) extension. This provides syntax highlighting, inline validation, and autocomplete for `.xs` files — without it, they appear as plain text with no error feedback.
**Already using the full XanoScript extension?** If you want to keep it for push/pull, that's fine — but delete any `agents.md` or other `.md` artifact files it created in your workspace root, as these can conflict with the Developer MCP and confuse AI assistants. For the best experience, we recommend using the [XanoScript Language Server](https://marketplace.visualstudio.com/items?itemName=xano.xanoscript-language-server) extension alongside the CLI for push/pull.
The [Developer MCP](/developer-mcp/get-started) gives AI tools direct access to XanoScript documentation and real-time code validation, significantly improving AI-generated XanoScript quality.
In the VS Code terminal, add the Developer MCP to your project:
```bash theme={null}
claude mcp add xano -- npx -y @xano/developer-mcp
```
Not using Claude Code? See the [Developer MCP guide](/developer-mcp/get-started) for setup instructions for Cursor, Windsurf, Codex, VS Code Copilot, and other AI tools.
Launch Claude Code in VS Code and ask it to make a change. For example:
> Add a step to the auth/signup endpoint that sends a welcome email after a successful registration.
Claude Code will read your existing XanoScript, plan the change, and write the updated code — with the Developer MCP providing documentation and validation along the way.
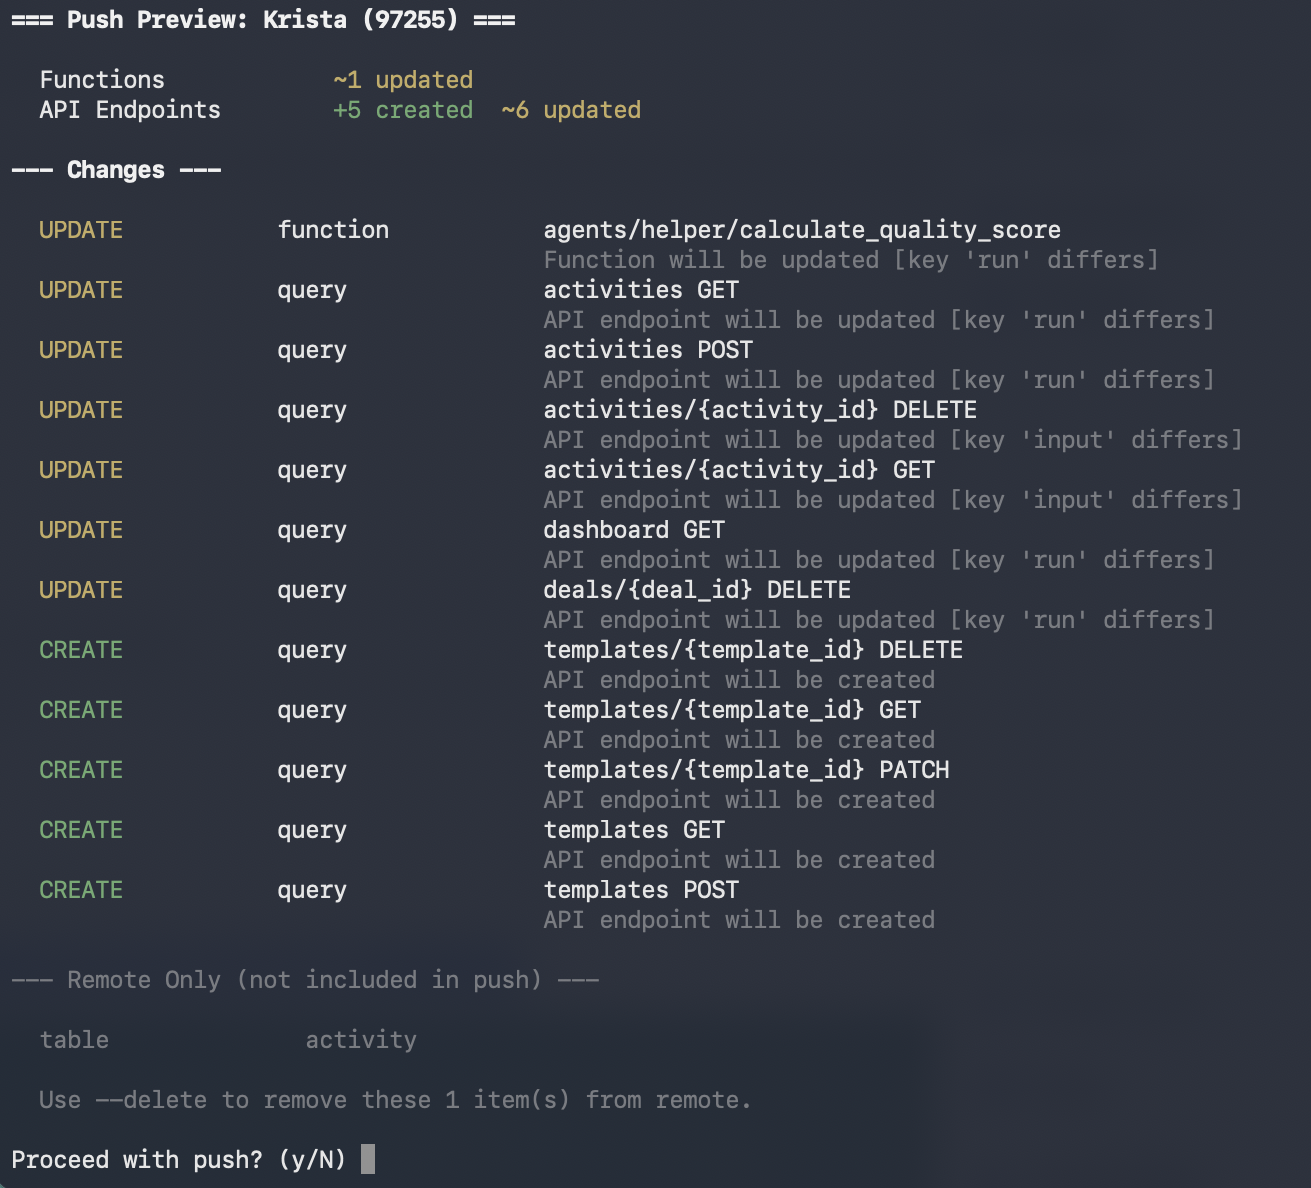
Before pushing, review what the AI changed against your local repository. Pay attention to any table schema changes — renamed or removed columns can affect existing data.
The CLI is safe by default: objects deleted locally won't be removed from your Xano workspace unless you explicitly use the `--delete` flag. If any changes would result in data loss — like dropping a column or deleting a table — the push preview will call them out as destructive operations before you confirm. See [Push & Pull](/xano-cli/push-pull#push-preview) for a full breakdown of what each operation means.
Work on a [development branch](/xano-cli/workspaces-and-branches#create-a-branch) to keep your changes separate from the live branch, or use a **secondary workspace** as your development environment to keep your data schema isolated before promoting to production.
Once you've reviewed your changes, head back to your terminal and run the push yourself — we recommend **not** asking the AI agent to push for you, so you stay in control of what gets applied. See [Using the CLI with AI Agents](/xano-cli/get-started#using-the-cli-with-ai-agents) for tips on managing agent permissions and keeping pushes safe.
**On paid plans**, `xano workspace push` is blocked by default and prompts you to first push to a [Sandbox](/xano-cli/sandbox) — an ephemeral tenant environment where you can test changes, inspect the snapshot diff, and promote them to your workspace. Use `xano sandbox push -d ./my-workspace` and `xano sandbox review` before running the workspace push below.
Start with a dry run to preview what the push will do without applying anything:
```bash theme={null}
xano workspace push -d ./my-workspace --dry-run
```
Review the output carefully, especially any destructive operations or schema changes. When you're ready, run the actual push:
```bash theme={null}
xano workspace push -d ./my-workspace
```
The CLI shows the same preview again and prompts for confirmation before applying anything.
 Send a POST request to your auth/signup endpoint and review the results.
```bash theme={null}
curl -X POST "https://your-xano-instance.xano.io/api:abcD123/auth/signup" \
-H "Content-Type: application/json" \
-d '{
"name": "John Doe",
"email": "john.doe@example.com",
"password": "super_secure_password"
}'
```
You should receive a welcome email shortly after the request completes.
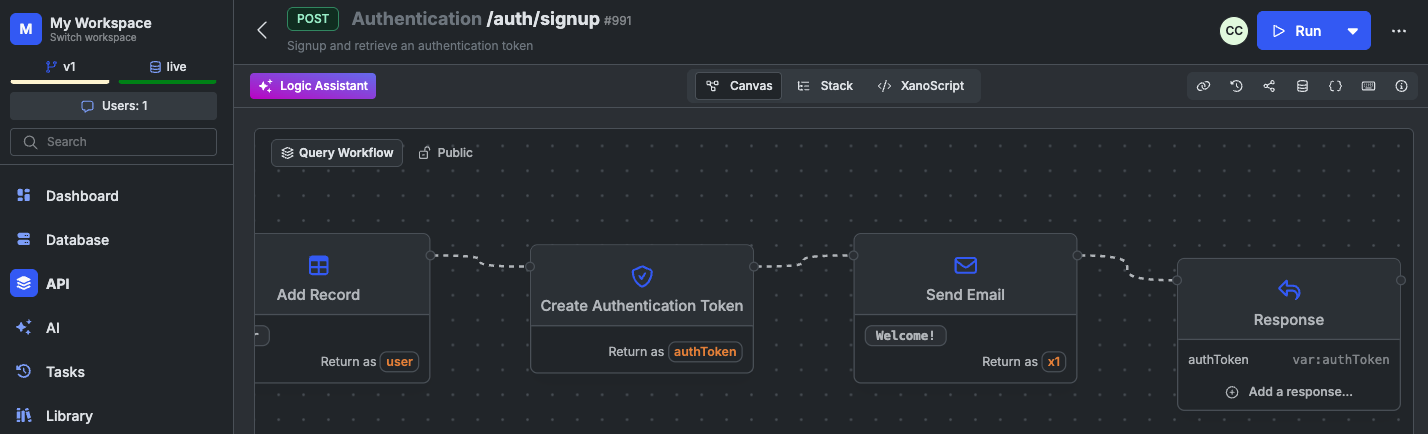
*This step is optional, but you can quickly see the parity between your code and the visual representation.*
Head into Xano, and navigate to your `auth/signup` API by clicking API in the sidebar, choose the **Authentication** group, and click `auth/signup`.
You should see the *Send Email* step at the end of the logic, right after the *Create Authentication Token* step.
Send a POST request to your auth/signup endpoint and review the results.
```bash theme={null}
curl -X POST "https://your-xano-instance.xano.io/api:abcD123/auth/signup" \
-H "Content-Type: application/json" \
-d '{
"name": "John Doe",
"email": "john.doe@example.com",
"password": "super_secure_password"
}'
```
You should receive a welcome email shortly after the request completes.
*This step is optional, but you can quickly see the parity between your code and the visual representation.*
Head into Xano, and navigate to your `auth/signup` API by clicking API in the sidebar, choose the **Authentication** group, and click `auth/signup`.
You should see the *Send Email* step at the end of the logic, right after the *Create Authentication Token* step.
 ## Using a different AI tool?
The Developer MCP isn't limited to Claude Code — it works with any AI tool that supports the Model Context Protocol. See the [Developer MCP guide](/developer-mcp/get-started) for platform-specific setup instructions.
* **[Cursor](/developer-mcp/get-started#cursor)** — Add the MCP server via Settings > Tools & Integrations.
* **[Windsurf](/developer-mcp/get-started#windsurf)** — Add the MCP server via Settings > Cascade > Manage Plugins.
* **[Codex](/developer-mcp/get-started#codex)** — Add a `.codex/mcp.json` file to your project.
* **[VS Code Copilot](/developer-mcp/get-started#vs-code)** — Add a `.vscode/mcp.json` file to your project.
***
## What's next
Explore the full set of tools and resources the Developer MCP exposes to your AI assistant.
Learn about push, pull, branching, workflow tests, and more with the Xano CLI.
Dive deeper into the logic that powers your APIs, functions, and background tasks.
Build AI agents in Xano that can reason, use tools, and take actions.
## Using a different AI tool?
The Developer MCP isn't limited to Claude Code — it works with any AI tool that supports the Model Context Protocol. See the [Developer MCP guide](/developer-mcp/get-started) for platform-specific setup instructions.
* **[Cursor](/developer-mcp/get-started#cursor)** — Add the MCP server via Settings > Tools & Integrations.
* **[Windsurf](/developer-mcp/get-started#windsurf)** — Add the MCP server via Settings > Cascade > Manage Plugins.
* **[Codex](/developer-mcp/get-started#codex)** — Add a `.codex/mcp.json` file to your project.
* **[VS Code Copilot](/developer-mcp/get-started#vs-code)** — Add a `.vscode/mcp.json` file to your project.
***
## What's next
Explore the full set of tools and resources the Developer MCP exposes to your AI assistant.
Learn about push, pull, branching, workflow tests, and more with the Xano CLI.
Dive deeper into the logic that powers your APIs, functions, and background tasks.
Build AI agents in Xano that can reason, use tools, and take actions.