> ## Documentation Index
> Fetch the complete documentation index at: https://docs.xano.com/llms.txt
> Use this file to discover all available pages before exploring further.
# Start from Scratch
> Build a new Xano backend from zero using the CLI and AI
export const BrowserFrame = props => {
const {url = "xano.run", maxWidth = 820, className = "", lightSrc, darkSrc, alt = "", children} = props || ({});
const style = typeof maxWidth === "number" ? {
maxWidth: `${maxWidth}px`,
margin: "16px 0"
} : {
maxWidth,
margin: "16px 0"
};
const hasSwapImages = Boolean(lightSrc && darkSrc);
return
{hasSwapImages ? <>


: children}
;
};
This guide walks you through building a brand new Xano backend entirely from the command line — from initial setup to pushing your first XanoScript.
## Prerequisites
* A [Xano account](https://app.xano.com/signup) (free tier works)
* [Node.js](https://nodejs.org/) 18 or later
* [VS Code](https://code.visualstudio.com/)
* [Git](https://git-scm.com/downloads)
***
If you haven't already, install the CLI globally:
```bash theme={null}
npm install -g @xano/cli
```
Verify with `xano --version`.
Log in with your Xano account:
```bash theme={null}
xano auth
```
Your browser will open for authentication. After logging in, select your instance and name your profile.
For self-hosted or beta environments, add `-o https://your-environment-url.com`. See [Get Started](/xano-cli/get-started#other-environments) for details.
Create a new workspace for your project:
```bash theme={null}
xano workspace create "My New App"
```
Note the workspace ID from the output, then add it to your profile:
```bash theme={null}
xano profile edit -w WORKSPACE_ID
```
Pull the empty workspace scaffold to create your local directory structure:
```bash theme={null}
xano workspace pull -d ./my-new-app
```
This creates the directory structure where you'll add your XanoScript files.
Want to start with a working example instead of an empty workspace? Pull the **Hello World** sample from the [XanoScript examples repo](https://github.com/xano-inc/xanoscript-examples):
```bash theme={null}
xano workspace git pull -d ./my-new-app \
-r https://github.com/xano-inc/xanoscript-examples \
--path helloworld
xano workspace push -d ./my-new-app
```
This gives you tables, functions, and API endpoints to explore and build on.
Open the workspace folder in VS Code, then install the [XanoScript Language Server](https://marketplace.visualstudio.com/items?itemName=xano.xanoscript-language-server) extension. This provides syntax highlighting, inline validation, and autocomplete for `.xs` files — without it, they appear as plain text with no error feedback.
**Already using the full XanoScript extension?** If you want to keep it for push/pull, that's fine — but delete any `agents.md` or other `.md` artifact files it created in your workspace root, as these can conflict with the Developer MCP and confuse AI assistants. For the best experience, we recommend using the [XanoScript Language Server](https://marketplace.visualstudio.com/items?itemName=xano.xanoscript-language-server) extension alongside the CLI for push/pull.
The [Developer MCP](/developer-mcp/get-started) gives AI tools direct access to XanoScript documentation and real-time code validation, significantly improving AI-generated XanoScript quality.
In the VS Code terminal, add the Developer MCP to your project:
```bash theme={null}
claude mcp add xano -- npx -y @xano/developer-mcp
```
Not using Claude Code? See the [Developer MCP guide](/developer-mcp/get-started) for setup instructions for Cursor, Windsurf, Codex, VS Code Copilot, and other AI tools.
This is where the power of local XanoScript development shines. Use [Claude Code](https://docs.anthropic.com/en/docs/claude-code/overview) with the [Developer MCP](/developer-mcp/get-started) to generate your backend — the MCP provides XanoScript documentation and real-time validation directly to your AI assistant.
Ask Claude Code to generate what you need. For example:
> Create a users table with name, email, and role fields, a signup API endpoint, and a login API endpoint.
Claude Code will write the XanoScript files directly into your local workspace.
You can also write XanoScript by hand or paste the [XanoScript documentation](/xanoscript/introduction) into your AI tool's context and ask it to generate `.xs` files. Place them in the appropriate subdirectories (`table/`, `api/`, `function/`, `task/`).
Start with your database tables first, then functions, then API endpoints. This order ensures dependencies are resolved correctly when you push.
Before pushing, review what changed against your local repository. Pay attention to any table schema changes — renamed or removed columns can affect existing data. The CLI is safe by default: objects deleted locally won't be removed from your Xano workspace unless you explicitly use the `--delete` flag. If any changes would result in data loss, the push preview will call them out as destructive operations before you confirm. See [Push & Pull](/xano-cli/push-pull#push-preview) for a full breakdown.
Work on a [development branch](/xano-cli/workspaces-and-branches#create-a-branch) to keep your changes separate from the live branch, or use a **secondary workspace** as your development environment to keep your data schema isolated before promoting to production.
Before pushing, run a dry run to see exactly what will be created, updated, or changed — without applying anything:
```bash theme={null}
xano workspace push -d ./my-new-app --dry-run
```
Review the output carefully, especially any destructive operations or schema changes.
When you're satisfied with the preview, head to your terminal and push yourself — we recommend **not** asking the AI agent to push for you, so you stay in control of what gets applied:
```bash theme={null}
xano workspace push -d ./my-new-app
```
The CLI shows the same preview again and prompts for confirmation before applying. Your tables, APIs, functions, and tasks are now live in Xano.
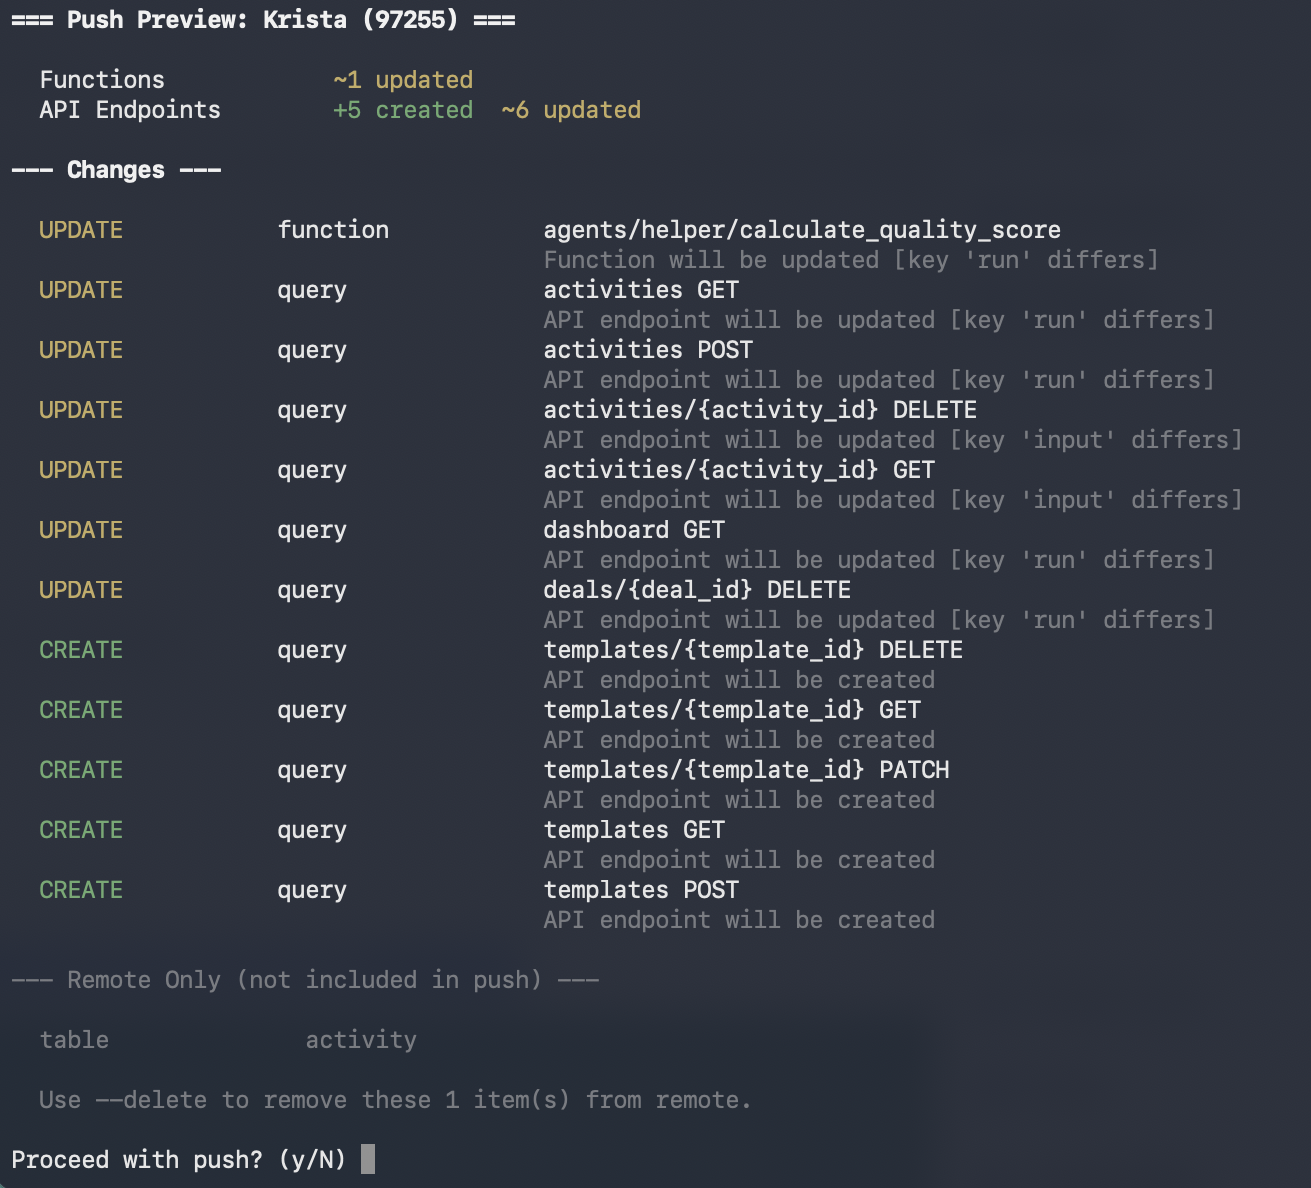 See [Push & Pull](/xano-cli/push-pull#push-preview) for a full breakdown of what each section of the preview means.
Open your workspace in the [Xano dashboard](https://app.xano.com) to see your resources. You can test APIs directly from the dashboard, view your database tables, and make visual adjustments.
Any changes you make visually in Xano can be pulled back down:
```bash theme={null}
xano workspace pull -d ./my-new-app
```
If your project includes a frontend (React, Vue, Svelte, etc.), you can host it directly on Xano using [static hosting](/xano-cli/static-hosting). Build your frontend, zip the output, and upload it:
```bash theme={null}
npm run build
zip -r build.zip ./dist
xano static_host build create my-site -f ./build.zip -n "v1.0.0"
```
This deploys your frontend alongside your Xano backend — no separate hosting provider needed.
***
## Recommended Workflow
Once you're up and running, a typical development cycle looks like this:
1. **Pull the latest** — `xano workspace pull -d ./my-new-app`
2. **Edit locally** — Write or generate XanoScript with Claude Code and the Developer MCP
3. **Test** — Run your workflow and unit tests with the CLI before pushing
4. **Review with Git** — Run `git diff` to inspect exactly what changed before pushing
5. **Dry run** — `xano workspace push -d ./my-new-app --dry-run` — preview the server-side impact without applying anything
6. **Push** — `xano workspace push -d ./my-new-app` — review the preview and confirm
7. **Deploy frontend** (if applicable) — Build, zip, and upload with `xano static_host build create`
8. **Verify in Xano** — Check your APIs and resources in the Xano dashboard
9. **Iterate** — Pull any Xano browser-edited changes, edit locally, and push again
Use a [development branch](/xano-cli/workspaces-and-branches#create-a-branch) to keep your logic separate from the live branch. When ready, [set the branch live](/xano-cli/workspaces-and-branches#set-a-branch-live). For more safety, dedicate a Workspace to be your development environment to keep your data schema separate before promoting to a production Workspace.
***
## Version Control with Git
Your XanoScript files are plain files on disk — commit, branch, and open PRs exactly like any other project. Git history pairs well with Xano's own [branching system](/xano-cli/workspaces-and-branches): use Git for code history and Xano branches for deployment environments.
Working with a team? See [Team Workflows](/xano-cli/team-workflows) for Git branching strategies, code review with pull requests, and CI/CD integration.
See [Push & Pull](/xano-cli/push-pull#push-preview) for a full breakdown of what each section of the preview means.
Open your workspace in the [Xano dashboard](https://app.xano.com) to see your resources. You can test APIs directly from the dashboard, view your database tables, and make visual adjustments.
Any changes you make visually in Xano can be pulled back down:
```bash theme={null}
xano workspace pull -d ./my-new-app
```
If your project includes a frontend (React, Vue, Svelte, etc.), you can host it directly on Xano using [static hosting](/xano-cli/static-hosting). Build your frontend, zip the output, and upload it:
```bash theme={null}
npm run build
zip -r build.zip ./dist
xano static_host build create my-site -f ./build.zip -n "v1.0.0"
```
This deploys your frontend alongside your Xano backend — no separate hosting provider needed.
***
## Recommended Workflow
Once you're up and running, a typical development cycle looks like this:
1. **Pull the latest** — `xano workspace pull -d ./my-new-app`
2. **Edit locally** — Write or generate XanoScript with Claude Code and the Developer MCP
3. **Test** — Run your workflow and unit tests with the CLI before pushing
4. **Review with Git** — Run `git diff` to inspect exactly what changed before pushing
5. **Dry run** — `xano workspace push -d ./my-new-app --dry-run` — preview the server-side impact without applying anything
6. **Push** — `xano workspace push -d ./my-new-app` — review the preview and confirm
7. **Deploy frontend** (if applicable) — Build, zip, and upload with `xano static_host build create`
8. **Verify in Xano** — Check your APIs and resources in the Xano dashboard
9. **Iterate** — Pull any Xano browser-edited changes, edit locally, and push again
Use a [development branch](/xano-cli/workspaces-and-branches#create-a-branch) to keep your logic separate from the live branch. When ready, [set the branch live](/xano-cli/workspaces-and-branches#set-a-branch-live). For more safety, dedicate a Workspace to be your development environment to keep your data schema separate before promoting to a production Workspace.
***
## Version Control with Git
Your XanoScript files are plain files on disk — commit, branch, and open PRs exactly like any other project. Git history pairs well with Xano's own [branching system](/xano-cli/workspaces-and-branches): use Git for code history and Xano branches for deployment environments.
Working with a team? See [Team Workflows](/xano-cli/team-workflows) for Git branching strategies, code review with pull requests, and CI/CD integration.