> ## Documentation Index
> Fetch the complete documentation index at: https://docs.xano.com/llms.txt
> Use this file to discover all available pages before exploring further.
# Static Hosting
> Use static hosting in Xano to host your frontend right alongside your backend
## Overview
Static Hosting is a feature that allows you to host static files on your Xano instance. It's great for hosting your frontend right alongside your backend, or even just deploying quick tests as you build and iterate on your application.
Static Hosting is available on any paid plan.
## Supported Technologies
Static Hosting serves **pre-built frontend assets** — HTML, CSS, and JavaScript. When a `package.json` file is present, Xano automatically runs your `build` script (e.g. `npm run build`) and hosts the generated output.
**Any frontend framework that produces static output is supported.** This includes frameworks that use Node.js during the build step — Xano runs Node.js to build your project, it just doesn't run a persistent Node.js server at runtime.
### Works With
* **React** (Create React App, Vite, etc.)
* **Next.js** (using `output: 'export'` for static export)
* **Vue** (Vue CLI or Vite)
* **Svelte and SvelteKit** (static adapter)
* **Astro**
* **Angular**
* **Vanilla HTML/CSS/JS** projects (no build step required)
* **Any other framework** that outputs static files during build
> 💡 If your project can produce a static `build`, `dist`, or `out` folder, Xano can host it.
### What Static Hosting Does Not Do
Static Hosting does not run a **persistent server process** at runtime. Your project is built once, and the resulting static files are served. This means:
* No server-side rendering (SSR) at request time — use static export / static site generation (SSG) instead
* No backend application servers (e.g., Express, Django, Flask, Rails)
* No server-side languages running at runtime (Python, PHP, Ruby, etc.)
This does **not** mean you can't use frameworks built on Node.js. Frameworks like Next.js, Astro, and SvelteKit all work great — just configure them to output static files instead of relying on a runtime server. Your Xano backend handles all server-side logic via APIs.
### Example Project Structure
```bash theme={null}
my-frontend/
├─ package.json
├─ src/
│ ├─ index.jsx
│ └─ ...
```
## Creating a new site
Each workspace has a static hosted site already created for you. You'll see it labeled as `default` in the Static Hosting screen.
From the sidebar, switch to the Host Files tab, and choose Static Hosts.
In the top-right corner, click Create New Site.
Give your site a name and a description, and click Create.
## Uploading a site
Each upload starts with a **build**, which you can think of as a snapshot of your site at that time.
After creating a site, choose it from the list and click Upload Build.
Click the Browse files button to select a file, or drag and drop it into the box.
You'll need to create a new build to pull changes later; they are not synced automatically.
Provide the URL of your repo in the panel after choosing "Git Repository".
HTTPS urls work only for public repositories. For private repositories, use the SSH URL instead.
This is usually best for workflows where you're already using the extension to build your backend, and have done the same for your frontend.
Make sure your static files are in a separate subfolder called `static`.
Find the icon in the left-hand navigation, and click it to open the extension panel.
Click the Upload Static Files button to upload your static files.
## Deploying your site
Once you've uploaded your site, you'll need to choose whether you want to deploy it to `prod` or `dev`. Xano issues you a separate domains for each environment, so you can easily test new builds without impacting your production site.
Click on your site in the Static Hosting screen, and then choose the build you want to deploy.
From the panel that opens, choose either Deploy Prod or Deploy Dev to deploy your site to the appropriate environment.
Xano will run your `build` script (e.g. `npm run build`) and deploy the generated output to the appropriate environment. You can see the URLs for your deployed sites in the site management screen. Once the deployment is complete, logs are available by selecting the build and reviewing them in the panel that opens.
## Custom domains
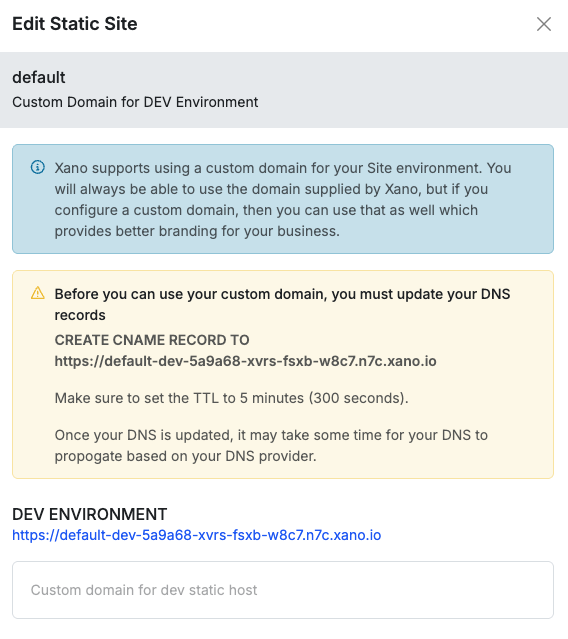
You can set up custom domains for both your `prod` and `dev` environments. The Xano domain will always be available, even if you have a custom domain set.
Click the button in when reviewing your site to open the settings panel.
From there, you can click the domain button to add a custom domain for either environment.
Xano will present you with instructions on how to set up your DNS records to point to Xano's servers.