Primitives
A primitive is where everything starts. It represents a basic building block of anything you can build in Xano, such as APIs, AI Agents, or database tables. For each primitive, you will start by declaring the type of primitive and its name. An optional description can follow.Basic primitive declaration format
API with authentication
Inputs
Inputs are the data that the logic might need to perform its operation. They are declared in the input block of the primitives that support them. Inputs are optional, but the block must be declared even if empty.Input declaration format
text, email, password, int, decimal, and enum. For a complete reference, see Data Types.
You can make inputs optional, required, lists, or apply filters to transform them before use. Here are the available options:
| Option | Description |
|---|---|
<input_name>? | Makes the input optional |
Example: text name? | |
<input_type>? | Makes the input nullable |
Example: text? name | |
required | Makes the input required by not specifying optional |
Example: text name required | |
<input_type>[] | Makes the input a list |
Example: text[] names | |
filters=<name>:<option> | Applies filters to the input |
Example: text name filters=trim|lower |
Build Along: Defining the Primitive
Let’s declare an API called
user_list. This is a GET API that will return a list of all users with formatted names and creation dates, and will use ‘user’ authentication. There will not be any inputs, but we still need to declare the input block.API declaration example
Stacks
Stacks are the core building blocks of writing logic in XanoScript. Inside of a stack, you’ll declare functions and their parameters. Functions begin with a namespace — basically, a category that the function is a part of. Each namespace is separated with a period. After the namespace, you’ll declare the function name and any parameters the function requires. Functions can also have a description, which is optional.Stack with function declaration
as keyword followed by the variable name.
This is a simple example of a function in a stack.
Build Along: Defining the Stack
Let’s declare a stack that will query the user table and return a list of all users. Later, we’ll expand on this stack to manipulate the data, but for now, we’ll just return the list of users to a variable called
$users.Stack declaration example
Responses
Responses are the output of a primitive. They are declared in the response block of the primitive.Response declaration format
Build Along: Defining the Response
Let’s declare a response that will return the list of users.
Response declaration example
Settings
Settings are the configuration of a primitive. Sometimes, a primitive will have a settings block, and sometimes the settings are integrated into the most parent object. If a setting is not specified, the default value or no value will be used, depending on the behavior of the primitive.An example of settings defined after the response.
Build Along: A simple API endpoint
Here’s the complete API endpoint we’ve built so far. It’s a simple GET API that returns a list of all users from the user table. We’ll continue to iterate on this endpoint throughout the rest of the guide by adding the logic to transform the data with filters and a loop.
An example of an API endpoint that returns a list of all users from the user table.
Variables and Data Manipulation
Variables
Set and update variables using thevar keyword.
Variable declaration and update
Build Along: Initializing a variable
Let’s initialize a variable called
$formatted_users that will hold the formatted user data.Variable declaration example
Reserved Variable Names
Some names are reserved for magic variables that XanoScript provides automatically. Don’t use them as your own variable names, as doing so will collide with the built-in value they reference.| Reserved | Reason it’s reserved (the magic variable it collides with) |
|---|---|
$input | API/function input parameters |
$auth | Authenticated user context |
$env | Environment variables |
$db | Database field references (in where clauses) |
$this | Current item in loops/maps |
$var | The stack-variable namespace |
$response | The API/function response |
$output | Function output |
$error | Error context (try/catch) |
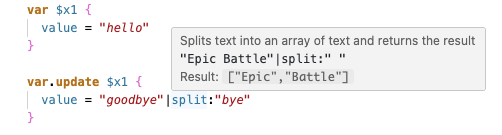
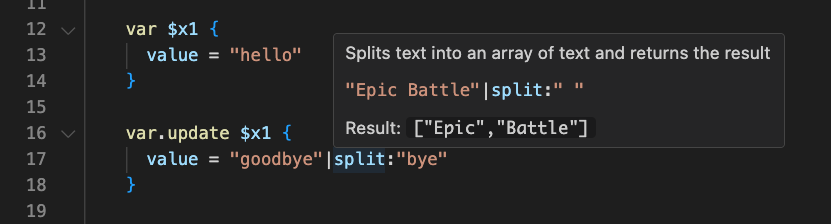
Dot Notation
Dot Notation is used to navigate inside of objects and arrays to target specific pieces of data. In the following object,{"a":"hello", "b":"world"}, we can target the value of the a key using the dot notation. The object is, for the sake of this example, contained in a variable called $x1.
Dot notation for object access
["apple", "banana", "cherry"] inside of a variable called $x1, we can target the value of the second item using the dot notation.
Dot notation for array access
Build Along: Using dot notation
In the API we’re building, we’ll be using dot notation to target specific values in each user object and manipulate them.
Dot notation example -- Targeting the created_at value of a user
Filters
Filters are used to manipulate data throughout your stack. They can be applied almost anywhere that data is generated or referenced; anything from creating a variable to manipulating the response object on the fly. They are applied using the| pipe character, and any filter options are separated by a colon immediately after.
Filter syntax format
This is a simple example of using a filter.
This is a simple example of using a filter with an argument.
Build Along: Using filters
Let’s use the
format_timestamp filter to format the created_at value of a user so that it’s human readable.Filter example -- Capitalize the name of a user
Loops
Loops are used to repeat a set of operations a certain number of times. XanoScript supports three different types of loops: For Each, For, and While. In the example below,$x1 is the variable that contains the list of items to iterate through. $x2 is the variable that will hold each item as the loop iterates through it.
In the nested object, you can add any number of functions to be executed as part of the loop.
This is a simple example of a For Each loop.
10 is the number of times the loop will run. $index is the variable that will hold the current iteration number, starting at 0.
This is a simple example of a For loop.
<condition> is the condition that will determine if the loop will continue to run, for example $x1 = 10 would continue to run the loop while $x1 equals 10.
For statements that evaluate to true, you don’t need to specify the condition, as it will be assumed to be true by writing while ($x1) if, for example, we were checking to see if $x1 was equal to true. For statements that evaluate to false, you need to specify the condition, as it will be assumed to be false by writing while ($x1 == false).
You can specify multiple conditionals by using the && operator for AND, or the || operator for OR. You can also use grouping to specify AND() and OR() groups, such as while ($x1 == true && (1 < 2 && 2 > 3)).
This is a simple example of a While loop.
Build Along: Using a loop
Let’s use a loop to iterate through our list of users and manipulate the data with filters. The end result will give us a list of users with their names capitalized and their created_at values formatted.
This is a simple example of a For Each loop.
Conditionals
Conditionals are used to perform different actions based on the condition of a statement. XanoScript supports three different types of conditionals: If, Else, and Else If.Conditional statement structure
Build Along: Using a conditional
Let’s use a conditional to check and see if any users were returned. If not, we’ll update the
formatted_users variable to contain an error message.Conditional example -- Check if the users were returned
Expressions
Using the expression data type, you can combine multiple operations into a single line, or multiple lines, to traverse, transform and manipulate data. Expressions can be used anywhere data is accepted, such as function parameters, variable values, and conditionals.Expression example
Multi-line expression example
Basic Examples
Get a user record by its ID
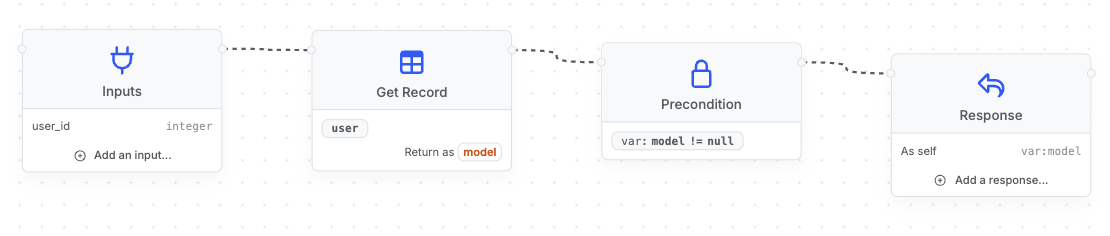
Get a user record by its ID
Get a user record, capitalize the name, and make the created_at field human readable
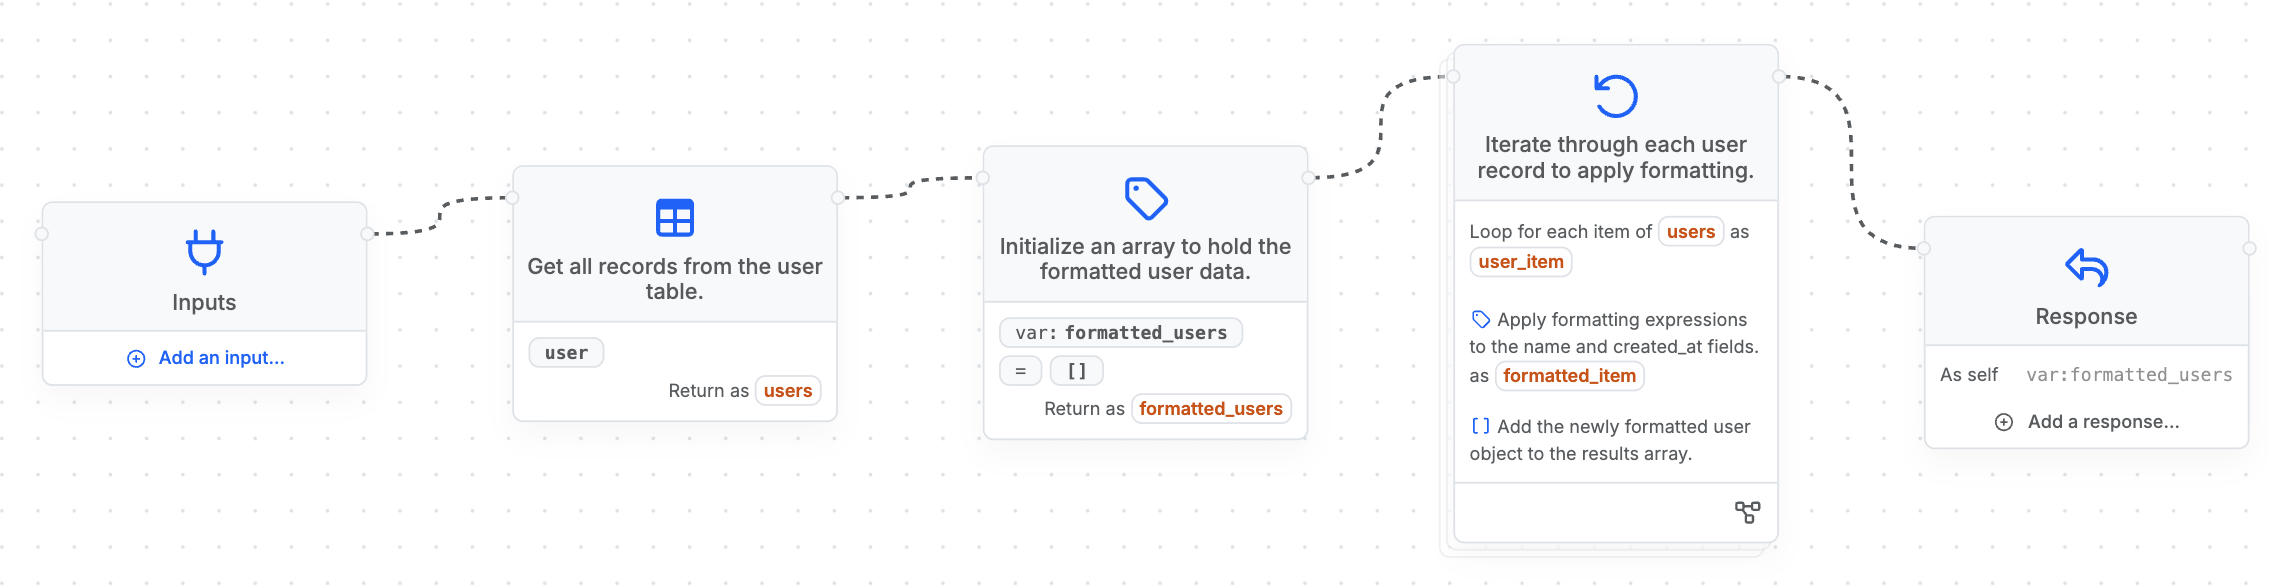
Get a user record and manipulate the data