Switching back to the CLI after working in another build mode? If you’ve made changes using the visual builder, the in-browser XanoScript editor, the VS Code extension, or the MCP server, your local CLI files won’t reflect those changes automatically — there is no automatic sync or diff checking. Always run
xano workspace pull to download the latest state of your workspace before making further changes locally.Pull
Pull downloads your workspace as individual.xs (XanoScript) files, organized by type. Behind the scenes, the CLI retrieves a single multidoc — a combined XanoScript document containing every definition in your workspace — and splits it into separate files.
This creates a directory structure like:
.xs file. Key details:
- API endpoints are grouped under
api/{group_name}/directories, with each group containing anapi_group.xsand endpoint files named{name}_{verb}.xs - Hierarchical functions (with
/in the name) are split into subdirectories - AI resources (agents, tools, MCP servers) are grouped under
ai/, with triggers inai/{type}/trigger/ - Realtime resources are organized under
realtime/channel/andrealtime/trigger/ - Triggers are placed in
trigger/subdirectories within their parent type (table/trigger/,ai/agent/trigger/, etc.) - All filenames are converted to
snake_case
Pull Options
Include environment variables
Include database records
Pull your table records alongside the schema. This is also a convenient way to create a local backup of your data before pushing schema changes.Both
Pull a specific branch
If-b is not provided, the pull targets the branch stored in your profile. If no branch is set in your profile, it defaults to the live branch.
Push
Push uploads local.xs files back to your Xano workspace, syncing your local changes. By default, only changed files are pushed (partial mode). Use --sync to push all files.
The CLI recursively collects all .xs files from the directory, compares them against your workspace, and sends only the changes to Xano. Before applying anything, the CLI shows a preview of what will be created, updated, or deleted, and prompts for confirmation. After completion, the CLI displays the total execution time.
See Push Options for detailed usage of each flag.
How objects are identified (binding local to remote)
When you push, Xano decides whether each local.xs file updates an existing object or creates a new one by reading a single line inside the file: its guid.
guid embedded in each document. There is no separate mapping file, and file paths do not affect binding. When you push, the CLI recursively collects every .xs file under the push directory, and matches each one to a workspace object by its guid (together with the object’s type and name) — never by folder, filename, or a numeric ID.
- Files that have a
guidmatching an existing object are updated (overwritten) in place. - Files with no
guid, or aguidthat doesn’t exist on the server, are created as new objects.
This information is provided for reference; rarely will you ever have to worry about managing GUIDs unless you are deviating into a non-standard workflow.
Push modes at a glance
The samepush command behaves differently depending on the flags you combine. All modes are gated behind the preview and confirmation unless you add --force.
Regardless of mode, matching is always by
guid — so switching between partial and --sync changes which files are sent, never which objects they bind to.
Recipe: bind local files to existing objects (and avoid duplicates)
If you’re unsure whether a push will duplicate objects, this three-step loop guarantees it won’t:- Pull to bind.
xano workspace pull -d ./my-workspace— pull regenerates every.xsfile from the server, so each one arrives carrying its object’s correctguid. Because pull rewrites each file in full, commit or stash any local changes first so they aren’t overwritten. - Preview.
xano workspace push -d ./my-workspace --dry-run— read the labels: existing objects should show as UPDATE (yellow), and only genuinely new objects as CREATE (green). - Confirm. If the preview matches your intent, run
xano workspace push -d ./my-workspaceand confirm at the prompt. - Do not create manually. Never create an object from scratch outside of your Xano workspace’s local directory.
CREATE, its file is missing the right guid — re-run step 1 to restore it. You never edit an identity file by hand; there isn’t one.
Common misconceptions
Is there a .xano/objects.json (or a manifest) that maps my objects?
Is there a .xano/objects.json (or a manifest) that maps my objects?
No. The CLI has no object manifest, registry, or mapping file of any kind. Identity is the
guid line stored inside each .xs file. The only local file the CLI writes is your auth profile at ~/.xano/credentials.yaml, which is unrelated to object identity. There is nothing to hand-edit and nothing that can “lose” your objects.Does the file path or a numeric object ID decide what gets updated?
Does the file path or a numeric object ID decide what gets updated?
No. Binding is by the embedded
guid (plus type and name). Folder and filename are irrelevant — function/foo.xs and functions/foo.xs bind to the same object if they share a guid. A functions/ vs function/ prefix mismatch cannot break binding or create duplicates.Is the flag -dry-run or --dry-run?
Is the flag -dry-run or --dry-run?
It’s
--dry-run (two dashes). It shows the full preview and exits without changing anything.Does the dry-run preview tell me update vs. create?
Does the dry-run preview tell me update vs. create?
Yes. Every object is labeled CREATE (green), UPDATE (yellow), or DELETE (red), per type, before the confirmation prompt.
Do I need to stop working to avoid duplicating my functions?
Do I need to stop working to avoid duplicating my functions?
No. As long as each file carries the right
guid — which a fresh pull guarantees — a push updates existing objects in place. Run pull, then push --dry-run, and confirm the objects show as UPDATE before applying.Push Preview
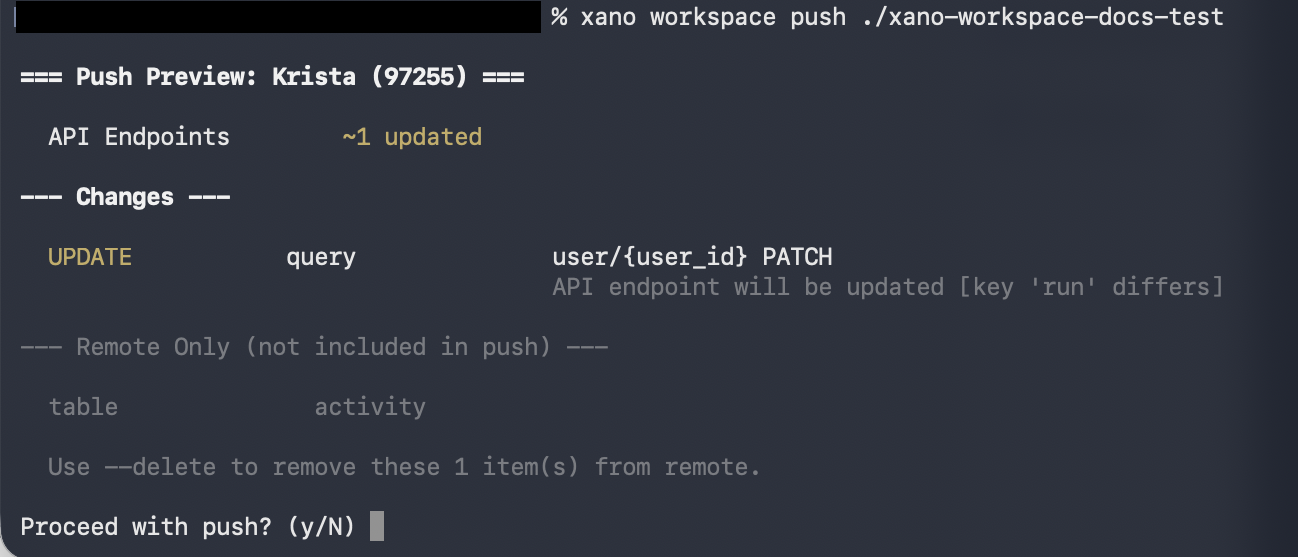
Everyxano workspace push automatically runs a preview before making any changes. The CLI performs a dry-run against your Xano instance and shows you exactly what will happen — then prompts for confirmation before proceeding.
If there are no changes to apply, the CLI exits with No changes to push. If changes are detected, the preview is shown before the confirmation prompt. When records are included (--records), the preview also shows record counts per table.
Summary & Changes
The preview opens with a per-type count of what will be created, updated, or deleted — color-coded green, yellow, and red — followed by the non-destructive operations: new objects being created (CREATE), existing objects being updated (UPDATE), and fields being added or modified (ADD_FIELD, UPDATE_FIELD).
This is how you confirm that a push will update your existing objects rather than duplicate them: an object matched by its guid shows as UPDATE, while only genuinely new objects show as CREATE. Review these labels before confirming.
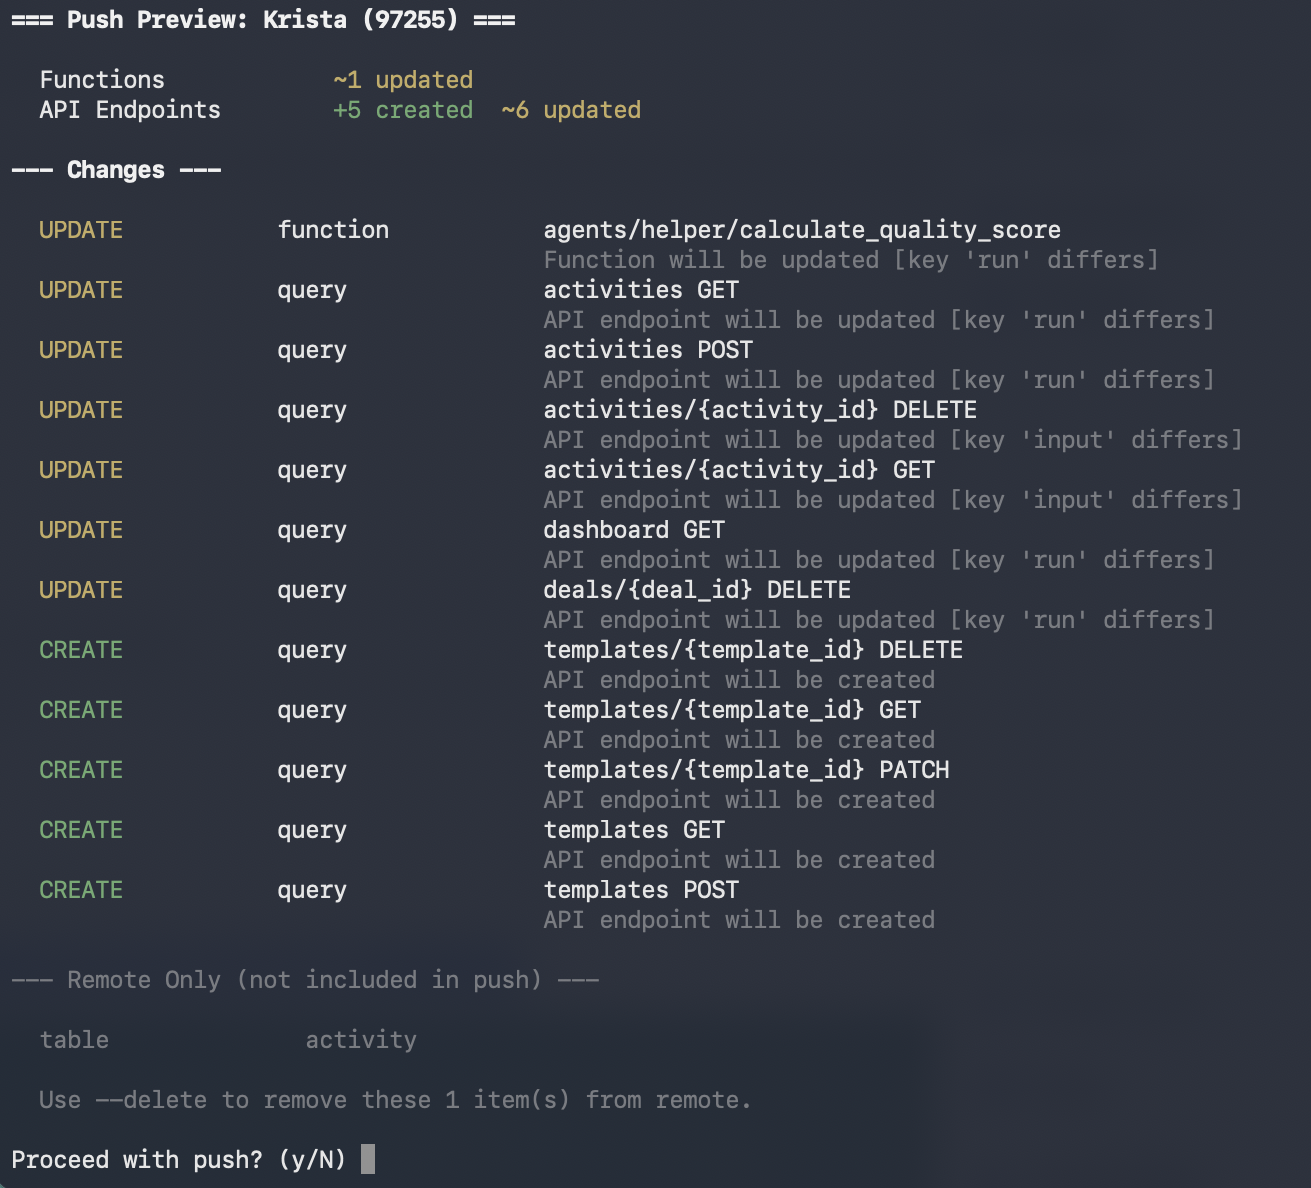
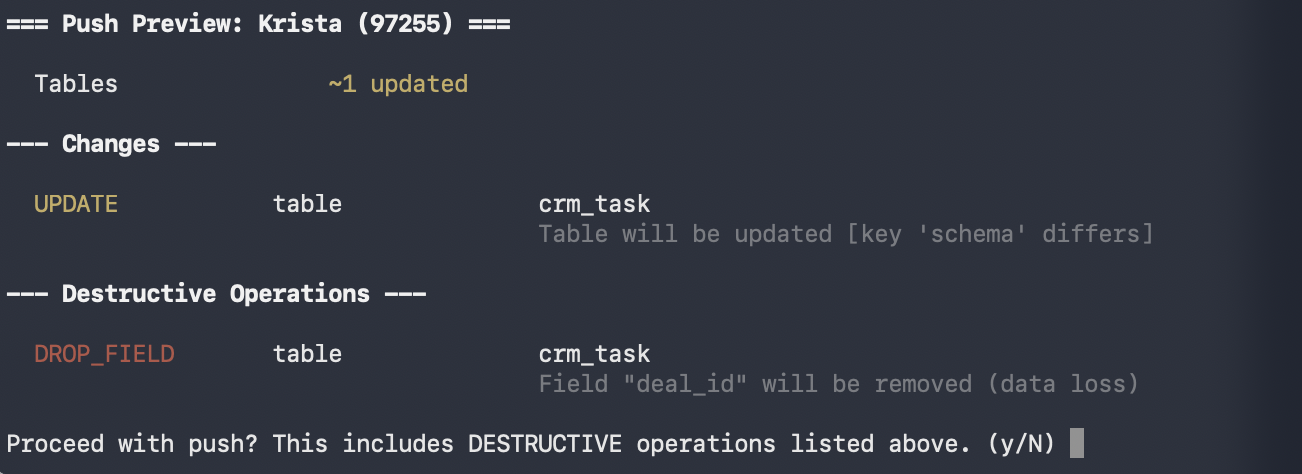
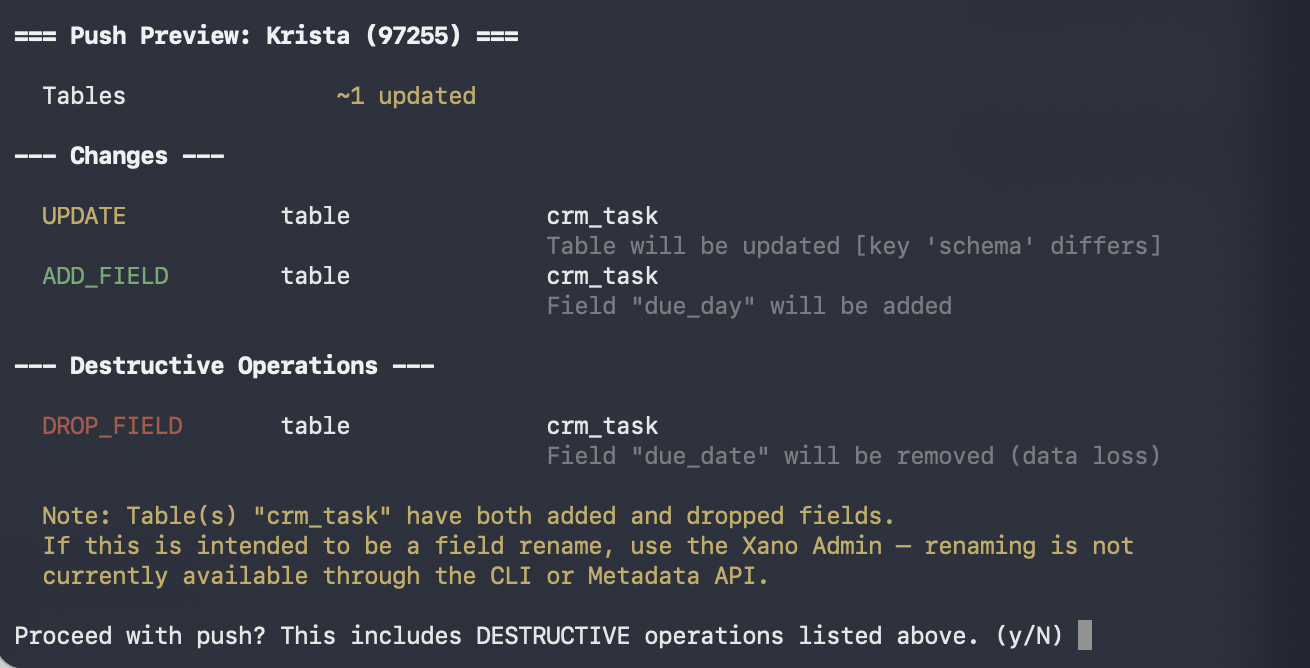
Destructive Operations
Operations that can cause data loss are listed separately and highlighted:DELETE, CASCADE_DELETE, TRUNCATE, DROP_FIELD, and ALTER_FIELD. When destructive operations are present, the confirmation prompt explicitly warns you before asking to proceed.
Remote Only
Objects that exist in your Xano workspace but are not in your local files. These are shown when--delete is not set — they will not be deleted, but the preview makes them visible so you’re aware of the discrepancy.
Verbose mode
Add-v to see a reason line under each operation explaining why the server classified it that way:
Preview only (dry run)
Use--dry-run to see the full preview — changes, destructive operations, remote-only items, and records — then exit without pushing. Nothing is applied.
A --dry-run prints exactly what a real push would show, then stops. Here’s a sample, colored as it appears in your terminal:
=== Push Preview: workspace 5 ===
instance: xuwv-vqfi-rpkp.xano.io | workspace: Integration Builder Dashboard | cli: v1.0.4
Functions +1 created ~2 updated
Tables ~1 updated
--- Changes ---
CREATE function cf_stripe_finalization_bridge
UPDATE function cf_stripe_finalization_validate
UPDATE function cf_stripe_post_order_payment_collection
UPDATE table payment_ledger
guid shows as UPDATE (yellow), and only genuinely new objects show as CREATE (green). Because this is --dry-run, nothing was written — it’s the safe way to confirm a push will update in place rather than duplicate. When destructive operations are present (DELETE, TRUNCATE, DROP_FIELD), they appear in red under a separate Destructive Operations heading.
This is useful when you want to inspect what a push would do before committing to it — especially helpful for AI agents that need to review the impact of changes before deciding to proceed.
Critical error blocking
Pushes that contain critical errors — such as XanoScript syntax errors or unresolved placeholders — are automatically blocked. The preview highlights these errors so you can fix them before retrying. Use--force to override and push anyway.
Skipping preview
Use--force to bypass the preview and confirmation prompt entirely — useful in CI/CD pipelines or scripted workflows. --force also overrides critical error blocking.
In non-interactive environments (e.g. piped output, CI/CD), the CLI requires
--force to skip the confirmation prompt.Push Options
Push with records
Records are off by default on push, matching pull behavior. To include records, you must have first pulled with--records (so the data exists locally), then explicitly pass --records on push:
Push with environment variables
Environment variables are also off by default on push. Pull with--env first, then push with --env:
Push with records and environment variables
File filtering
Use-i (or --include) to push only files matching a glob pattern, and -e (or --exclude) to skip files matching a pattern. Patterns are matched against relative paths from the push directory. You can pass multiple flags to combine patterns.
Full sync
By default, only changed files are pushed. Use--sync to push all files — this performs a full sync against your workspace.
Delete removed objects
Use--sync --delete to remove any objects in Xano that are not present in your local files. This ensures your workspace matches your local directory exactly. --delete requires --sync.
Skip GUID sync
By default, after a push the CLI writes server-assigned GUIDs back into your local.xs files. Use --no-guids to skip this step — useful in CI/CD pipelines or when you don’t want local files modified.
Skip transaction
By default, pushes are wrapped in a database transaction so that failures roll back cleanly. Use--no-transaction to disable this — useful for debugging failed imports where you want to inspect the partial state.
Truncate table records before importing (staging/test workspaces only)
Use--truncate to wipe all existing rows from every table before importing records from your local files. This is useful when you want a clean slate — for example, resetting a staging or test workspace to a known dataset before running automated tests, or re-seeding a fresh environment with fixture data.
Pull from Git
You can pull XanoScript files directly from a Git repository (GitHub, GitLab, or any git URL) into a local directory — without needing to clone the repo yourself. This fetches all.xs files from the repository and organizes them into the same directory structure as a workspace pull.
Git Pull Options
URL Formats
You can pass a variety of URL formats — the CLI extracts the owner, repo, branch, and path automatically:Workflow: Import from Git, Push to Xano
A common use case is pulling XanoScript from a shared Git repository and pushing it to a workspace. For example, you can pull the Hello World sample from the XanoScript examples repo and push it to your workspace:Typical Workflow
On paid plans, the default development cycle pushes through your sandbox — an isolated copy of your workspace where you can test changes before promoting them. Direct workspace pushes are blocked unless you turn on Allow Direct Workspace Push in Xano → Workspace Settings.1
Pull the latest
2
Make changes locally
Edit
.xs files in VS Code with the XanoScript Language Server extension for syntax highlighting and inline validation.3
Review changes with Git
Before pushing, review exactly what changed using Git:Pay close attention to any table schema changes — renamed columns, removed fields, or changed field types — as these can affect existing data.
4
Push to your sandbox
Push your changes to your sandbox. The CLI shows the same preview and confirmation as a workspace push.
5
Test in the sandbox
Verify your changes work as expected in the isolated sandbox environment before they touch your workspace.
6
Review & promote
Open the sandbox in the browser to review the diff against your workspace and promote the changes:See Sandbox for the full set of sandbox commands — including reset, env vars, and running tests.
Pushing directly to your workspace. Free plans always push directly. On paid plans, enable Allow Direct Workspace Push in Xano → Workspace Settings to bypass the sandbox. Then substitute
xano workspace push -d ./my-workspace --dry-run to preview, and xano workspace push -d ./my-workspace to apply.

 Git works like it always has
Your workspace is plain files on disk — git init, commit, branch, and open PRs exactly like any other project. Xano’s push/pull fits into your Git workflow, not the other way around.
Working with Git
Since pull outputs standard files to your filesystem, you can version control your XanoScript with Git: This gives you full commit history, diffs, branching, and collaboration through Git — on top of Xano’s own branching system.Tips
- Pull before you push to avoid overwriting changes made by teammates in the Xano dashboard.
- Use branches for development work. Create a branch with
xano branch create dev, then use-b devon push and pull commands to target it without affecting the live branch. - Snapshot your data by pulling with
--recordsbefore pushing schema changes. This gives you a local copy of your database records you can restore from if needed. To push those records back, pass--recordson push as well — records are off by default in both directions. - Use
-ito include specific files (e.g.-i "function/*") or-eto exclude files (e.g.-e "table/*"). Use--syncwhen you need a full push, and--sync --deleteto remove remote objects not in your local files. - Combine with AI tools like Claude Code or Cursor to generate and edit XanoScript locally, then push the results. See the Start from Scratch and Work from Existing guides for full walkthroughs.
Troubleshooting
If a push or pull isn’t working as expected, use the-v (verbose) flag to see the full request and response details:
Verbose mode shows:
- The HTTP method and full URL being called
- Request headers (with the authorization token partially masked)
- The request body (truncated to 500 characters for readability)
- The response status code and elapsed time
XANO_VERBOSE environment variable: