

 Xano
XanoCreate roles
Define custom roles with the right level of access for each kind of team member.
Assign to team members
Apply a role when inviting a user, or adjust per-workspace permissions later.
Bulk operations
Copy/paste permissions between users and apply roles or changes to many at once.
Permissions reference
What each permission unlocks across the instance, workspace, and tenant center.
Accessing RBAC
From the instance selection screen, click the icon and choose Permissions (RBAC).The Permissions Center
Xano offers five pre-defined user roles as described in the table below.Creating roles
In the Roles tab, click Add new custom role Give the new role a name, and click Add Custom Role You’ll see your new role appear in the list of roles below the Xano defined options.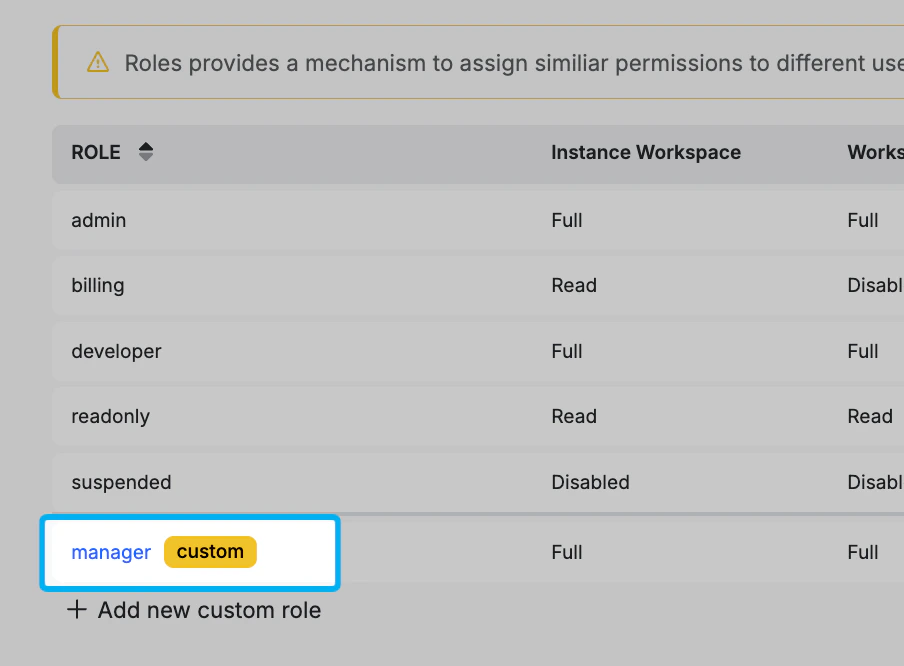
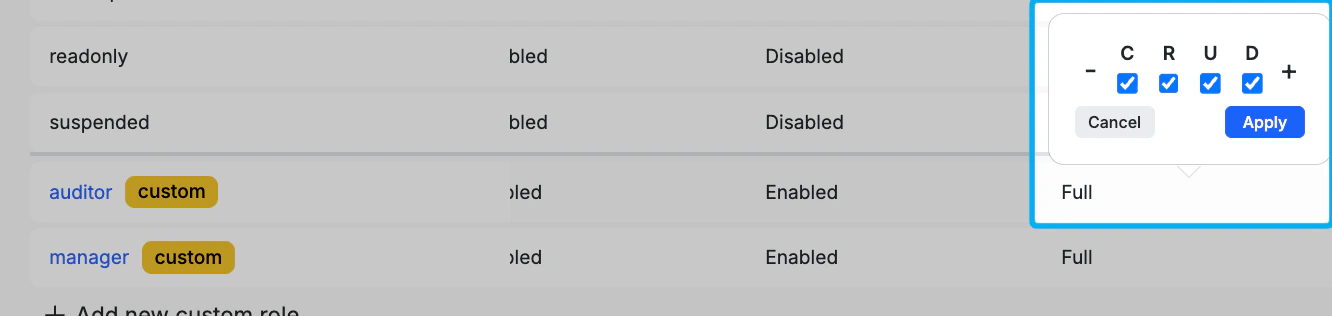
A new role comes with all permissions enabled by default.
Assigning roles
You can assign a role to a user when inviting them to your instance.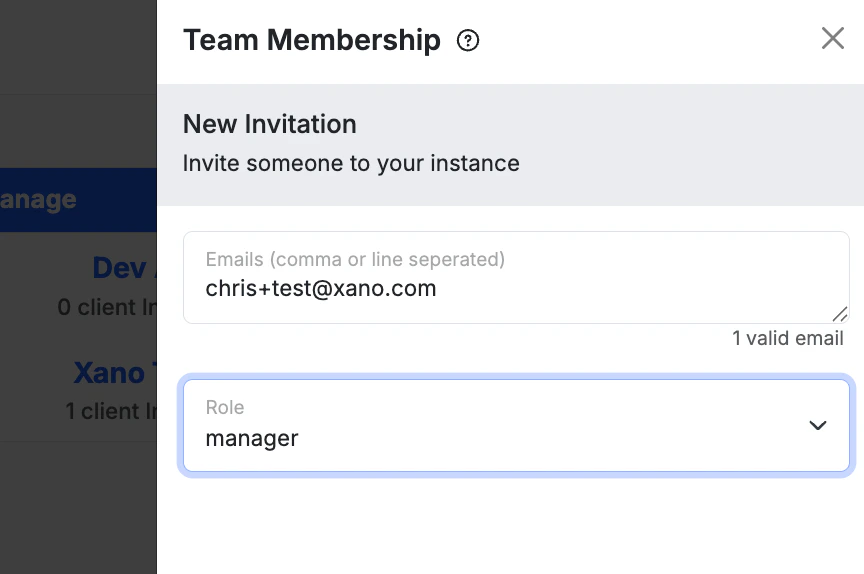
Adjusting permissions
Click on a permission to adjust it for that user. There are four levels of access for each permission: Create (C), Read (R), Update (U), and Delete (D). Some, depending on context of the permission, will only offer Enabled or Disabled. There are also - and + options to quickly add or remove all permissions for that feature — turning everything on is sometimes referred to as Full access. When adjusting permissions for a user on a specific workspace, you’ll also see an Inherit option, which means that permission will obey what’s defined by the assigned role.Inherit example: If you set Jane’s Run & Debug permission on Workspace A to Inherit, and Jane’s assigned role is Developer, then Jane’s Run & Debug access on Workspace A will match whatever the Developer role allows for Run & Debug. Change the role later and Jane’s inherited permissions follow automatically.
Bulk operations
You can manage permissions for many users at once from the Workspace tab of the Permissions Center.Copy/paste permissions
Use Copy/Paste Permissions to quickly give one team member the same permissions as another — useful when several team members need identical access across each workspace. Click the Copy/Paste button, choose the team member to copy permissions from, then choose the team member to paste permissions to.Bulk role assignment
Click the three dots above the roles list to open the bulk menu. Choose Managing Team Roles, select the role you want to apply, then select the users to apply it to. The role is applied to every selected user at once.Bulk permission editing
From the same three-dot menu, choose Bulk Editing Permissions. Select the users you want to modify, then select the workspaces those changes should apply to. Adjust permissions as needed — any row left as Unmodified is skipped, so you only change what you explicitly set.Permissions explained
Below, you’ll find a rundown of each permission and exactly what it changes for that user. Expand any permission to see its details.Workspace & data
Workspace
Workspace
The master gate for the entire workspace. Without Read, a user cannot see or enter any workspace at all.Related docs: Workspace Settings
Importing a workspace export via the Metadata API requires Update, not Create. A user who can create new workspaces but lacks Update cannot restore from a file.
Database
Database
Schema-level operations on database tables.
Does not affect data records inside tables.
Database Content
Database Content
Read/write access to actual data inside database tables.
Live Datasource
Live Datasource
A secondary check that limits data operations specifically when the user’s active datasource is the live/production branch. Always checked alongside Database Content — both must allow the action.Related docs: Data SourcesIt uses the same C/R/U/D shape as Database Content, but applies only when the live datasource is selected. This lets you grant a user full edit access on staging while preventing any writes against production.
Files
Files
File storage — the workspace’s vault of uploaded files (images, attachments, documents).Related docs: File Storage in XanoStandard C/R/U/D on files and access to the file manager.
Build & logic
API Endpoints
API Endpoints
Functions
Functions
Reusable custom functions across the workspace.Related docs: Custom FunctionsStandard C/R/U/D on functions. Adding a function from inside the process stack requires Create.
Tasks
Tasks
Scheduled background tasks.Related docs: Background TasksStandard C/R/U/D on tasks and access to the Tasks section.
Middleware
Middleware
Request/response middleware — pre- and post-processing logic that wraps API endpoints.Related docs: MiddlewareStandard C/R/U/D on middleware definitions and access to the Middleware section. Read is also required for middleware to appear in the workspace settings modal’s Middleware Defaults section.
Addons
Addons
Addons — enrich database operations with data from related tables.Related docs: AddonsStandard C/R/U/D on addon definitions and access to the Addons section.
Services
Services
Shared Services
AI Tools
AI Tools
Realtime
Realtime
Realtime servers, channels, messages, and settings. One permission covers both Realtime and Realtime (Legacy) — a role that can manage one can manage the other.Related docs: Realtime · Realtime (Legacy)
Workflow Tests
Workflow Tests
End-to-end workflow testing — automated test scenarios for APIs, functions, and other logic.Related docs: Test SuitesStandard C/R/U/D on workflow tests. Test execution itself reuses the Functions permission.
Run & debug
Run & Debug
Run & Debug
The “Run & Debug” panel that executes any workflow from inside of Xano.When Enabled, the user sees the “Run & Debug” button on every editable workflow — APIs, custom functions, tasks, middleware, workspace triggers, addon functions, and workflow tests — and can launch it. When Disabled, the button and the keyboard shortcut are hidden, all inputs in the panel are locked, and execution is impossible from any surface.
Read-only access to view code is unaffected. This permission only governs execution.Does not distinguish between branches — a user with this permission on a live branch can run against production data unless also restricted by Live Datasource.
Request History
Request History
The Request History feature — a captured log of API requests that can be replayed and inspected.Related docs: Request History
Run Debug from Request History
Run Debug from Request History
The “Activate Debugger” button inside the Request History panel — replays a captured request through the Run & Debug panel.Related docs: Request History · Testing and Debugging Function StacksWhen Enabled, clicking a request history item shows an “Activate Debugger” button. Clicking it pre-populates the Run & Debug panel with that request’s captured inputs and (for non-tenant sessions) re-executes against current code; for tenant impersonation sessions, it shows the historical result read-only. A confirmation prompt appears before re-running against a live branch or production datasource.
Settings & integrations
Workspace Settings
Workspace Settings
Access to the Workspace Settings modal and all of its sub-panels — a multi-section configuration surface covering most workspace-level preferences.Related docs: Workspace Settings · Environment Variables · Git Sync
Big surface area. This permission spans 10+ distinct sub-features. The most common ones to call out are env vars, Git Sync, and realtime config.The Database Connector lives under “Connect,” not “Settings,” but is still gated by Workspace Settings Update — an easy point of confusion.
Compliance Log
Compliance Log
The workspace’s audit/compliance log — a record of administrative actions taken in the workspace (separate from request traffic logs).Related docs: Audit LogsStandard C/R/U/D on the log. Read is required to view the log list.
Not request logs. This is the audit trail (who did what), not the captured-request log. Request traffic lives under Request History.
Workspace Export
Workspace Export
Workspace export operations — both schema/logic exports and data exports.Related docs: Export & SharingWhen Enabled, the user can run two distinct exports from inside the Workspace Settings modal:
- XanoScript MultiDoc Export — exports the workspace as a XanoScript document containing schemas, logic (functions/queries/tasks/middleware/etc.), env vars, records, drafts, workflow tests, actions, and triggers (each toggleable). Useful for version control and migration.
- Data Export — exports database records (and optionally hosted files) as a downloadable archive. Runs in the background; you will receive an email with a 12-hour download link when complete.
Marketplace
Marketplace
The Marketplace, where users can install Xano-provided workspace templates.Related docs: MarketplaceWhen Enabled, the Marketplace nav item appears in the workspace sidebar and Marketplace pages are accessible. However, you will still need to enable the Marketplace inside of the workspace along with this permission. When Disabled, the entire Marketplace feature is hidden.
Connect
Connect
Third-party platform integrations with specific Connect statements (e.g. Webflow). This does not impact access to the External Database Query functions.Related docs: ConnectWhen Enabled, the user can save and manage Connect integration configurations. When Disabled, the Connect modal’s actions are blocked.
Releases & Tenant Center
Releases
Releases
Releases — named, versioned snapshots of a workspace branch that can be deployed to tenant environments. This permission is enforced for Metadata API access (used by CI/CD pipelines and the Xano MCP server). The Tenant Center’s release-deploy flow uses Tenant Center Deploy instead.Related docs: Branching & Merging · Xano CLI Releases
Tenant Center
Tenant Center
The master gate for the Tenant Center — the workspace-level interface for managing isolated tenant environments (each tenant has its own database and receives logic from releases).Related docs: Tenant Center
The Tenant Center is also subject to a plan/feature gate checked separately from RBAC: the instance must have at least one tenant slot allocated. Both must pass for the UI to show.
Tenant Center RBAC
Tenant Center RBAC
Manages the tenant’s own role-based access control — distinct from the top-level workspace RBAC. Governs which roles, permissions, and team members exist inside RBAC-enabled tenants.Related docs: Tenant CenterWhen Enabled, you’ll see the “RBAC” / “Manage Members” button in the Tenant Center header and can open the tenant-RBAC management panel to view and edit roles, permissions, and member assignments for tenants that have RBAC turned on. When Disabled, the button is hidden and the panel is read-only or inaccessible.
Tenant Center Logs
Tenant Center Logs
The Tenant Center audit log — a structured record of administrative actions performed against tenants (creation, deletion, deployment, impersonation, license views, env var changes, backups, etc.).Related docs: Tenant Center · Audit LogsWhen Enabled, the user sees the “Audit Logs” button in the Tenant Center header (showing logs across all tenants) and a “Logs” action in each tenant’s row menu (showing logs for that one tenant).
These are audit logs, not request/traffic logs. They record administrative events, not API request data. API traffic is in Request History.
Tenant Center Backups
Tenant Center Backups
Backup operations for tenant environments — full snapshots of tenant data that can be restored later.Related docs: Tenant Center · Backup & Restore
The Restore operation maps to Update, not Create.
Tenant Center Deploy
Tenant Center Deploy
A multi-purpose permission covering four distinct deployment-related actions in the Tenant Center.Related docs: Enterprise Deployment · Resource ManagementWhen Enabled, the user can access:
- Deploy Release — push a versioned logic release to one or more tenants in bulk. Available for all tenants. Diff viewing is supported before confirming.
- Deploy Platform — tier2/tier3 only. Migrate a tenant from one infrastructure platform to another (used during Xano-managed platform upgrades).
- Manage Resources — tier2/tier3 only. Configure compute resources for a tenant: CPU/RAM per deployment, replica counts, node affinity, toleration effects, storage settings.
- Infrastructure — tier2/tier3 only. View the live infrastructure state of a tenant: pods, deployments, services, storage volumes, ingresses, jobs. Read-only monitoring view.
Easy to confuse: Deploy Release pushes application logic; Deploy Platform moves the underlying Xano version. They are different operations entirely.The Infrastructure panel is read-only but still requires this permission to open.
Tenant Center Impersonate
Tenant Center Impersonate
Impersonation — opening a live workspace session inside a tenant environment as the calling user.Related docs: Tenant CenterWhen Enabled, the user sees the “Impersonate” action in each tenant’s row menu. Clicking it generates a one-time token, exchanges it for tenant-scoped credentials, and opens the target tenant’s workspace in the browser. The session is bound to the impersonating user’s identity — all actions taken inside the tenant are attributed to them, and the impersonation event itself is recorded in the tenant audit log.
Impersonation respects the tenant’s RBAC configuration once inside — the impersonating user may have different access in the tenant than they do in the parent workspace.Not available when a tenant has a Proxy URL configured.
Tenant Center Metadata API
Tenant Center Metadata API
The gateway permission for the Xano Metadata API in tenant context. The Metadata API exposes machine-readable endpoints for all workspace operations (creating tables, deploying releases, managing API groups, etc.) and is consumed by external CI/CD pipelines, the Xano MCP server, and the Metadata API Explorer.Related docs: Metadata APIWhen Enabled, the user’s access token is allowed to authenticate and call any Metadata API endpoint that resolves to a tenant context. When Disabled, all Meta API calls to tenant-scoped resources are rejected regardless of the token’s other permissions.
This is an unlock prerequisite, not a full bypass. After granting it, the token still obeys all other workspace-level permissions for each individual endpoint.
Tenant Center Secrets
Tenant Center Secrets
Sensitive tenant data — covers two distinct surfaces: the tenant License and tenant Environment Variables.Related docs: Tenant Center · Environment Variables
The two surfaces are:
- License — for tier3 (self-hosted / Regional Isolation) tenants, the license contains cluster credentials or external database connection strings. Exposure allows direct database or cluster access outside the Xano platform, hence treated as a secret.
- Environment Variables — key-value pairs injected into the tenant runtime; typically API keys, connection strings, and feature flags.
Tenant clusters
Tenant Cluster
Tenant Cluster
Tenant Clusters — registered remote clusters used to host tier3 (Regional Isolation) tenants. Self-hosted/enterprise feature only; available when the instance has tier3 tenant slots allocated.Related docs: Resource Management
Cluster registration stores credentials at create time; subsequent credential management is governed by the separate Tenant Cluster Secrets permission.
Tenant Cluster Secrets
Tenant Cluster Secrets
The cluster credentials stored for each registered remote cluster — the complete credential set for managing that cluster.Related docs: Resource Management
Both Read and Update events are written to the audit log.
Highest-privilege permission. Exposure of these credentials grants full control over the remote cluster — this should be granted only to operators who need to rotate or inspect credentials.Distinct from Tenant Center Secrets (which covers tenant database credentials, not cluster-level credentials).