Read more about how file management works in Xano
File Storage in Xano
The Content Upload Flow
When working with files in Xano, they can exist in a few different states.- File Resource
- The file resource can be thought of as a reference to your raw file data. It is a base64 encoded string that represents the file during execution, enabling you to pass the data through variables and functions that handle content management with ease.
- Raw File Data
- When necessary, you do also have the ability to turn your file resource into raw file data, and manipulate it inside of the function stack when appropriate, such as a CSV file.
- Metadata
- While the metadata is not a representation of the file data itself, the metadata is necessary when the file needs to be referenced inside of a database table. The tables do not store the files themselves, but hold onto the metadata, so that when the record is retrieved, you can also retrieve the file data, or deliver a link to the file.
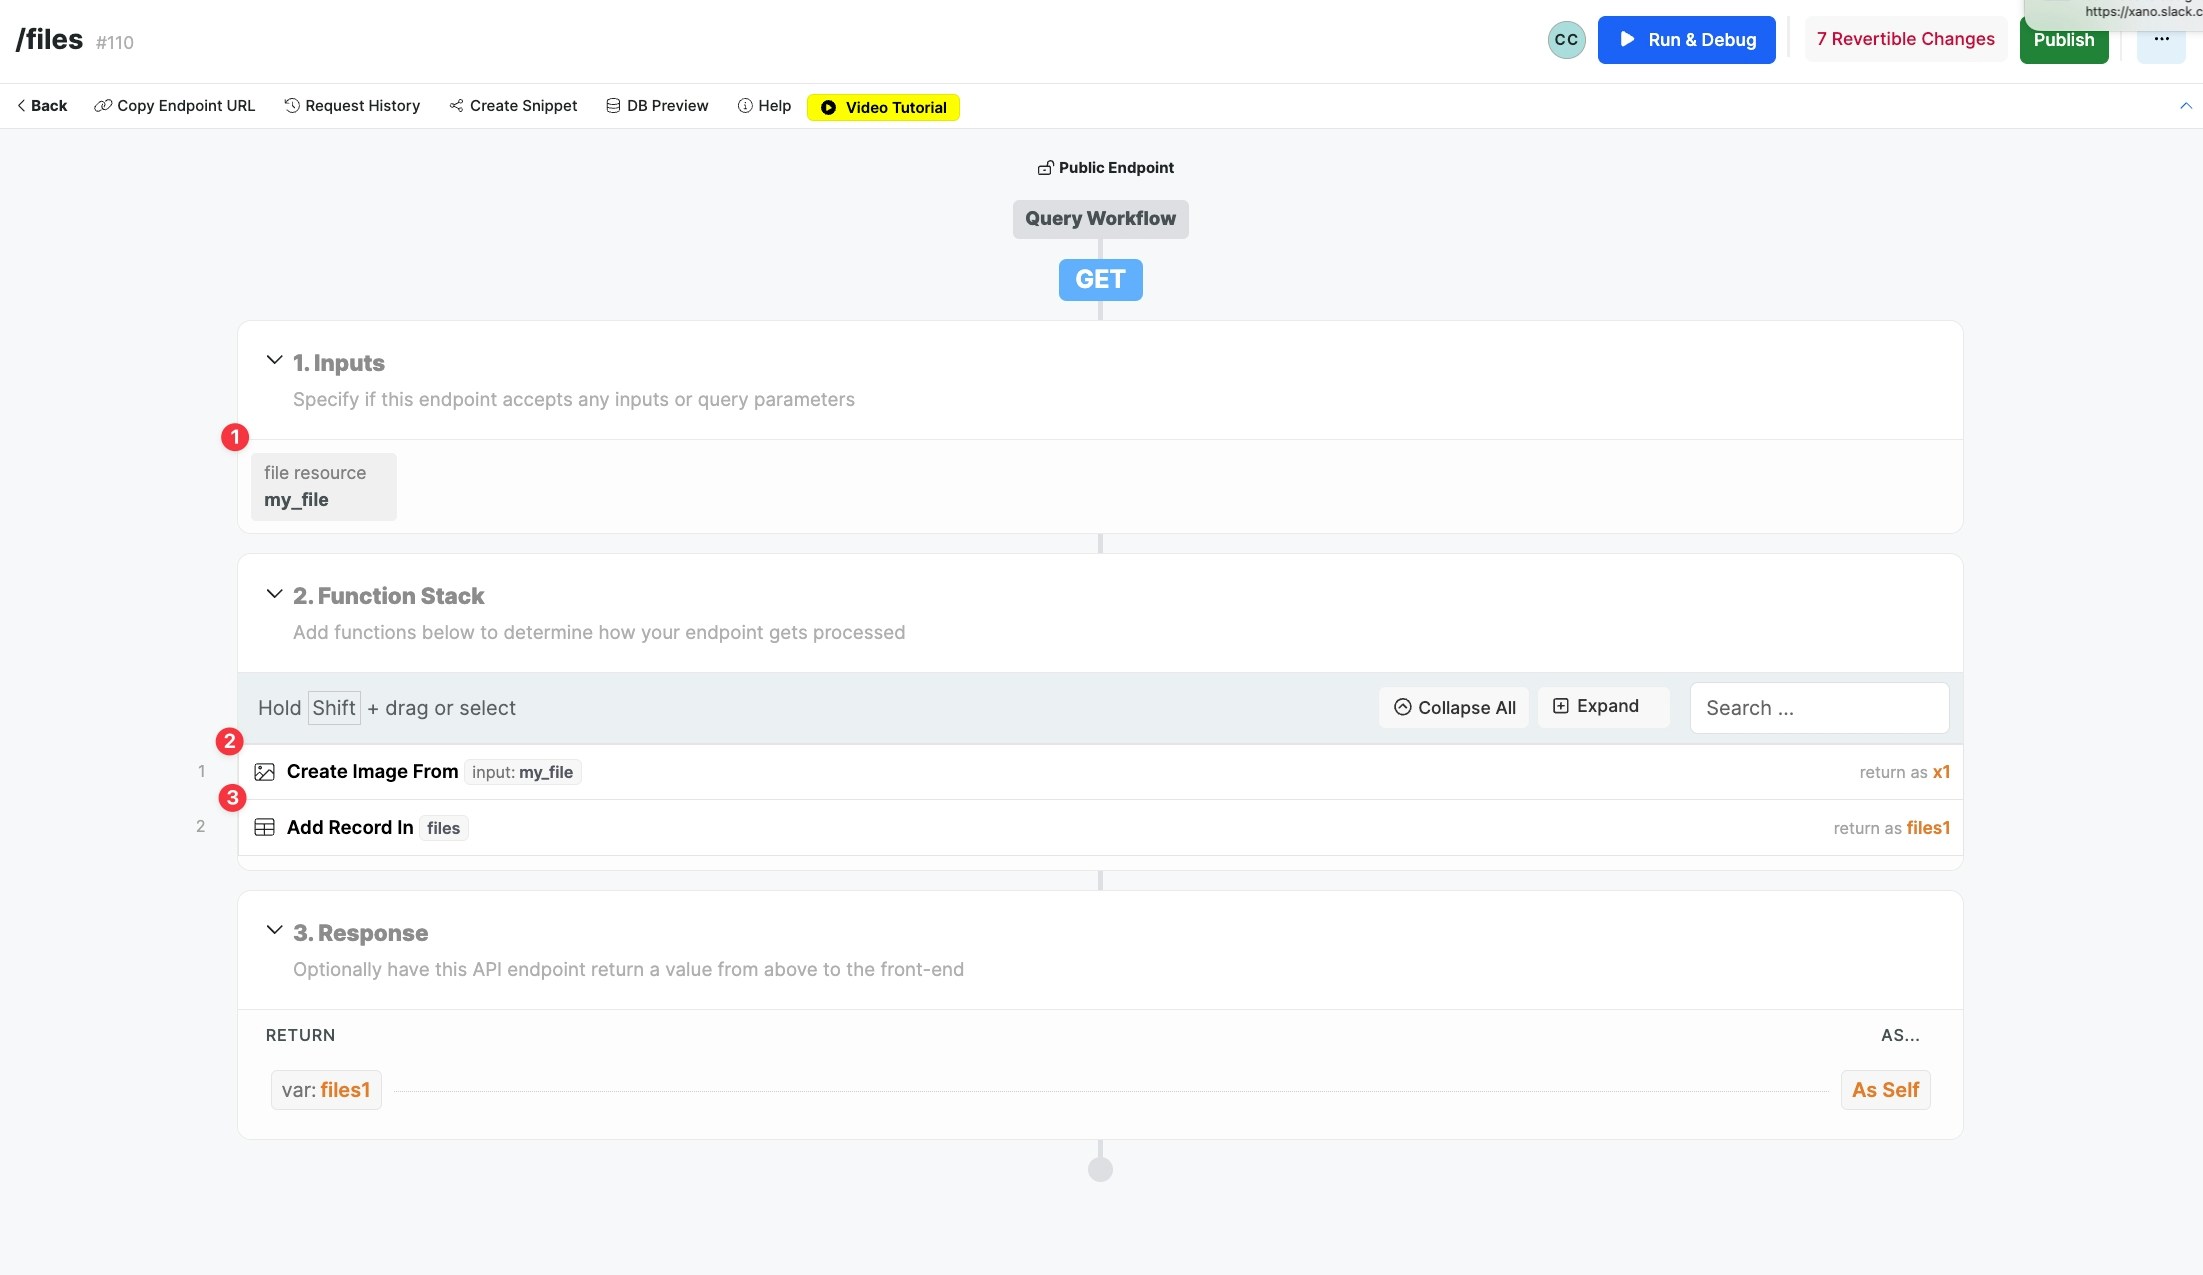
- Files in a function stack always start with a **file resource. **The file resource can come via a file resource input, or by using a Create File Resource function in the function stack itself (such as if the file comes from an external API request).
- After we have our file resource (in this case, our File Resource input), we need to generate metadata for that file in preparation to store it in our database table.
- Finally, once we have our metadata, we can write it to our database table, adding the metadata to the appropriate field in the record.
Input, Field Types, and Functions
The File Resource Input
Your content upload function stacks should always start with a file resource input, if your users are uploading files through your application. You can then utilize the file resource input in future functions, such as **metadata generation, **to store the file in your database or return a URL to the file.Field Types
Xano supports several different field types in the database related to content upload.- Image - For storing images
- Video - For storing video
- Audio - For storing audio
- Attachment - For storing anything else
Functions
The Content Upload Functions are:- Create Image Metadata - Creates image metadata from a file resource so that it can be formatted properly to be stored in Xano.
- Create Video Metadata - Creates video metadata from a file resource so that it can be formatted properly to be stored in Xano.
- Create Audio Metadata - Creates auto metadata from a file resource so that it can be formatted properly to be stored in Xano
- Create Attachment Metadata - Creates attachment metadata from a file resource so that it can be formatted properly to be stored in Xano.
- Create File Resource - This functions is able to create a file resource in the function stack from a variable. Typically, you will use a file resource as an input. However, there are certain use cases, for example, where you may hit an external API which is providing you with a raw image or file. In this event, you will want to first use this function to create a file resource then use one of the create metadata functions.
- Delete File Resource - This function will permanently delete a file stored in your Xano file storage. You’ll usually pair this with a database operation like Get Record / Query All Records, or you can delete a file created earlier in your function stack as long as one of the Metadata functions have been executed, as the Delete File Resource function requires you to specify the path to the file. Files are not recoverable. Proceed with caution.
- Zip: Create File Resource - Creates a new, empty zip file that you can add files to in your function stack
- Zip: Add File Resource - Used to add additional files into an existing zip file
- Zip: Remove File Resource - Used to remove files from an existing zip file
- Zip: Extract Zip File Resource - Used to extract a zip file and generate separate file resources for each file extracted
- Zip: View Contents - Show details about the files contained inside of a zip file
Serving File Downloads
There are a couple of different ways you can serve downloads of files, depending on your use case.Provide the URL for your frontend to process.
When you use one of the Create Metadata steps to store the file in your Xano files library, it returns a path key which contains a path to the file.Returning a complete URL requires prepending this path with the URL to your Xano instance.If our metadata looks like this……our full URL would look like this:
Serve the raw file contents for direct download.
If you want an API call to immediately initiate a file download, add the following headers to your function stack using the HTTP Header function.
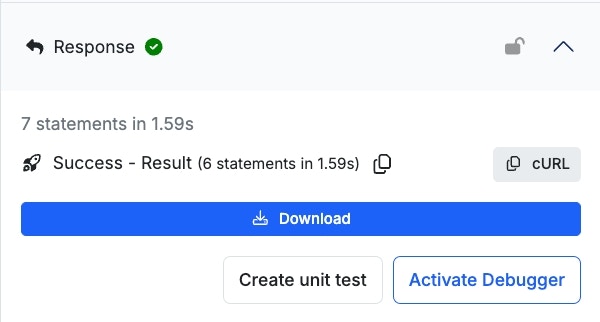
Content-Disposition: attachment; filename="replaceme"Content-Type: application/octet-stream
data path from the output of Get File Resource Data.Your function stack should look something like this:

Private File Storage
Private file storage is available as a premium add-on for our Launch plans, or included with Scale or HIPAA compliance. All files stored as private files are only accessible through on-demand time sensitive URL generation. This means that all files in your Private Storage are inaccessible until you generate a new URL in your function stack. To work with private file storage, there are two key components to understand: private file database fields and the Private File: Sign URL function.Private File Database Field
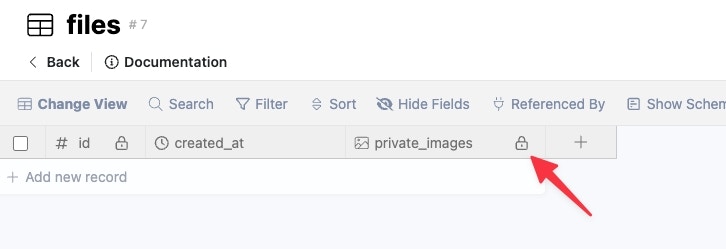
To store files in your private files library and have them accessible from your function stacks, you’ll need to use a database field that is enabled for private file storage. You can enable this for any of the current file field types. Keep in mind that the file access is defined per field, which means that you can not store both public and private files in the same field.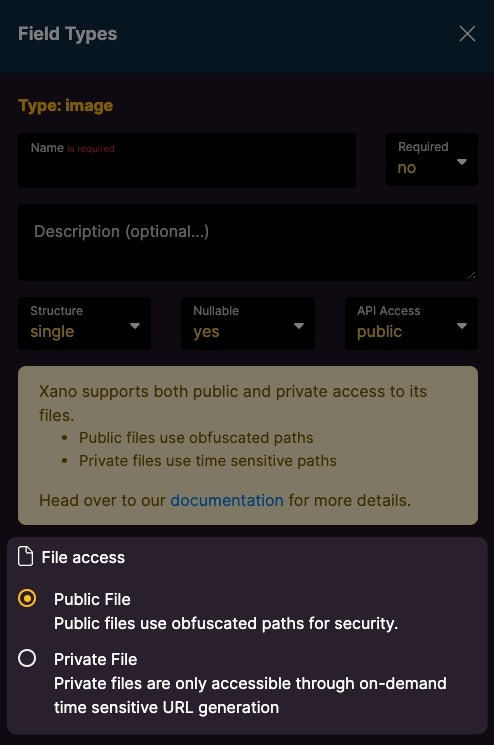
Private File: Sign URL function
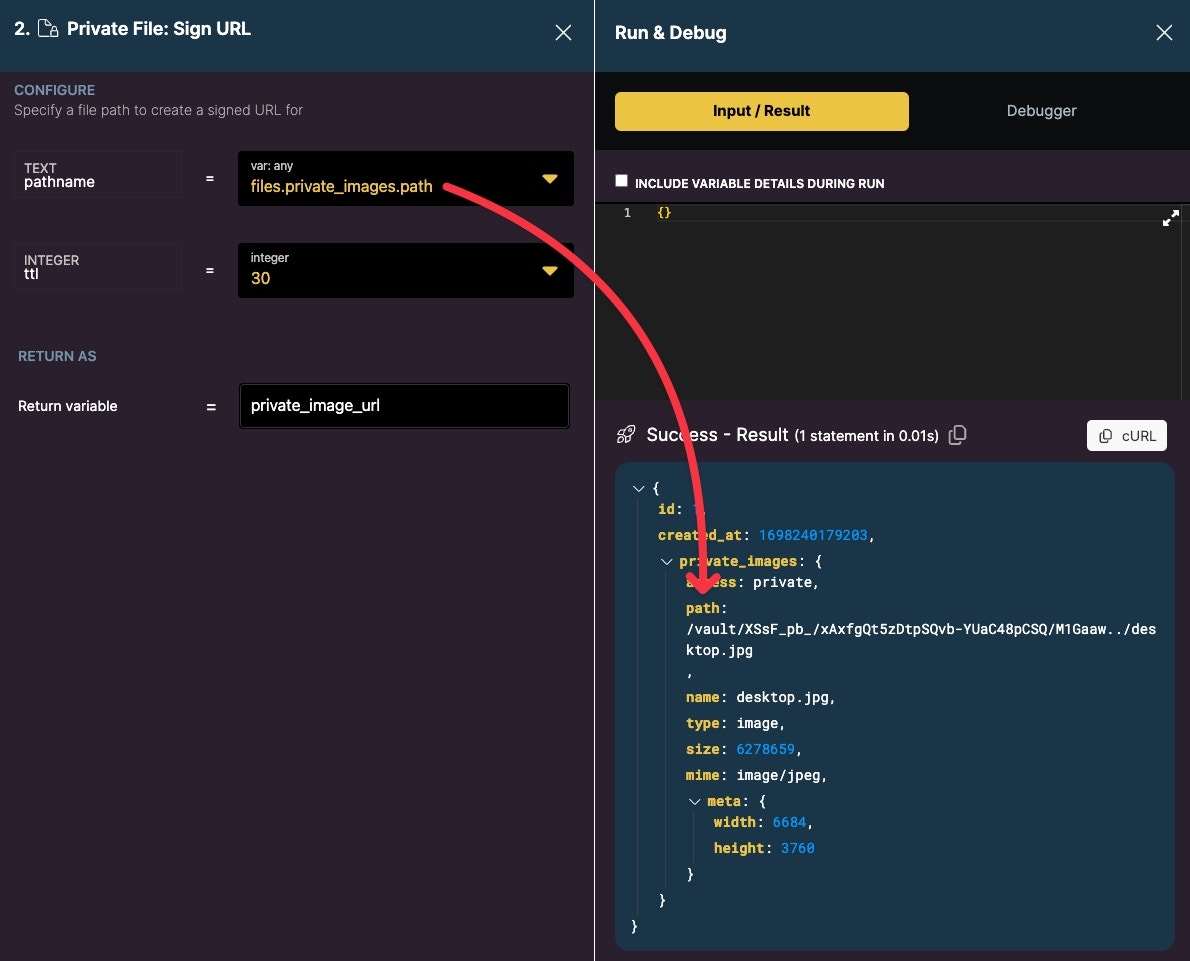
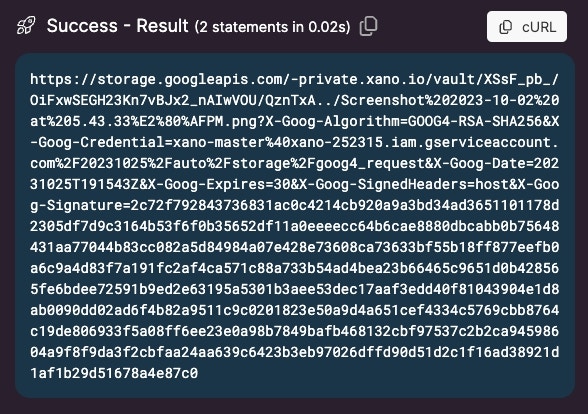
To generate a signed URL that enables a private file to be accessible, you first need to retrieve the path of the file, which is stored in the database record. In this example, we have queried our files table and this is the expected return for a private image. The main difference here is that on public files, a URL is returned. For private files, no URL is provided.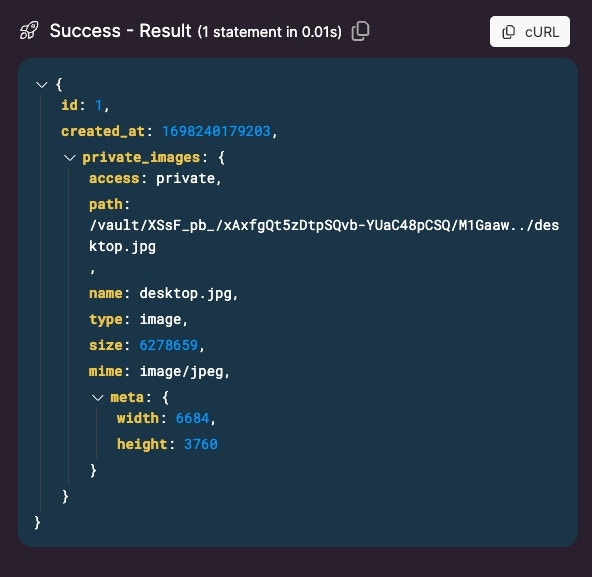
Zip Management
Viewing Zip File Contents
In this example, all we want to do is upload a zip file and review its contents in our function stack. We’ve added our file resource input to ingest the file, and then utilize the Zip: View Contents function, targeting our file resource input. We can also provide a password to this function if our zip file requires one to open.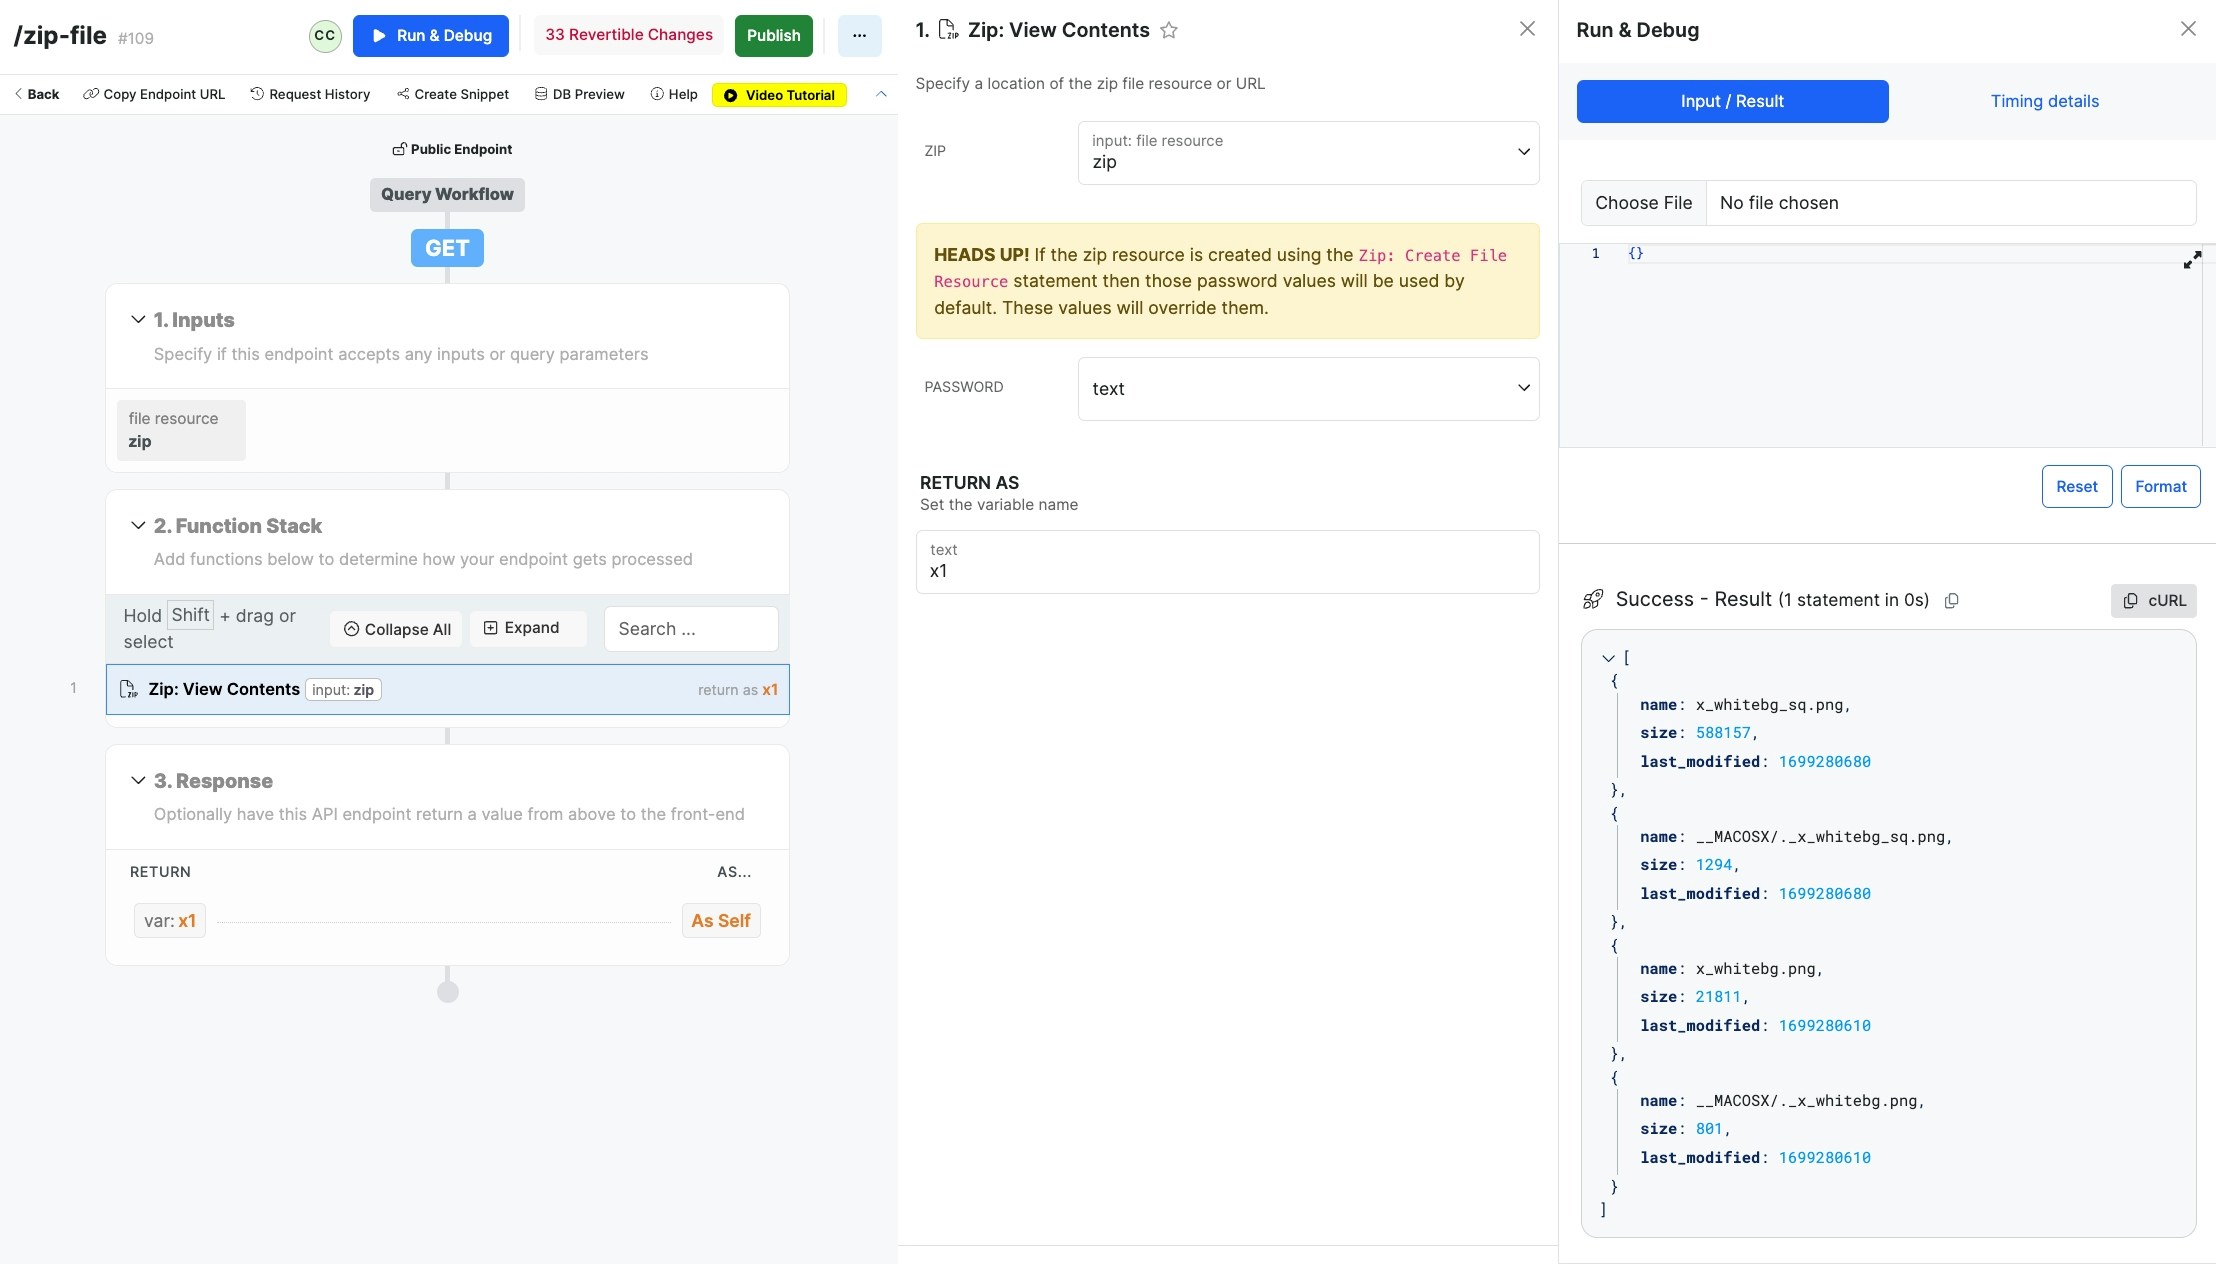
- Zip: View Contents - Returns the contents of our zip file to a variable
Extracting a Zip File
In this example, our users will be uploading a zip file. We then want to extract all of those files from the zip file in order to add those files individually to our database.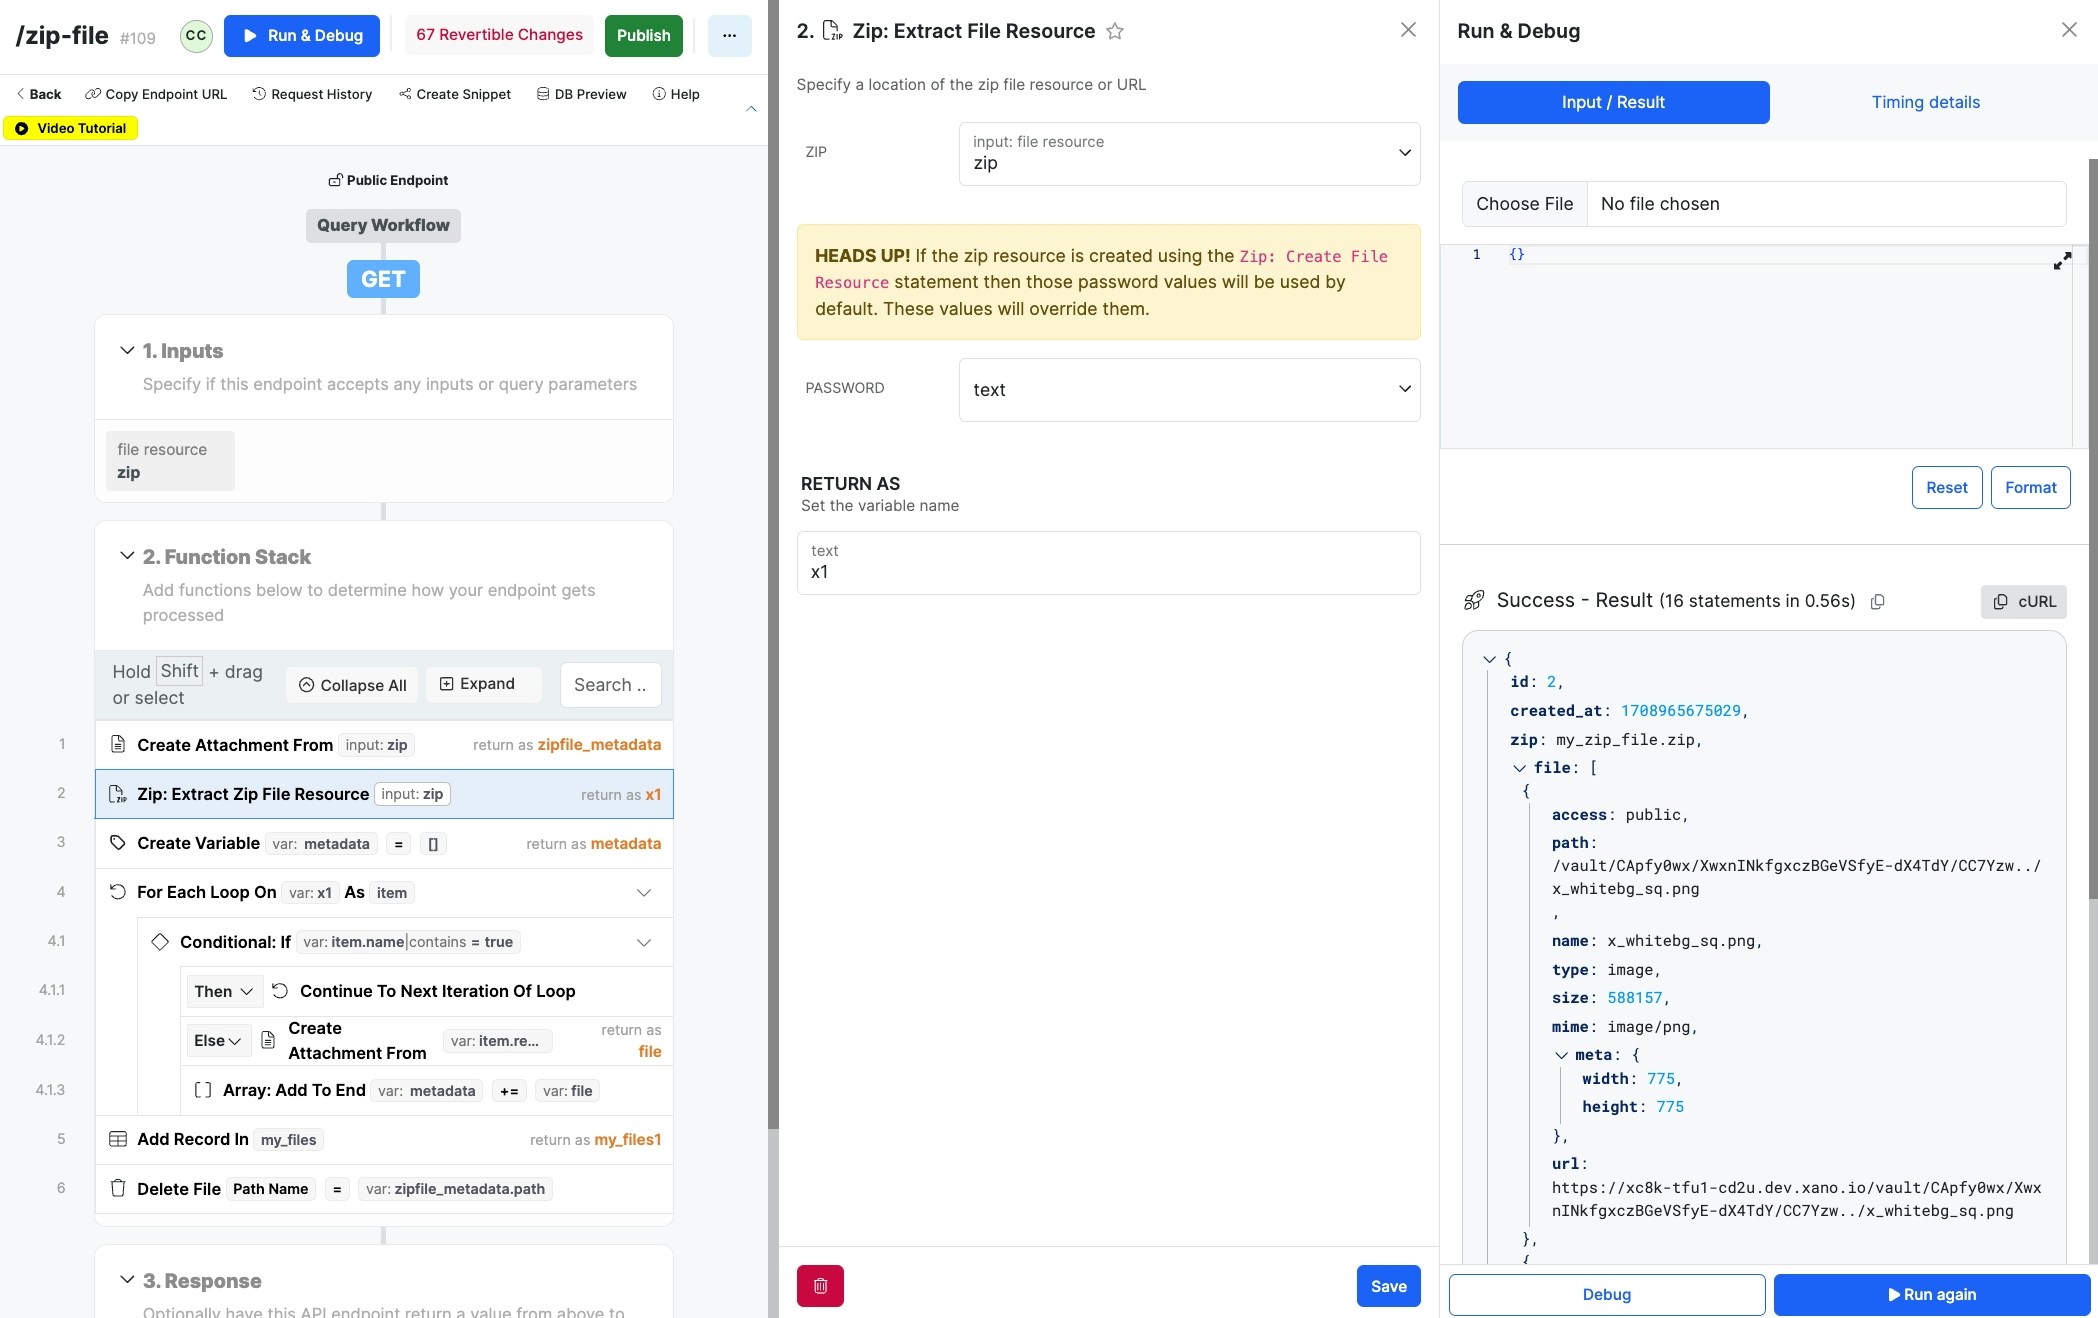
- Create Attachment Metadata - Creates metadata for the uploaded zip file so we can get the filename
- Zip: Extract Zip File Resource - Extracts the zip file and returns individual file resources for each file
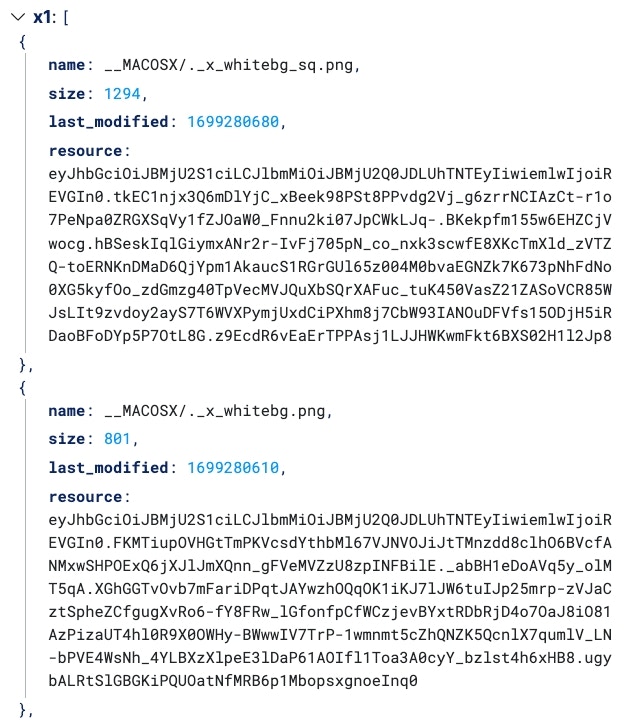
- Create Variable - Creates an empty array to store our individual files metadata
- For Each Loop - Loops against the array of file resources created in step 2
- Conditional - Checks for junk files generated by Mac OS and skips them. This step is optional.
- **Create Attachment **- Creates metadata for the file resource that the loop is currently iterating through
- Array: Add to End - Adds the generated metadata to our metadata array established in step 3
- Conditional - Checks for junk files generated by Mac OS and skips them. This step is optional.
- Add Record - Adds our metadata to the database
- Delete File - Deletes the zip file. This is only necessary if you generate metadata for it as we did in step 1.
Adding to a zip file
In this example, our users are uploading a zip file, and we want to add another file to that same zip file. We have two file resource inputs: one is for the zip file, and one is for the new file to add.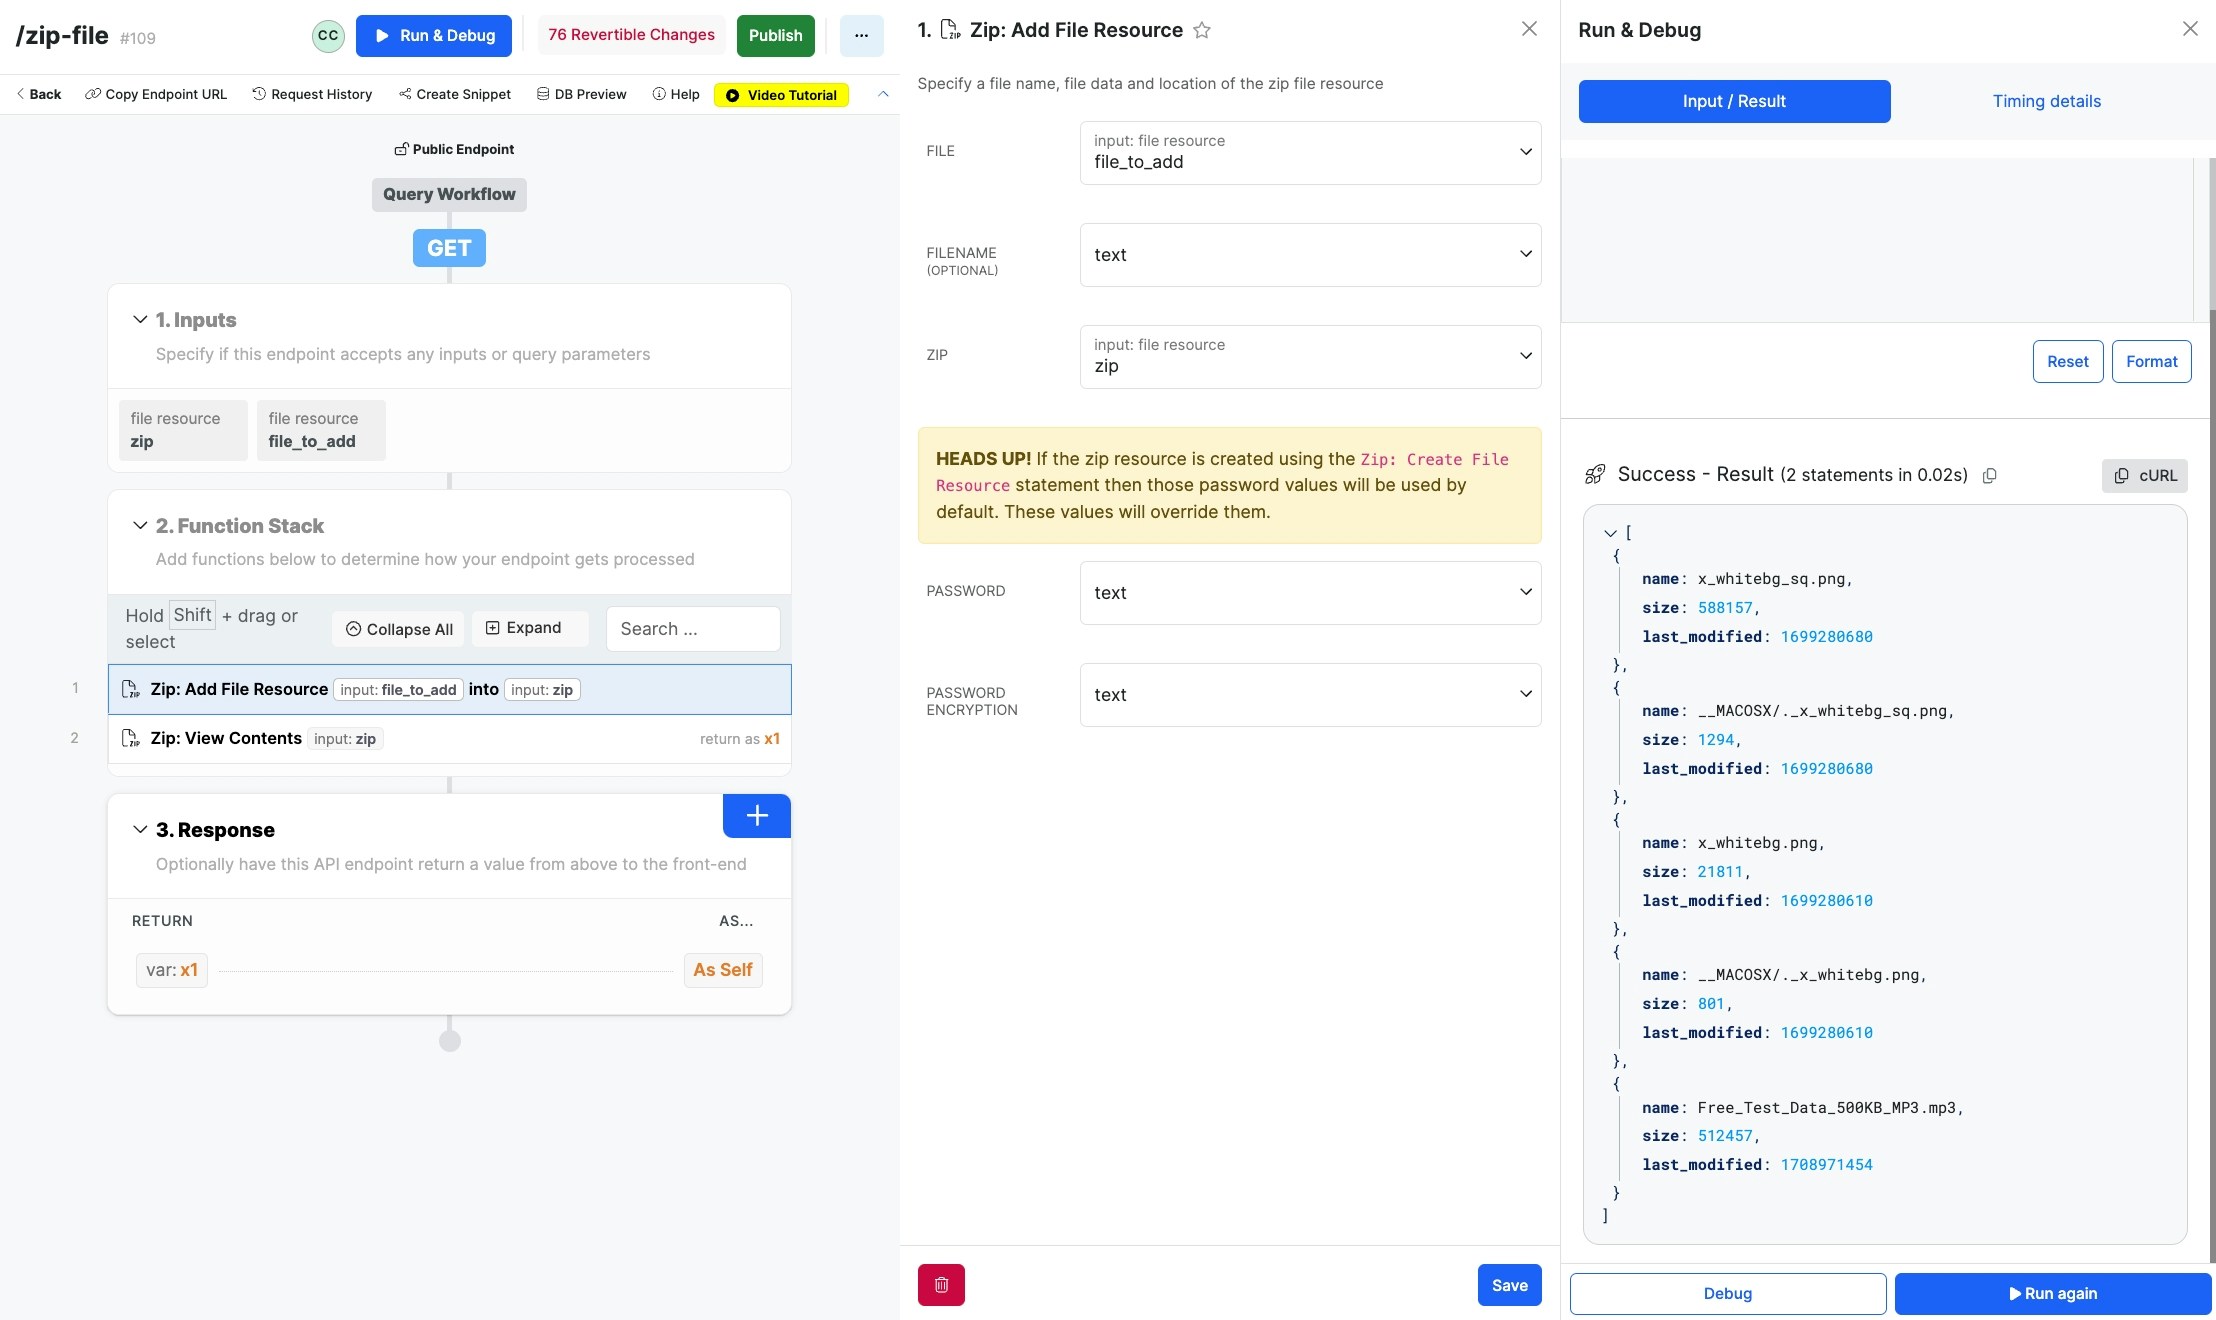
- Zip: Add File Resource - Adds the new file into the existing zip file
- Zip: View Contents - Allows us to view the contents of the updated zip file
Removing from a zip file
In this example, our users are uploading a zip file, as well as specifying a file to remove, and we want to remove that file from the zip file. We have two inputs: a file resource input for the zip file, and a text input for the file name to remove.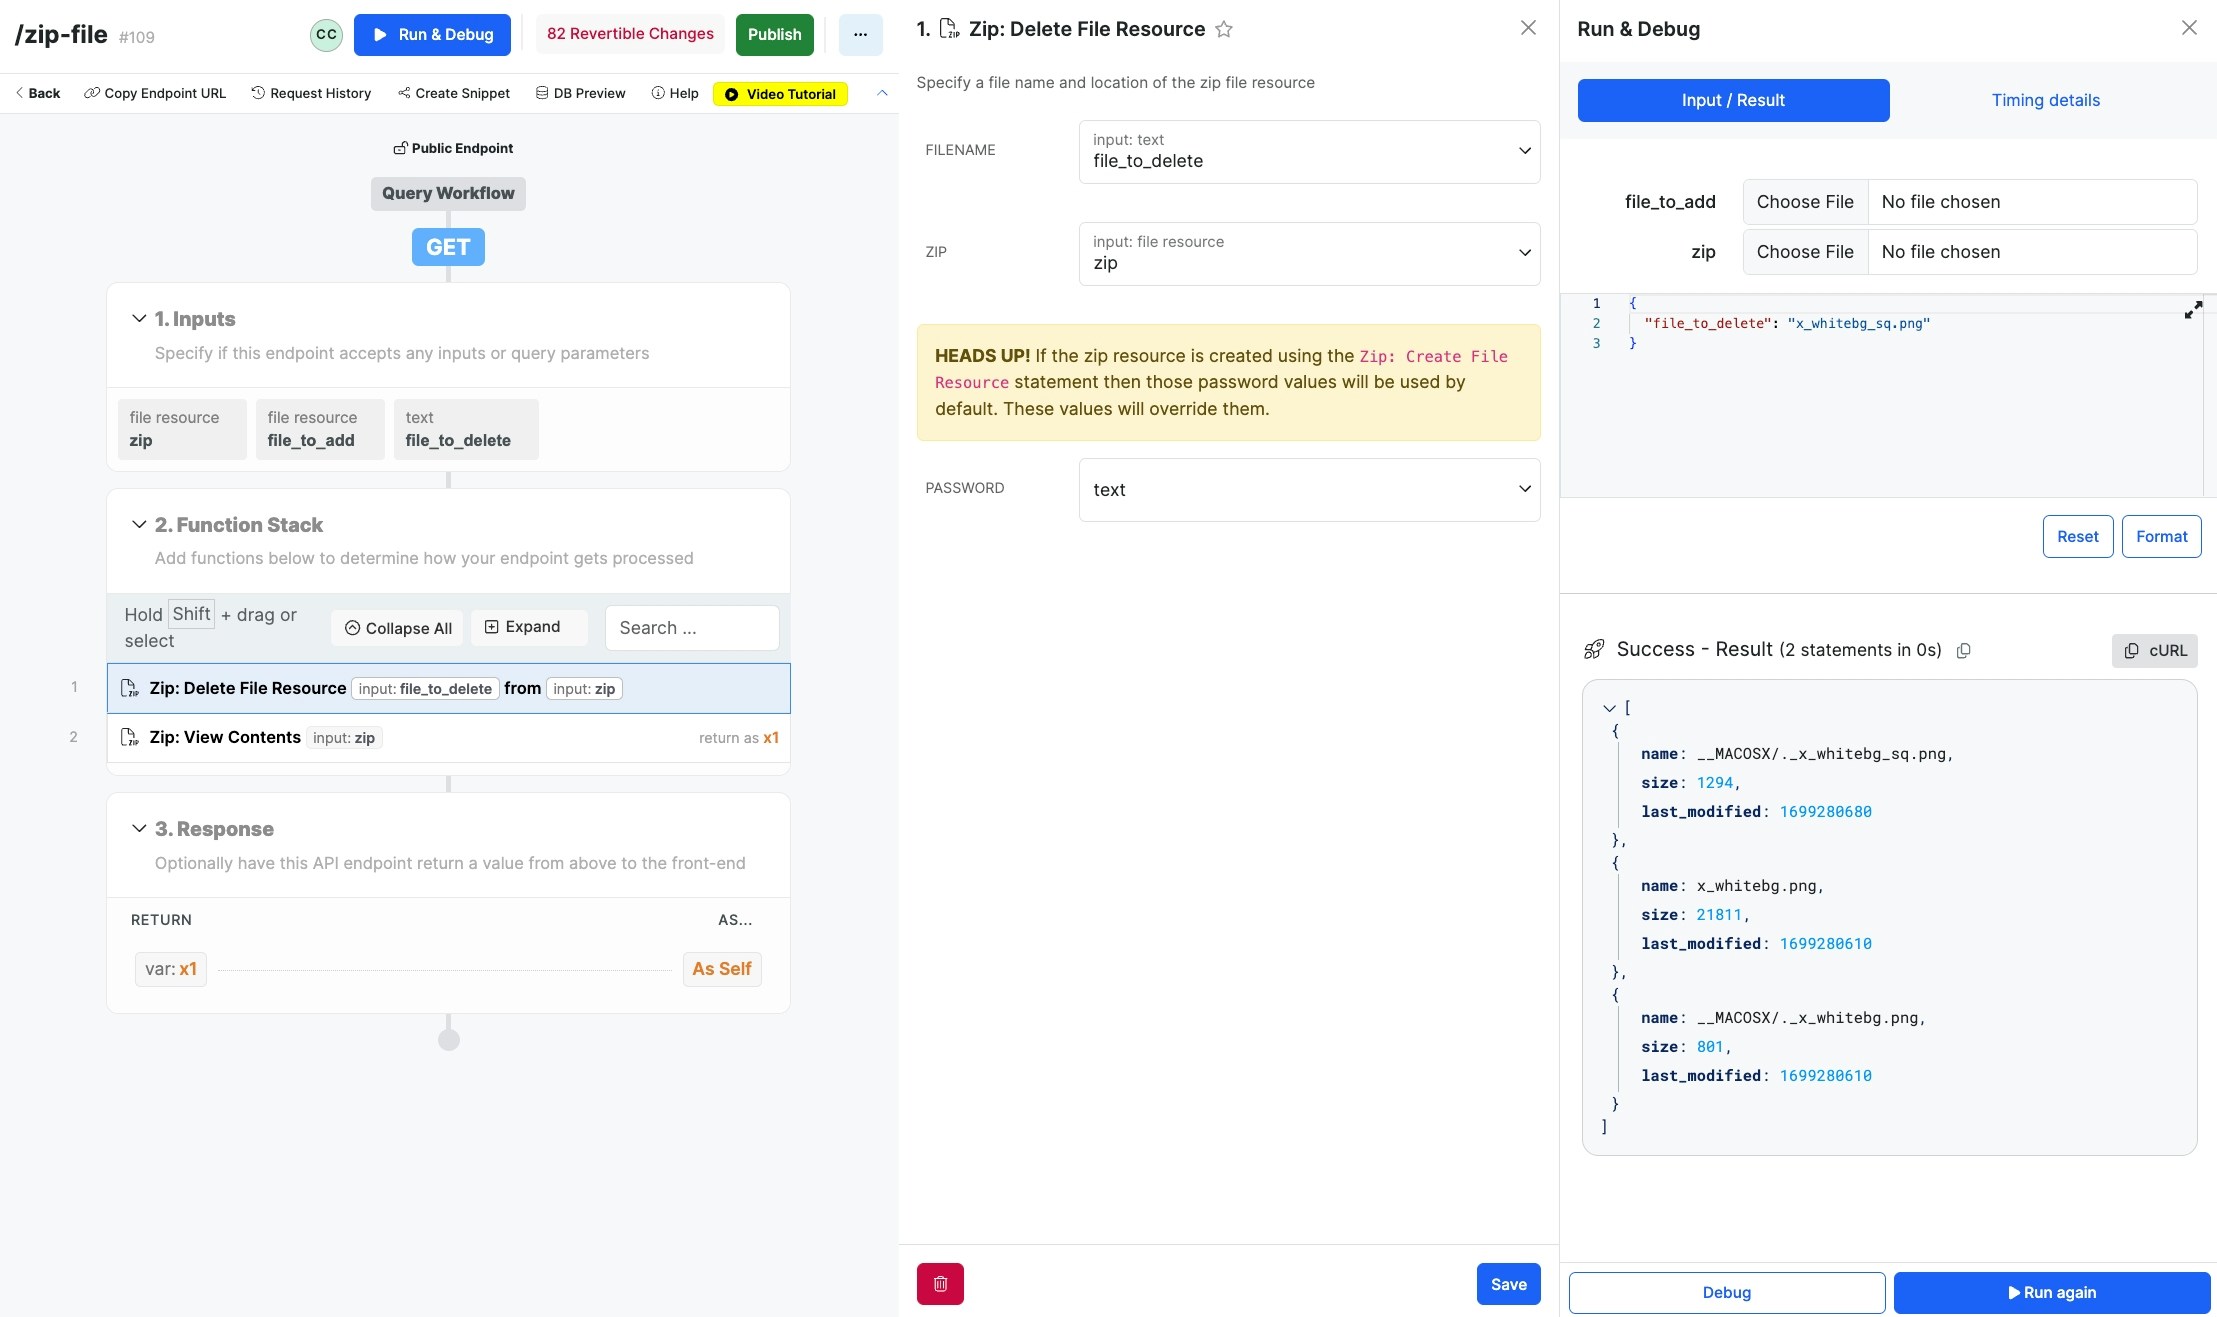
- Zip: Delete File Resource - Removes the file matching the filename from the existing zip file
- Zip: View Contents - Allows us to view the contents of the updated zip file
Creating a zip file from scratch
See Serving File Downloads to learn how to provide a download of a created ZIP file.
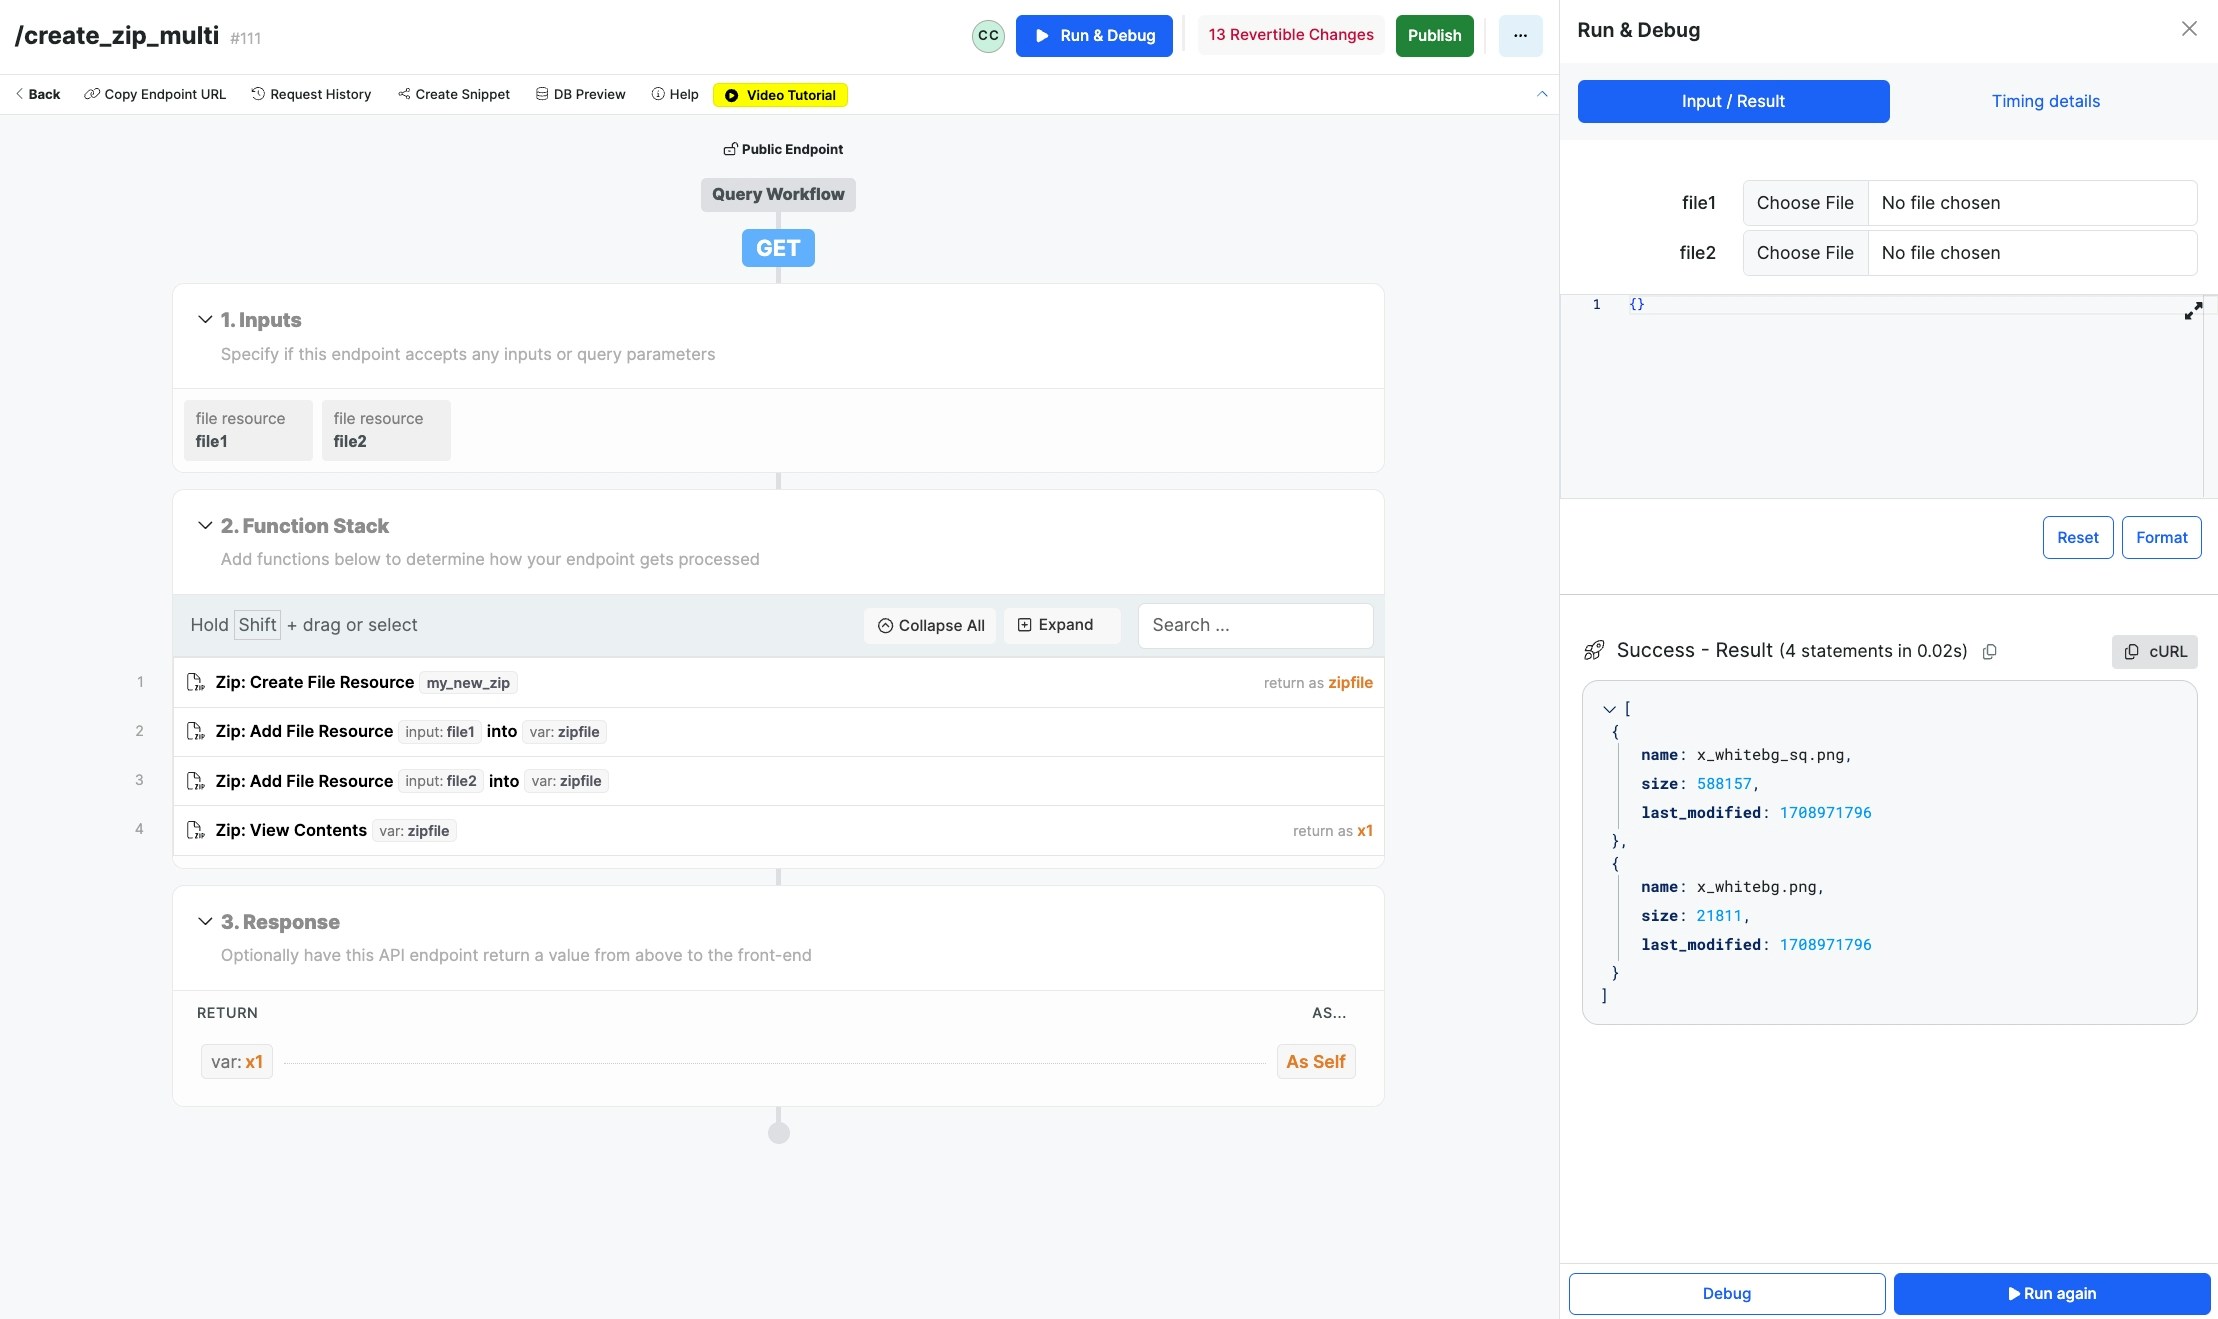
- Zip: Create File Resource - Creates our zip file that we can add to in the rest of the function stack
- Zip: Add File Resource - Adds the data from file1 into our zip file
- Zip: Add File Resource - Adds the data from file2 into our zip file
- Zip: View Contents - Allows us to review the zip file contents after completion
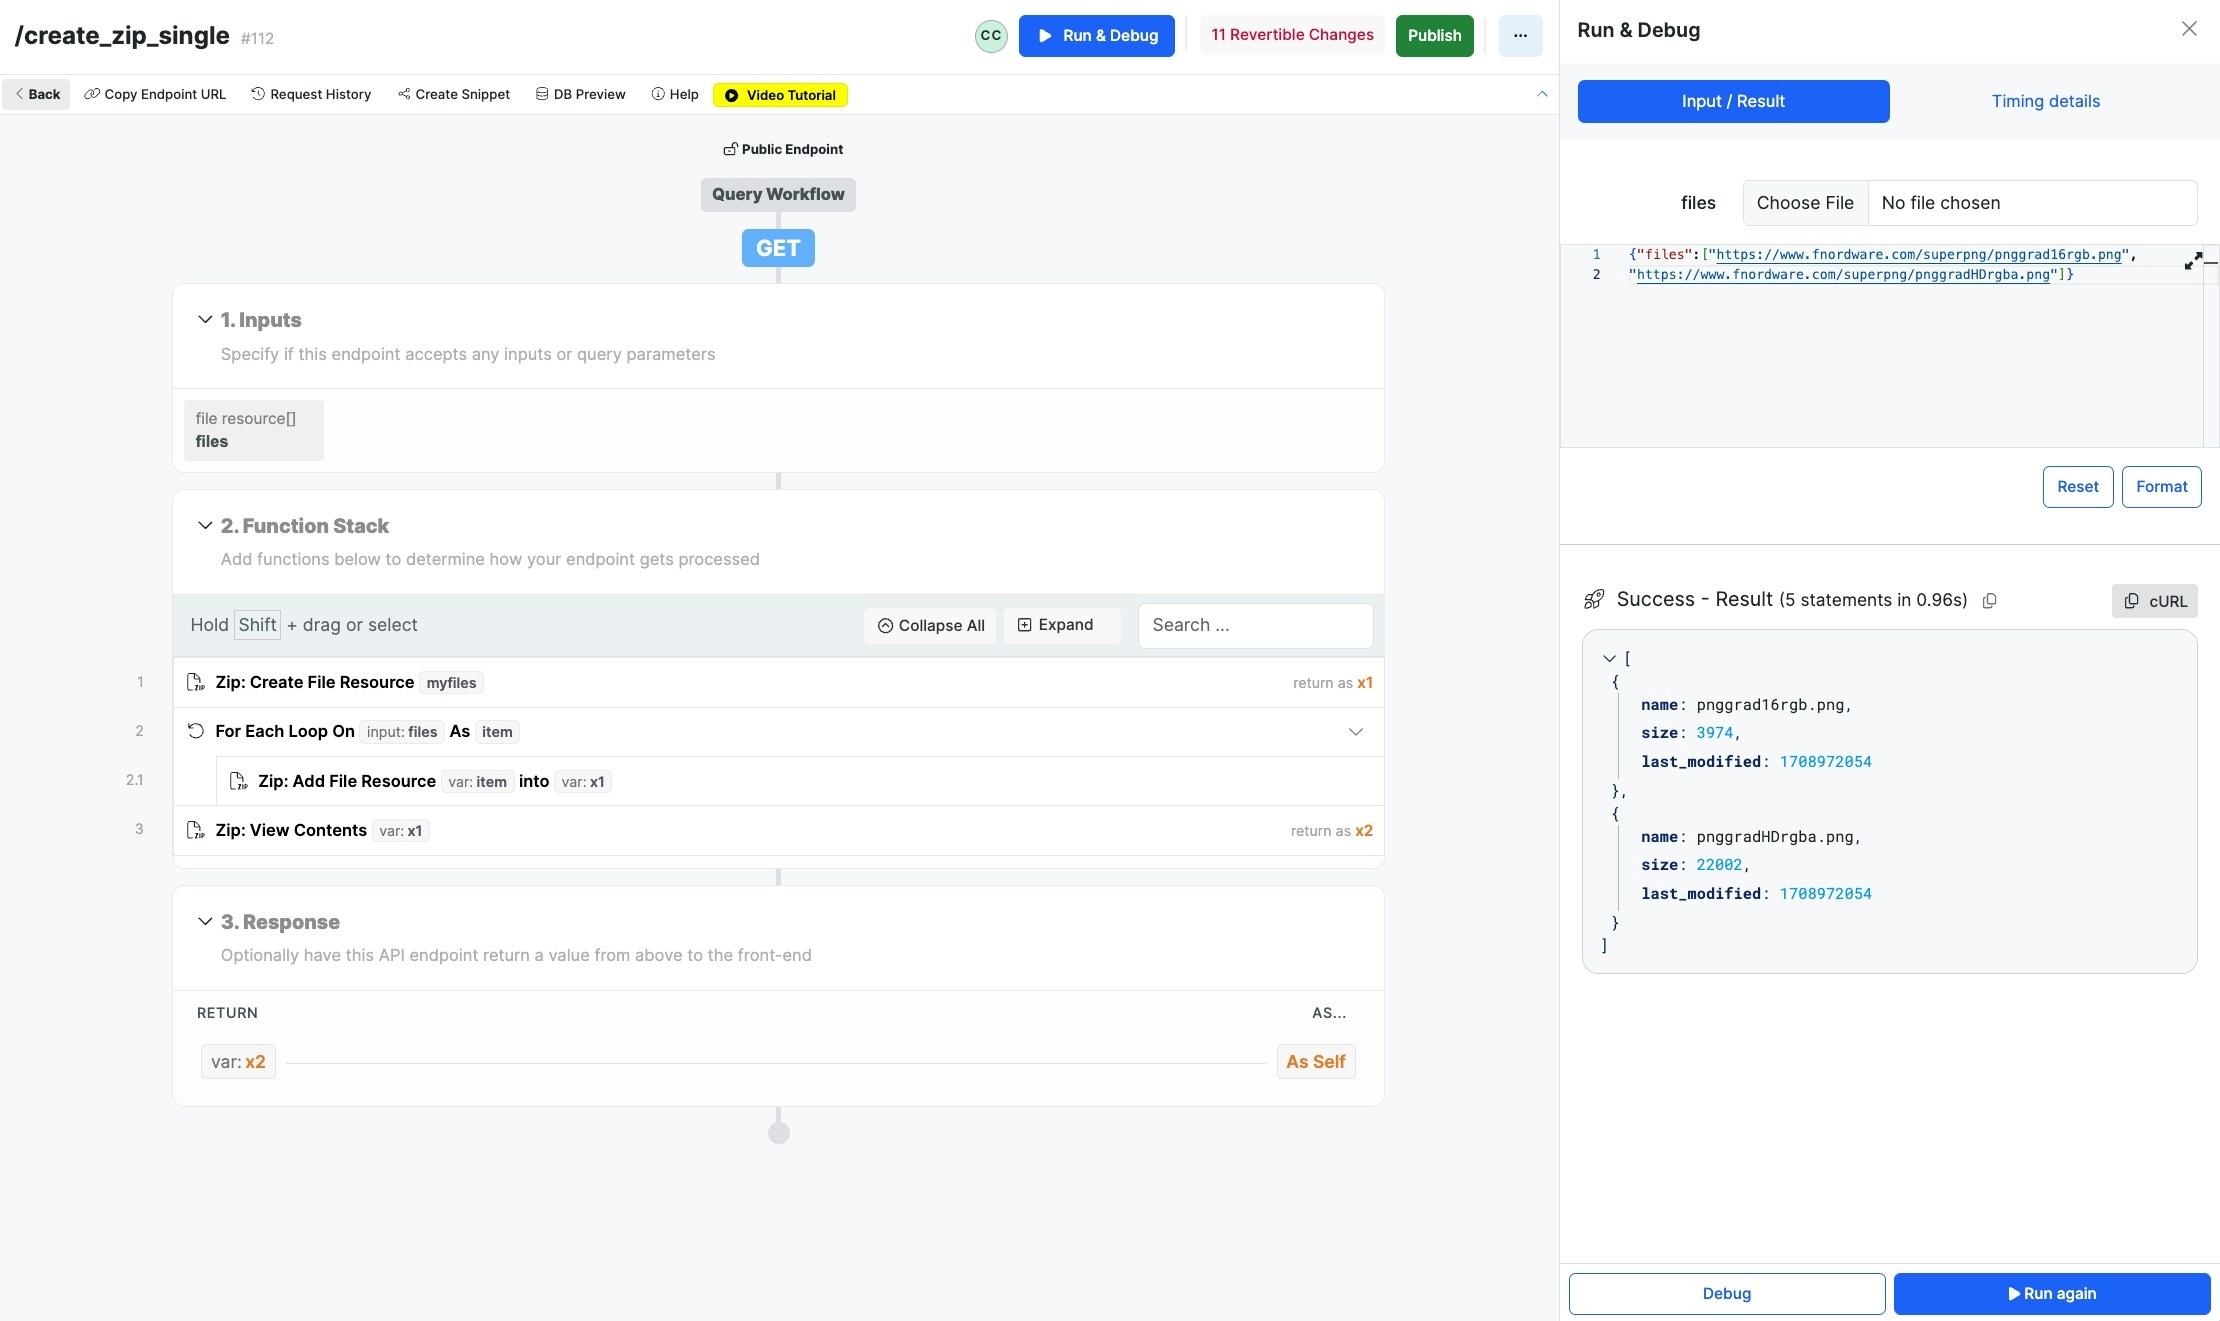
- Zip: Create File Resource - Creates our zip file that we can add to in the rest of the function stack
- For Each Loop - Loops against our list file resource input
- Zip: Add File Resource - Adds the file the loop is currently iterating through to our zip file established in step 1
- Zip: View Contents - Allows us to review the zip file contents after completion
A note about encryption
Xano supports creating and working with encrypted zip files. In the zip functions available, you’ll notice one or both of the following fields:
- Standard - This is the most compatible form of encryption (Traditional PKWARE encryption). This is required if you need to be able to extract your zip files using Windows’ native zip extraction.
- AES-128
- AES-256
- AES-512