Not looking for Agents, and just want to connect to your favorite AI models, like ChatGPT?Check out this resource instead: Chatbots
Quick SummaryAI agents in Xano refer to autonomous entities designed to perform tasks by leveraging artificial intelligence. Your Xano Agents can integrate with your database, APIs, tasks, and functions, as well as external systems.These agents can process data, make decisions, and execute actions without human intervention. AI agents in Xano can efficiently handle a variety of applications, from chatbots to data analysis tools, enhancing automation and productivity.
Introduction to AI Agents
Tools for Agents & MCP Servers
What are Agents?
- OpenAI
- Grok
- Anthropic / Claude
- Google Gemini
Building Agents in Xano
- From the sidebar, click Agents & MCP, then Agents
- Click + Add Agent
- Fill out the requested information
Please note that not all models support certain features such as:
- Structured outputs
- Reasoning
- Tool calls
- Structured outputs with tool calls
- Tool calls with reasoning
All Agents
Name
Give your agent a name that describes its role or primary function.Example:
Order Processing AgentDescription
Internal-only field describing what your agent does.Example: Analyzes incoming orders, decides on fulfillment priority, and triggers shipping workflows.
Agent Settings
Define dynamic inputs the Agent can accept from Function Stack workflows and reference environment variables.Use
{{ $args.propertyName }} for workflow inputs and {{ $env.variableName }} for environment variables.Model Host
Select the AI model host for the agent.Options
- Anthropic (Claude)
- OpenAI
- Google Gemini
Max Steps
Define how many steps the Agent can execute to complete its task.Example:
5System Prompt
Core instructions that define your Agent’s role, capabilities, and behavior.Example
You are a helpful AI Agent that completes tasks accurately. When you need additional information to complete a task, use the available tools. Never make assumptions.
Prompt Type
The type of prompt provided to the Agent.
Either
Either
messages (a list of prior conversation messages) or prompt (a single standard prompt).Example: messages or promptPrompt
Additional context and instructions sent with each request.Example
Please help the customer with their inquiry:
{{ $args.customer_message }}.
Their account ID is {{ $args.account_id }}.Structured Outputs
Configure the Agent to return responses in a specific JSON format using your predefined schema.Toggle the checkbox to enable or disable.
Output Schema
Define the JSON structure for structured outputs.Example keys
textuser_email
Tags
Categories for organizing your Agents.Example tags
contactmessaging
Request History
Controls logging of requests to Request History.Modes
- Inherit Settings: Uses the currently defined workspace settings
- Disabled: No logs recorded
- Enabled: Logs requests with options for storage limits
Anthropic Settings
API Key
Your Anthropic API key.
Get your key here.Example:
Get your key here.Example:
sk-ant-apixx-xxxxxxxxx-xxxxxxxxxxxxxxxxx-xxxxxxxxxxxxxxxxxxxxxxxxxxxxxxxxxxxxxxxxxxxxxxxxxxxxxxxxxx-xxxxxxxxModel
The Anthropic model to use.
List of available models here.Examples
List of available models here.Examples
claude-opus-4-1-20250805claude-3-7-sonnet-latest
Temperature
Controls randomness of the response.Higher values (e.g.
0.8) make output more random;
lower values (e.g. 0.2) make it more focused.Examples: 0.1, 0.9Send Reasoning
For reasoning models, when enabled, Claude creates
thinking content blocks showing internal reasoning before the final response.Example: Defaults to trueThinking
Google Generative AI (Gemini) Settings
API Key
Your Gemini API key.
Get your key here.Example:
Get your key here.Example:
AIzaSyDaGmWKa4JsXZ-HjGw7ISLn_3namBGewQeModel
The Gemini model to use.
List of available models here.Examples
List of available models here.Examples
gemini-2.5-progemini-2.5-flash-lite
Temperature
Controls randomness of the response (creativity).
Higher = more random, lower = more deterministic.
More info here.Examples:
Higher = more random, lower = more deterministic.
More info here.Examples:
0.1, 0.9Use Search Grounding
Grounding with Google Search connects Gemini to real-time web content and enables verifiable sources.
Works with all available languages.
Not all models support search grounding.
More info here.Example:
Works with all available languages.
Not all models support search grounding.
More info here.Example:
on or offThinking
OpenAI Settings
API Key
Your OpenAI API key.
Get your key here.Example:
Get your key here.Example:
sk-Am1rLw7xUwGxGuBasGsNt3BlbkFjdBgBUgBBK5BuG9y6oWWBModel
Temperature
Controls randomness of the response.Higher values (e.g.
0.8) make output more random;
lower values (e.g. 0.2) make it more focused.Examples: 0.1, 0.9Reasoning Effort
For reasoning models, sets how much effort the model spends thinking during generation.Examples:
low, medium, highAdding Tools to an Agent
An Agent needs tools to function — the tools are essentially single functions that the Agent can perform, such as looking up user data or cancelling a subscription.- From the sidebar, click Agents & MCP, then Tools
- Click + Add Tool
-
Fill out the requested information
Using Existing Function Stacks as Tools
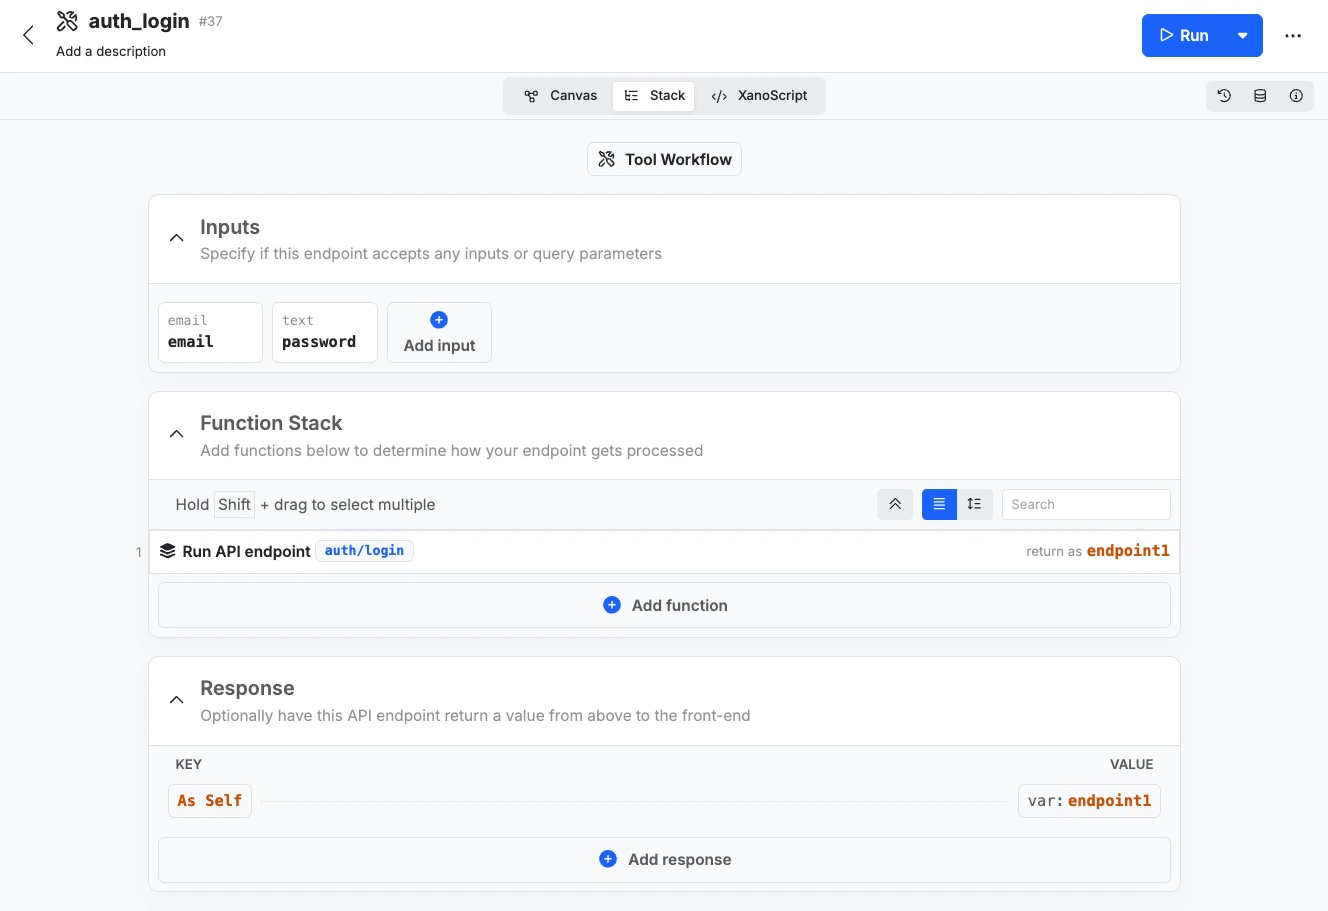
A tool created from an existing API endpoint
Creating Tools from Scratch
From the sidebar, click Agents & MCP, then Tools, then + Add Tool Fill out the required information.- Name
- Give your tool a recognizable name. This is also the command that will be used to execute your tool.
- Description
- This is an internal-only field just for you to describe the purpose of the tool.
- Allow Connections
- Enable or diffsable connection to this specific tool
- Add Tag
- Tag your tools for easier search across your Xano workspace
- Authentication
- Determine if this tool requires an authentication token
- Tool Instructions
- These instructions are what your clients will use to understand how to send requests to the tool, and what the expected result will be. Markdown format is recommended.
Structured Outputs
Structured Outputs are used for providing a specific format that you need your agent to return its result as. This is especially useful when you are calling agents from other agents and want to ensure that the output from Agent 1 is clear and easy to understand for Agent 2. You can add structured outputs to your Agent in the settings by checking the Structured Outputs checkbox, and then clicking + Add Output Schema to build your output schema.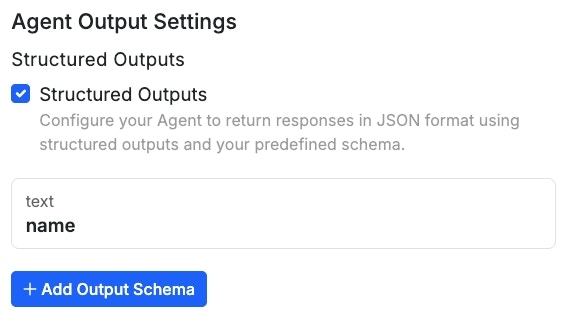
Example Agents
🤖 Customer Support Agent
Purpose This Agent is designed to handle customer inquiries that don’t typically need human interaction. Tools An Agent designed for this purpose might have the following tools available:- Get User Information
- Retrieves user information from the database
- Update User Information
- Retrieves existing user information from the database, and updates it per a user’s request, such as changing their phone number or address
- Send Verification Code
- This tool could be used as a secondary security measure to verify that the request is coming from the user that the data belongs to
- Change Subscription
- Based on the user’s request, this could be used to stop an upcoming renewal, or cancel a subscription immediately. Because Agents excel at ‘fuzzy logic’ depending on certain circumstances, this could also be used for things like churn prevention — dynamically offering the user a discount to stay, for example
- Search Documentation
- Calls an external API from your chosen documentation platform to search your product documentation in an attempt to solve the user’s query without human intervention
- Create Support Ticket
- In the case that the Agent does not have the necessary tools to solve the user’s concerns, create a support ticket for human intervention