Realtime

Learn how realtime connections work in Xano and how you can incorporate them into your application.

What is Realtime?

Realtime can be defined as anything that enables your application to provide live updates inside of your application. Think of something like a chat window, where volume of interactions can be high, and it doesn't really make sense to constantly ping an API for new updates. Realtime enables an always-open connection, and in combination with our Javascript SDK or other frontend integration, can easily be enabled in your applications that use Xano as a backend.

Behind the scenes, Realtime connections are powered by a Websocket server to maintain connections. It can enable you to build dynamic and responsive functions for your website or application, such as a real-time chat, collaboration, or instant in-app notifications.

Realtime can also refer to database triggers, which is logic that can run immediately when something changes in a database table. For more information on triggers, see this section of our documentation.

How does Realtime work in Xano?

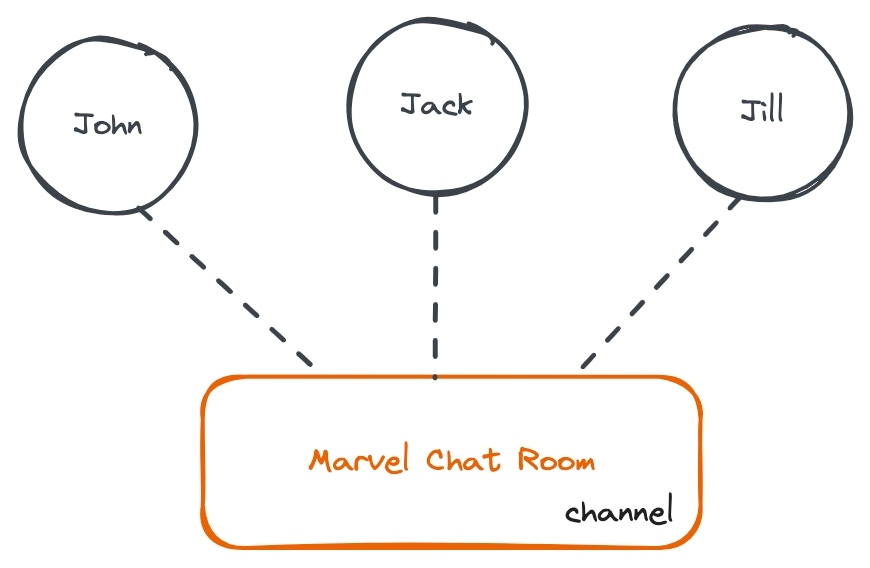
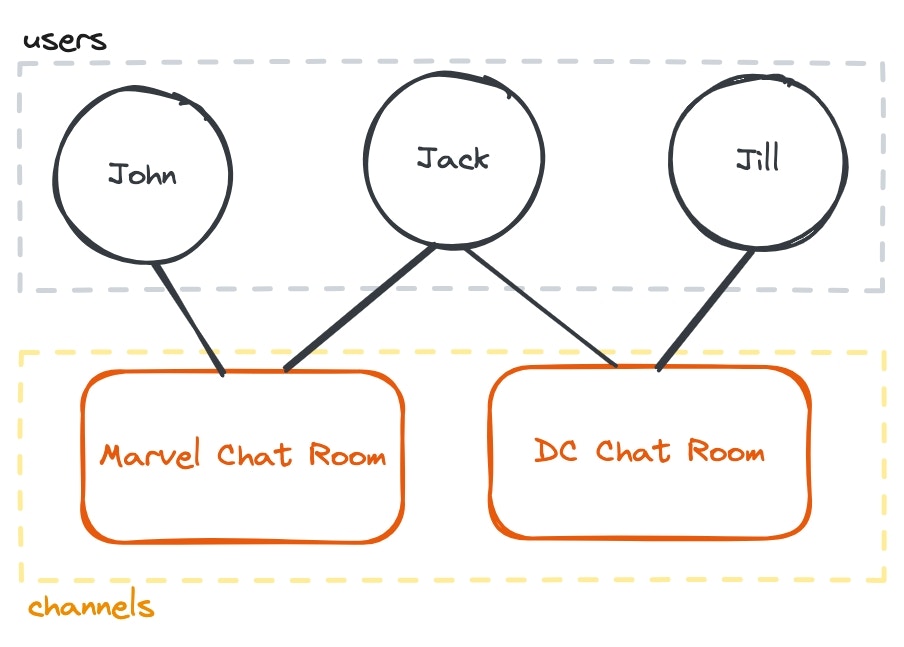
When your client (user or application) connects to a Realtime channel in your backend, it will start listening for new messages. A channel is just a way to segregate messages into 'sections'; similar to having separate chat threads with different people, each thread would have its own channel.

A message can be anything you want, from plain text to complex JSON. To keep things easy to understand, the instructions below will be using plain text messages.

In this example, we have a channel for a 'Marvel Chat Room'. All of our users are connected to this chat room. Anytime someone sends a message, it will appear for every user connected. Functionally, this means that if Jill sends (or broadcasts) a new message, John and Jack will receive it, but Jill will also receive the message back; this makes it super simple to ensure that the view across all clients remains in sync.

Realtime allows you to use as many channels as you want. If we were to open a new channel, a 'DC Chat Room', and Jack joins both of them, he will be able to send and receive messages in both channels. John will not be able to interact with the DC chat room until he joins the channel; same with Jill and the Marvel chat room.

How do I use Realtime?

Enabling Realtime

If you haven't done so already, you'll need to enable Realtime at the workspace level. From your workspace dashboard, open the menu in the top-right corner, choose Realtime Settings, change the dropdown to Yes, and then click Save.

If this is the first workspace to have Realtime enabled in your instance (even if you've had it enabled and then disabled it previously), Xano will need to provision the additional resources required for Realtime to function. This should only take a few minutes to complete, and you can check progress from the Realtime Settings panel.

After Realtime is enabled, you'll need to define some channel permissions. For a deep dive into how channel permissions work, see this section of our documentation.

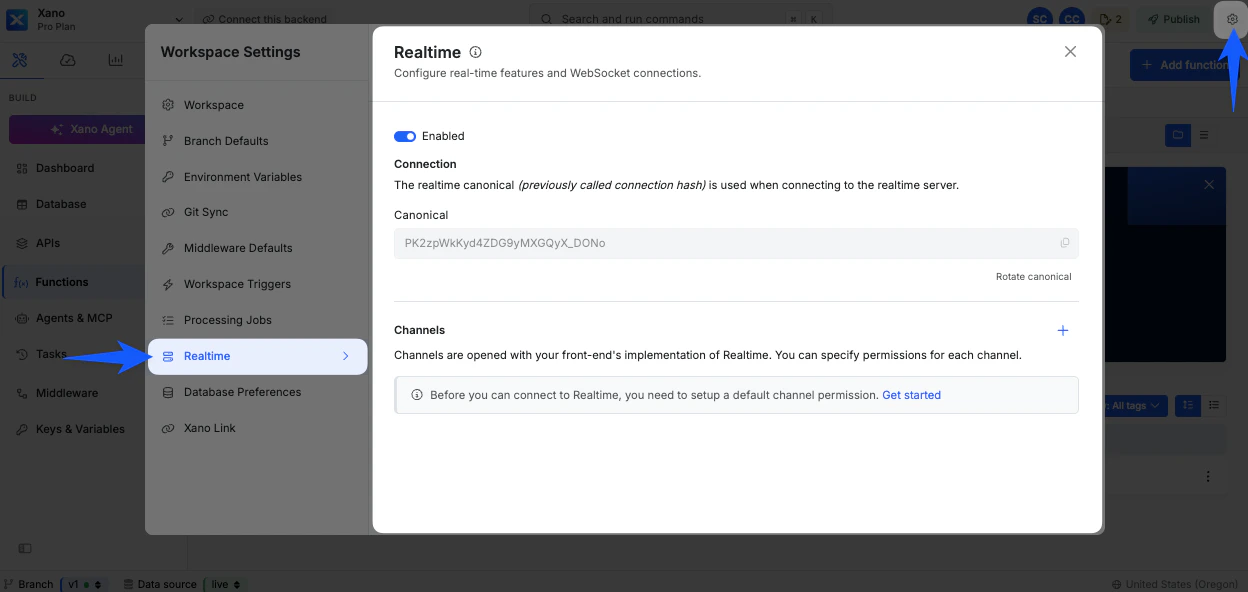
Implementation using the Xano SDK

We've made using Xano Realtime as easy as possible to build into your application by integrating it into our Xano SDK.

If you aren't familiar with Javascript, that's okay. We hope to have more direct integrations with your favorite frontends in the near future. Each code snippet is broken down into a special Code Explanation section to help you understand what's going on.

To get started, import the SDK to your project by...

Using our HTML import (best for beginners)

<script type="text/javascript" src="https://cdn.jsdelivr.net/npm/@xano/js-sdk@latest/dist/xano.min.js"></script>

Using NPM

npm install @xano/js-sdk

Next, you'll need to collect the following information:

  • An instance base URL, which you can find anywhere when logged into Xano.

  • The realtime connection hash, which is located in your Realtime Settings panel.

We need to initialize a new xanoClient, using the following Javascript.

If you are already initializing the SDK for other purposes, just add the realtimeConnectionHash parameter. You do not need to specify instanceBaseUrl if you are providing an API group base URL.

const xanoClient = new XanoClient({
  instanceBaseUrl: "http://abc1-def2-ghi3.xano.io/",
  realtimeConnectionHash: "a1b2c3d4e5f6g7h8i9",
});
Code Explanation
const xanoClient = new XanoClient

This defines a new variable called xanoClient. The value for this variable is "new XanoClient", which calls the SDK to tell it we're establishing a connection to Xano.

The ({ lets the code know that we are going to send some parameters to the SDK along with our request to establish a connection.

  instanceBaseURL: "http://abc1-def2-ghi3.xano.io/",
  realtimeConnectionHash: "a1b2c3d4e5f6g7h8i9",
});

This is the instance URL and our realtime connection hash that we are using to establish our connection.

We also need to define a channel for our messages to live in.

const marvelChannel = this.xanoClient.channel("marvel-chat-room");
Code Explanation
const marvelChannel = this.xanoClient.channel("marvel-chat-room");

Just like before, we're defining a new variable, this time called marvelChannel with const marvelChannel

For the value, we are referencing this.xanoClient. 'this' refers to the global object. Without getting into too much detail, the global object can just be thought of as the entirety of your Javascript code. channel("marvel-chat-room"); just defines the channel name.

Now that you have initialized your Xano SDK and defined a channel, we can listening for new messages.

marvelChannel.on((message) => {
  switch (message.action) {
    case 'message':
      messageReceived(message.payload);
      break;
    default:
      console.info(message);
  }
});
Code Explanation
marvelChannel.on((message) => {

We previously defined our marvelChannel, so now we can issue commands to it. In this case, the 'on' command just tells the SDK "I'm ready to listen for messages; whenever there is a message, run the code inside the {} brackets.

 switch (message.action) {

Switch starts a decision-making process (kind of like our If/Then statements) based on the contents of the command received.

  case 'message':
      messageReceived(message.payload);
      break;

We're now telling our switch command "When you see [Realtime] Message sent to you, call a function called messageReceived with the message contents from message.payload and then stop (break). Don't worry, we haven't gone over messageReceived yet, so it's okay if that seems strange. This would be the function that your frontend uses to actually display the message, so it will vary based on your specific application.

    default:
      console.info(message);
  }
});

This last piece tells our switch command "If the message is anything else but [Realtime] Message, do this instead. In this case, 'this' is just logging the message so we can review it in our browser's Developer Console.

So far, we've enabled the Xano SDK, set up our Marvel channel, and implemented a function to listen for new messages. The last piece is to add a function to send new messages to the channel.

marvelChannel.message("Hello World!");
Code Explanation
marvelChannel.message("Hello World!");

In this code snippet, we're talking to our marvelChannel, and sending a message of Hello World!

With that, we're ready to start building Realtime into our front-end! View and play with a completed example below.

Be aware that the demo code below assumes you have a channel called marvel-chat-room defined in your channel permissions. If you'd like to use a different channel name, find this line:

 const marvelChannel = xanoClient.channel('marvel-chat-room');

and update "marvel-chat-room" to your channel name.

Instructions:

  1. Click here to open the demo in a new tab.

  2. Fill in your API group base URL and Connection Hash.

  3. Click 'Submit'.

To achieve the maximum effect, duplicate the tab and have a little chat with yourself!

Or, if you prefer, you can download the Marvel Chat example below and play around with the code locally. Make sure you open the HTML file in a text or code editor of your choice and update the instance base URL and connection hash.

Xano Auth + Realtime

To authenticate your users with channels that require authentication, you will use your xanoClient as usual. The client will automatically authenticate if the realtimeAuthToken setting is set.

After your xanoClient is defined, perform an API request to your login or signup endpoint and store the returned auth token using the setRealtimeAuthToken command.

You can generate separate auth tokens when your users log in, sign up, or otherwise are ready to initiate a connection to Realtime.

xanoClient.setRealtimeAuthToken(authToken);

Previously, this was accomplished with setAuthToken, and will continue to function as such until July 1, 2024. On that date, it will become required to use setRealtimeAuthToken instead to authenticate a realtime connection. If you don't need separate tokens, you can just supply the same auth token for both values.

Message Types

The realtime connection has several different message types that can be sent, and you can modify your custom code to react differently to each message type.

StatusMeaning

connection_status

Informs the status of the connection to your Realtime server. This appears in your console log when initiating a connection to a channel.

error

An error has occurred connecting to or interacting with Realtime. Check your console log for more details.

event

An event is anything beyond a standard realtime message, and can be used to enable dynamic handling of different data being sent through Realtime

join

Sent when joining a channel

leave

Sent when leaving a channel

message

A new message has been received

presence_full

A full list of all clients connected to the channel

presence_update

Sent when a new client joins or leaves the channel

Message History

When setting up your Realtime channels, you have the option of storing message history as well.

Message history for your channels is backed by Redis cache, and it's important to consider how else you are using caching, if at all, when determining how much data to hold on to.

Message history can store up to 100 messages per channel, and can be returned to clients with the following:

channel.history();

channel.on('history', function(action) {
	console.log('history', action); // Your code for processing history goes here
});

Common Issues & FAQ

I can't send or receive messages using Realtime
  1. If you do not see this message at all, there is a problem with your implementation of the SDK or the realtime integration you are using. Check your code and reference our documentation on connecting with the SDK to find out more, or reach out to your frontend support for more information if it uses a direct integration.

  2. If you see this message, but it does not say 'connected', check your instance base URL, api group base URL, or connection hash to ensure it is accurate.

  3. If you see this message and it says connected, but you aren't seeing your messages send or receive, make sure your frontend is handling rendering your messages properly. Hint: Add a console.log(message) to ensure that the messages are working properly before trying to address the frontend.

When my users refresh their app or page, previous messages have disappeared

Realtime does not keep message history, and would require a custom implementation such as one that utilizes our Realtime Event function or Realtime Triggers.

What is the performance impact of Realtime on the rest of my backend?

Realtime uses dedicated resources for connections and message handling. This means that ultimately, realtime usage would not impact any other area of your backend such as APIs and background tasks.

However, it is important to note the following:

  • A mass of connections to Realtime beyond what your instance can handle can cause issues.

  • Realtime resources scale with each plan upgrade just like other resources. Depending on your Realtime needs, it may necessitate an upgrade to your Xano subscription to utilize effectively.

Some strategies you can use to manage connections are:

  • Being strict about what data you use Realtime to deliver vs your APIs

  • Timing out connections after a certain period of inactivity by sending a Leave event from your front-end

Learn More

Hungry for more Realtime? Check out the following sections of documentation for more information.

Connecting to a Frontend with Realtime

Realtime with Bubble

Realtime support is currently being added to the Xano Connector plugin for Bubble. Check back soon!

Realtime with Webflow

Learn how to add Xano Realtime to your Webflow projects

More coming soon!

We're working hard to add Realtime support to more of your favorite frontends. You can utilize the Xano SDK today, or check back soon!

Last updated